• Please review our updated Terms and Rules here

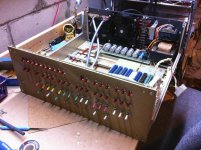
REV 0 Altair 8800 stock, SERIAL NO. 221876K

leiy

Experienced Member
Joined
Dec 9, 2014
Messages
247
REV 0 Altair 8800 stock, SERIAL NO. 221876K

I purchased this Altair in 2014, cost me nearly 4K USD.

I tested the computer, deposite and exameine memory locations, run simple front penal programs well.

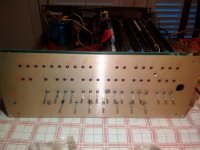
There has no 8800 silver strip on the buttom of front penal.

115634kku4cj9488kt4lt3.jpg


115637z5mzxg9a3x98xz1r.jpg


122636l361jh6p73h3bjy6.jpg


115641rr5jmhekrahz0h3h.jpg


115644f1l1rn9p6m1c4y9i.jpg


115646selmdc49kgdvxdnm.jpg


115650q66j78tvmf8fk068.jpg


Computer hobbyist can grab and republish these photos, but please retain the web stamp on photos, thanks.
 
Last edited:
Interesting pics. I finally was able to view them. It seems my ISP doesn't like your site. I can open them from my 4g connection.

Anyway... Looks like the builder put the nuts on the wrong side of the switches. I wouldn't change it because the front panel is most likely scratched from them. There is an metal panel underneath which the nuts are used to mount the switches. The front panel is just held in by the assembly being pushed against the frame. If you look at a lot of unassembled Altair they tend to have pencil marks on the metal panel so they could be tested without the silk screened panel.

Cheers,
Corey

I was wondered why the builder make the front penal so unique when I first received the machine. When I disassemble the front panel to resolder some broken wires, I found the washer is pasted on every hole underneath of the second metal plate, that makes the insallation process much more complex than ordinary procedure. I finally realize the original builer assembling the front panel on that way inmind so that have an effort to make toggle switch very fastened and strengthened durability that prevent user from frequently wobble and toggle the switch over time to make the the base inside the toggle switch finally loosened.

And I also found the nuts are not scratched the front panel paint cover. :)

Since the front panel looks very nice and useful, and I really want to retian this front panel status it build since 1975. I will not intend to reverse it.

By the way, I just found the Altair 8800 front penal assembly method is as the same as Altair Disk:

and the front panel of altair disk is also not scratched by the nuts(REV 0 disk)
122957gbw23bg5rbsv6b2z.jpg


130418fmggvug4mh7n0csi.jpg


I have a Altair 8800b that is not luck than the Altair 8800 "SERIAL NO. 221876K", the 8800b front panel is installed just on regular 8800 way, many toggle switch are useless and loosened aganist the PCB.
 
Last edited:
Yes, is me. I want to make this computer to connect more boards use a S100 plate from a California computer system. Like install four 16K static memory boards, turnkey or bytesaver boards, 88 SIO A board or dazzler etc.
 
Last edited:
Strange, I've never had a problem with loose switches on any Altair. I guess the way yours was built it allowed the builder to tighten them periodically. Mine are all on with washers and nuts underneath.
Cheers,
Corey
 
Strange, I've never had a problem with loose switches on any Altair. I guess the way yours was built it allowed the builder to tighten them periodically. Mine are all on with washers and nuts underneath.
Cheers,
Corey

The toggle switch of my Altair 8800b and Altair 8800 are the same brand (not C&K) and manufacturer. Toggle switch condition on my 8800b is bad, many are loosened and switch base can wobble when toggling.
 
I havent' torn apart a "b", but doesn't the toggles secure to a thick metal panel with lock washers/nuts and the "front" silk screen panel is just decorative that slides over the remaining stems of the switches which is held in place by the front bezel just like an earlier altair. The thick metal panel is not "paint" smooth on the earlier Altair, I assume the same for the "b", which is why when you tighten the nuts and use the correct washers it shouldn't loosen up. Painted and powder coated surfaces like the silk screen panel don't work well with washers and nuts, you have to tighten them periodically as the paint on the surface is not as hard as the unpainted metal and over time can loosen.

IMG_1291.jpg
 
I've take apart all three (8800, 8800a, 8800b) and this is what my face plate looks like with nuts behind the face plate. I had taken it apart to fix some switches that were broken. It's like you mentioned, Corey, with markings on it so it could be tested without the face plate on it. This was the first of my three Altairs that I took apart and the only nuts on this one were the indented ones. The others do not have nuts at all. I have not had any loose switches but it may not have been as used as Leiy's.

Altair 8800b faceplate.jpg
 
I have to check I may have a bag of correct Apem nuts, I know I did at one point. If I still do I'll mail you a bunch for your Altair so you never have a problem.

Cheers,
Corey
 
Last edited:
Thanks Corey. I have a couple because of the replacements so I will take it apart again and let you know how many I need. Much appreciated if you can find them. Taking that front face plate off is easy. Putting it back on is a whole other matter :)
 
I havent' torn apart a "b", but doesn't the toggles secure to a thick metal panel with lock washers/nuts and the "front" silk screen panel is just decorative that slides over the remaining stems of the switches which is held in place by the front bezel just like an earlier altair. The thick metal panel is not "paint" smooth on the earlier Altair, I assume the same for the "b", which is why when you tighten the nuts and use the correct washers it shouldn't loosen up. Painted and powder coated surfaces like the silk screen panel don't work well with washers and nuts, you have to tighten them periodically as the paint on the surface is not as hard as the unpainted metal and over time can loosen.

View attachment 22485

I will take this in consideration, thank you.
 
Here's S-100 board/plate "inter-connector",I can connect REV 0 plate to California S-100 plate with this.

I hand wired two s-100 development board to get job done. (1mm square copper wire)

I install the "inter-connector" to REV 0 Altair 8800, leave the CPU board along on REV 0 plate, install memory board on California S-100 plate. Run a Kill a bit game from front panel switch, it works!

With the "inter-connector", I can bring the computer to full future without any damage to the original motherboard, I can restore Altair 8800 to original REV 0 status at any time when needed.

140846mmuuakao99yzulfl.jpg


141000wvdvutqu7gc8uug2.jpg


This is the original board from 1975
111223p27r822vf2xx2f7h.jpg


Here's some defect on PCB replication process
142552fbnoz3b4yiliinqb.jpg
 
Last edited:
I still am troubled by memories of all those bloody frail white wires--I improved my cursing considerably. Why on earth did MITS not use ribbon cable like any sane engineer would?
 
I still am troubled by memories of all those bloody frail white wires--I improved my cursing considerably. Why on earth did MITS not use ribbon cable like any sane engineer would?

It take's me long time to bind the two board together.
 
And finally success! I successfully connect two plate together without any damage to original REV 0 MITS S-100 motherboard.

This time with full 64K STATIC RAM populated on California S-100 plate.

I finally figured out some command of RMON V1.0 monitor from MITS Turnkey board, some command is the same as original MITS Turnmon monitor.

From right to left: CPU board, "Inter-connector", MITS 16KB static ram, MITS 16KB static ram, MITS 16KB static ram, Digital Micro System 16KB static ram, MITS Turnkey board.

171848sq3w5wkz0026od25.jpg


172712mqnh0byzqhy9ytkx.jpg


172925gjpjv5dq0yj8atvy.jpg


173218o9dxpw9qy7sxgxw7.jpg


174435y6bjtkpgi85gp858.jpg


174841ghz0mrcay80hihim.jpg


163700ipn3hca2t5h5zaws.jpg


163707xu7d6z7bokvdbazj.jpg


163704pgkl2k4m89fmqzl8.jpg
 
Last edited:
Great Job!!!! Next up run some Micro-soft basic stuff.

Great idea on the "reversible" motherboard idea. Just be careful of powersupply draw. The stock supply isn't good for more than about 8-10 cards depending on what they are.

I went a slightly different way. I sourced another MITS 4 slot motherboard. Got one with two connectors then sourced two original connectors and had a NOS spool of the same white wire MITS used. I happen to be rewiring mine anyway. After the third broken brittle wire from the front panel to motherboard, this was my only practical option to having a reliable machine. My plan was to build a money no object at the time machine that MITS would have provided so I obstained from anything that wasn't available Jan 76. Knowing how MITS trickled out the boards as they were ready it seemed plausible that someone would have gotten their Altair and as MITS started delivering something they would buy it. This is sort of a museum mentality for something like this. Put a date stake in the ground and make an "exhibit".

Still I bet you will be able to run CPM when Mike finishes his new controller card. I can't, but that's the direction I chose.

Finally now you need a plexiglass cover so you can show off the insides of your Altair. Just don't forget side vents to let the air out of the case when the fan is running.
Cheers,
Corey

Very valuable advice, thank you. I consider use one 64K DRAM board to replace four 16KB static ram boards, so it can unburden the power supply unit. Mike is developing a controller interface that can bring Altair Disk back to life that is great idea.
 
After bring the machine to maxium 64KB RAM and test it ok, I packed the stock 1KB static rev 0 ram to aluminum bag.

193900itteei71763iiiit.jpg


194901vq5tu5mmuzutmjuv.jpg
 
Back
Top