• Please review our updated Terms and Rules here

3D Printing a useful DEC bracket

Lou - N2MIY

Veteran Member
Joined
Apr 1, 2008
Messages
1,306
Location
Albuquerque NM / Potomac MD
Folks,

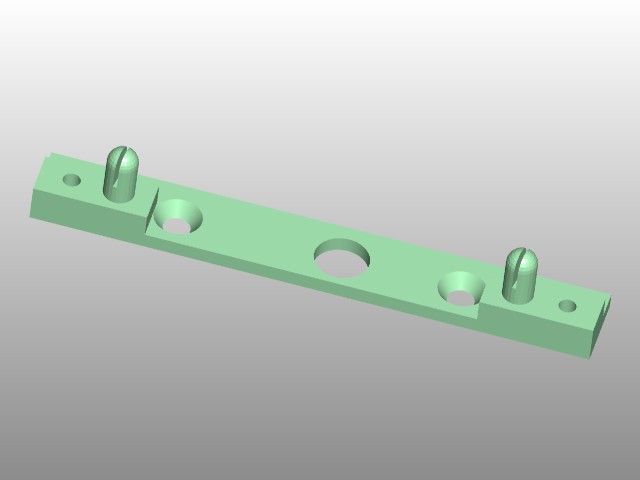
My wife bought my older son a Printrbot Simple 3D printer. It is quite amazing. I thought about the things I wish I could print with it, and one of the first things that came to mind is this bracket : http://www.vcfed.org/forum/album.php?albumid=51&attachmentid=32829

I have only one of these. The wooden thing in the background is my previous sad attempt at making another so that I could at least hold the front of my 8A in place. Has anyone here drawn this part in 3D cad and maybe have a .STL stereolithography file of this?

Thanks,
Lou
 
What was the failure with your wooden version? It looks functional enough. Perhaps an improvement would be to chuck the dowels in an electric drill and file or sand a makeshift ball so it has less chance of jamming in the fascia panel socket.
 
I have also joined the 3D printing club recently, and a lot of my activity is directed towards supporting my old computers. That bracket looks like a fine candidate for a 3D printed replacement. I could probably draft up a CAD model if I had one in my hands, but I don't think I have anything that uses one. I just have an 8M, not an 8A.
 
I don't know--those ball-heads would need to take a fair amount of strain. If this were mine, I'd probaby fab a replacement from some acrylic (perspex) and some ball-head bolts. A little solvent cement and you're all set.

You could also do something similar with brass bar stock.
 
Folks,
I have only one of these. The wooden thing in the background is my previous sad attempt at making another so that I could at least hold the front of my 8A in place. Has anyone here drawn this part in 3D cad and maybe have a .STL stereolithography file of this?
Lou

Here are mine:
http://www.so-much-stuff.com/pdp8/cad/3d.php
The brackets are sufficiently easy that most home 3D printers can do a credible job.

I've also had good luck casting a mold in silicone RTV and then casting the parts in 2
part resin.

Vince
 
I don't know--those ball-heads would need to take a fair amount of strain. If this were mine, I'd probaby fab a replacement from some acrylic (perspex) and some ball-head bolts. A little solvent cement and you're all set.

You could also do something similar with brass bar stock.

A word about those ball heads. Everyone complains how fragile they are, the post breaks, etc.

They're supposed to! It's a lot cheaper and easier to make a new bracket than to replace a damaged filler panel.

Brass might be OK for the bar stock, but using it for the posts invites damage to the sockets on the filler panel. Those are also getting old and brittle, so you don't really want to stress them.

I did some with screws for the posts, and realized (hopefully before it was too late) that I was damaging my filler panels.

Vince
 
Yet more comments. There's also a "bracket-new" in
http://svn.so-much-stuff.com/svn/trunk/3D/rack-bracket/
which has redesigned posts; hopefully more robust without tearing up the post sockets. It needs a springy plastic though -- it just snaps the posts if you do it in brittle plastics. That can also affect the desired orientation of the print (so it doesn't snap along a weak axis in the print), which in turn interacts with the need for support, etc.

On the web page you can see that the regular brackets come in a couple of thicknesses. I haven't drawn any with the raised bump/threaded hole in the middle, though I suppose I could try that someday.

Oh, and in case you missed the warning at the top of the web page, the STL files are in INCHES, NOT MM as you're probably used to. (I want the measurements to correspond to the measurements DEC would have used.)

Vince
 
you can try autodesk 123d catch, its free and works like a makeshift 3d scanner by having you take photo's 360 around the object and it stitches them together into a model

cheap tripod and a lazy susan should work great ... I have only tried it once and have no idea about its ability to keep things in scale but its worth a lark
 
Brass might be OK for the bar stock, but using it for the posts invites damage to the sockets on the filler panel. Those are also getting old and brittle, so you don't really want to stress them.

I did some with screws for the posts, and realized (hopefully before it was too late) that I was damaging my filler panels

Useful information! I haven't looked in my catalogs, but I wonder if nylon or delrin might be the best material for those ball-heads then.

Sigh. Old Shel Silverstein was right--everything's getting to be plastic--and we're paying the price.
 
Useful information! I haven't looked in my catalogs, but I wonder if nylon or delrin might be the best material for those ball-heads then.

ball heads are just a bad idea.
they should be forks so they give a little when the panel is attached
 
I take it that the threaded boss in the center of the bracket is for permanent panel attachment--or does it serve a different purpose? If the former, then the ball headed protuberances are just for alignment, no?
 
ball heads are just a bad idea.
they should be forks so they give a little when the panel is attached

Hence this design:
bracket-new.jpg


Unfortunately, the test print was in PLA, with the strong direction horizontal, so the tines just snapped off.

One thing I did notice -- the tines had a lot more contact area, which made the panel stick much more firmly to the rack. If I were working on it more, I'd add another slot at 90 degrees to the first.

Vince
 
I take it that the threaded boss in the center of the bracket is for permanent panel attachment--or does it serve a different purpose? If the former, then the ball headed protuberances are just for alignment, no?

My experience is that the posts and balls are light duty fasteners, used for filler panels and other plastic things you want stuck to the rack.

I've only seen the threaded holes used for heavier, metal things, like the 8/A and 11/34 front panels.

Vince
 
If the former, then the ball headed protuberances are just for alignment, no?

They fit into holes in the backs of the panels in pairs on 5 1/4" centers (10" panels have eight holes).
What typically happens is the ball heads snap off because you can't pull all eight out at once, and the panel
cocks up or down (or left or right), snapping off the ones on the edge that got stuck.

It's just a stupid, cheap design for a filler panel DEC never intended for people to remove.
 
I see. At this point, you guys are of sterner character than I. I'dve replaced the the silly blind panel arrangement with a mushroom fastener system, say Lockfast. The stuff takes a gorilla to dislodge, if that's your thing.
 
Yet more comments. There's also a "bracket-new" in
http://svn.so-much-stuff.com/svn/trunk/3D/rack-bracket/
which has redesigned posts; hopefully more robust without tearing up the post sockets. It needs a springy plastic though -- it just snaps the posts if you do it in brittle plastics. That can also affect the desired orientation of the print (so it doesn't snap along a weak axis in the print), which in turn interacts with the need for support, etc.

Vince, thank you so much. I've download the .STL files and will have a go later this evening. My son thinks he knows where to change some setting to use imperial units.

Indeed the balls are what is special. I do like the idea of fixing my wooden version by turning ball ends on dowels. Even with hardwood dowels, they would compress and not hold the heavy 8A panel on well after a few removals.

I have two different kinds of blank filler panels. One type is held on only by the balls. The other receives the balls and also has socket head cap screws held captive between the white plastic frame and black blank panel, with a small clearance hole to allow the Allen wrench to access the socket. This screw engages the thread insert in the middle of the bracket. My 8A front panel only has holes to receive the balls, it doesn't seem to have anything that engages the threaded insert. My panel is only the casting though. I have the feeling there is some other intermediate piece of sheet metal or bracket missing since there is one unused drilled and tapped hole in each corner of the casting above the ball holes.

Now off to try some printing ....

Lou
 
Vince, thank you so much.
My panel is only the casting though. I have the feeling there is some other intermediate piece of sheet metal or bracket missing since there is one unused drilled and tapped hole in each corner of the casting above the ball holes.

You're welcome!

Do you have the little 1/2" cubes of drilled brass on each side, with a 135 degree "L" bracket for each? You may be just missing the kept screws, if so.

Vince
 
I have the feeling there is some other intermediate piece of sheet metal or bracket missing since there is one unused drilled and tapped hole in each corner of the casting above the ball holes.

That sounds similar to what I found. On my road trip earlier this year where I acquired a FOX 2 (rebadged PDP-11/15) I found in the same cabinet what I thought was a PDP-11/05 in the slim H909-BA chassis, but missing the console and bezel. Once I got it home and took a closer look I realised it was not an 11/05 but an ME11L memory expansion unit, which had been connected to the 11/15 through a printed cable.
Whilst I was there fossicking through the horse stables I found a broken DEC fascia panel with a Mazak bracket at each end, covering the ball socket holes. As it was the only panel of its type there, putting two and two together I realised it must have come off the front of the ME11L. The screw holes align with the ME11L's brackets.
I repaired the panel and found some suitable small imperial screws in a jar of 1960s IBM equipment nuts and bolts that my dad had kept. The screws have to be quite short as they impinge upon the edge of the ball socket. I only realised this after putting in a slightly longer screw that bit into the socket receptacle and chipped it.
This is what it looks like:
DEC_ME11L_fascia_panel.jpg

Steve.
 
Back
Top