• Please review our updated Terms and Rules here

8/E restore/rebuild

harry

Experienced Member
Joined
Oct 19, 2007
Messages
310
Location
United Kingdom
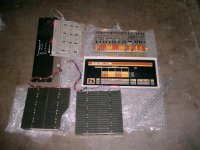
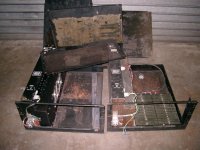
Some pictures of a recent find, and with some careful work and a "little" luck ! and hopefully help from some of you guys, I could end up with a working 8/E, just a pile of bits and tin at present,but most everything seems there. Included but not shown are a set of boards, and core memory, luckily with the top bridge jumper blocks! I have an 8/m which I can test /check out the boards that came with this stuff.
There is an interesting item that came with it.. a hardware breakpoint module and board, model 110B I have not searched for info on this yet.
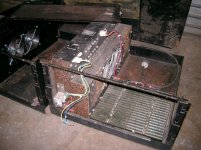
For now...first on the list, some primer and black paint I quess!

I will try and keep an account of my progress, and pitfalls..........Harry
 

Attachments

  • 2014-07-29 21.46.25.jpg
    2014-07-29 21.46.25.jpg
    96.7 KB · Views: 3
  • 2014-07-29 21.59.26.jpg
    2014-07-29 21.59.26.jpg
    95.5 KB · Views: 2
  • 2014-07-29 21.59.40.jpg
    2014-07-29 21.59.40.jpg
    97.5 KB · Views: 2
Harry,

I'm sure we can help you get this going. I think you have an excellent set of parts to start with. I am quite interested in your hardware breakpoint option, so please keep us informed if you find any documents or decide to reverse engineer it.

Lou

PS. I am very glad to see all of these 8/es finding their way out of the woodwork....
 
I would imagine there are plenty 8/e..8/m ..type machines in the States, but finding them in the UK is not so easy, so this is gives me a little more determination to get this working. Thanks for positive replies, as time allows I can refinish the rusted metalwork, and then move my attention to checking out the psu, I am reading with interest the work of others to reform the large capacitors in the psu unit on these machines , Not knowing how long ago any of this stuff was powered on, or what state they have been stored,( think I got a pretty good idea) I guess going down the same route before any power is applied is the way to go?


" PS. I am very glad to see all of these 8/es finding their way out of the woodwork.... "

Lou.....I think these have come out of water!!

......Harry
 
wow! that broken backplane must have been given a serious blow!

The rust on the cases should be fairly easy to sand off and the rest looks to be in decent condition.
 
wow! that broken backplane must have been given a serious blow!

Ah yes.....it does look at first glance that the corner of the back plane is missing.. it is in fact my bad photo ,the bubble wrap is just over the corner! phew! you had me wondering what I had missed. I see you had a pc04, Did you ever get it working with your 8/e?
I had thought the same as Pontus. Glad it wasn't broken.
 
Nice catch! A few ideas you may consider for the rust. After stripping it right down, dunk it in a vinegar bath for a couple of days, which will remove the rust back to bright steel. After removing from the vinegar, a good scrub with a brush should make those sections look like a shiny tin can. You can also use diluted molasses but I find vinegar is easier to get at a supermarket - no dilution neccessary, use straight. Molasses is at about 1:4 dilution. Afterwards a quick dunk in dilute bicarb of soda to neutralise the acid, then thouroughly wash, dry and prime with an epoxy etch primer.
You could also use 'the poor mans sand blaster' - aka a rotary wire brush on an angle grinder and for the tighter spots, a smaller equivalent on a Dremel. This works wonders for removing rust.
I regularly use both these techniques for rust removal and restoration of rare vintage vehicle parts and they are effective and cheap means to refurbish, in your situation certainly cheaper than buying a new chassis.

Steve.
 
Ok, I need more info on this Vinegar technique. I've been restoring cars and computers for years and this is a new one. Usually I use special rust removers, but for larger parts this gets expensive.

So do you simply remove loose rust and dunk in vinegar or do you completely remove all the rust by blasting or wire brush and then dunk to remove any pitting that my be residually left over?

Thanks,
Corey
 
I've never even considered trying to immerse big chunks of computer or rack chassis - what on earth do you use as a bath? I generally just wirebrush then paint with inhibitor/primer. Mind you, I've never had to deal with a totally rusted out piece of chassis, usually just patches.

<note to self - must stop putting vinegar on my chips (french fries to those over the ocean ;o)>
 
I hope you're being facetious. That chassis can be blasted and repainted for way less than $250. And Harry is on the other side of the pond, so the shipping would be killer. Lou

Yes, I am being facetious. I am a little amused at the prices for vintage DEC equipment on eBay lately.
 
Nice catch! A few ideas you may consider for the rust. After stripping it right down, dunk it in a vinegar bath for a couple of days, which will remove the rust back to bright steel. After removing from the vinegar, a good scrub with a brush should make those sections look like a shiny tin can. You can also use diluted molasses but I find vinegar is easier to get at a supermarket - no dilution neccessary, use straight. Molasses is at about 1:4 dilution. Afterwards a quick dunk in dilute bicarb of soda to neutralise the acid, then thouroughly wash, dry and prime with an epoxy etch primer.
You could also use 'the poor mans sand blaster' - aka a rotary wire brush on an angle grinder and for the tighter spots, a smaller equivalent on a Dremel. This works wonders for removing rust.
I regularly use both these techniques for rust removal and restoration of rare vintage vehicle parts and they are effective and cheap means to refurbish, in your situation certainly cheaper than buying a new chassis.

Steve.

Thanks for interesting reply and unusual technique to deal with rust! I get the impression you may perhaps be spending too much time in the kitchen....."vinegar,...Molasses,... bicarb of soda, ? perhaps a menu for rust! your recipe if used would still leave the original black paint which is well adhered to the chassis, Luckily my colleague has a industrial paint finishing shop, a light blast clean ,back to bare metal, which leaves an excellent surface finish for paint to bond to , is the choice for me, but with something which is just rusted ,I think I may give your recipe a try,
......Harry
 
Nice one Harry, thats going to give you hours of fun.
BTW when you go over the H724 I would look carefully at the two voltage reg IC's, VR1 and VR5, on my Lab8 one of these had the legs almost rusted away, that resulted in some very unstable rails!!. They are TO5 but you can " bodge in" a dil, they are 723's, I think LittleDiode ( in uk ) may have the TO part.
Also check R6 and 7 , I had thees drift on me.
As its a linear PSU you can bring it up slowly on a variac, with a light load , I did this over a few hours as I recall.
Dave H
 
Check the 724 schematic - if you want to bring it up slowly you'll need to bypass the switch relay (k1 - 24v ?). I'm in the process of restoring an 8/e ATM and what I did was just to bring a variac up until the relay latched then turn it quickly down again to the point where the relay was just held in and take it from there.

I don't personally subscribe to the capacitor reforming theories but at least bringing things up slowly minimises any explosions.

Another thing to check is the tightness of the various bolts and connection screws holding the ground strap to the main capacitors. On my current one these were all quite slack (vibration over time maybe) giving a bit of instability on the supplies due to high ground resistances. It's safe to run the supply unloaded initially, but I used a few bulbs to load the main rails ( +5 and -15) to exercise the circuitry a bit before trusting any boards to it.

(I've got as far as running Focal on a 32k RAM board, so doing OK so far, but the core stacks are playing up and the memory address extender is flaky.
 
Last edited:
To answer Corey, Bobaboba and Harry's comments about using vinegar to remove rust, I'll take a slight non-computer-related diversion if I may. Here is an example of an item that is equivalent in size to a PDP-8 chassis (perhaps somehat bigger) that I stripped the rust from as part of the restoration process (it being an original WWII jeep fuel tank).

Firstly, obviously a container must be found that is going to hold the item immersed for a few days. In my case I found my Council recycling collection 'wheelie bin' would hold the tank. I washed the bin out thoroughly before using:
Vinegar_rust_removal_1.jpg

Here you can see the tank standing upright inside the bin. As I'd only bought half a dozen 2L bottles of el-cheapo brown vinegar I filled three bottles with water to take up some of the volume alongside the tank:
Vinegar_rust_removal_2.jpg

After a two or three days I took it out and it looked good. The vinegar will look like grey bubbly muck and so will the item, but after scrubbing lightly you'll see the bright steel. I used a pressure washer to clean it all inside and out:
Vinegar_rust_removal_4.jpg

Here's the tank after washing and drying with compressed air, just baking in the sun. If you have it, use compressed air as it will allow drying before any further rust has a chance to start:
Vinegar_rust_removal_3.jpg

Cleaning irregular or hard to get to areas with a Dremel and a rotary wire brush (I soft-soldered copper rivets in to seal these holes):
Vinegar_rust_removal_5.jpg

Not shown is the etch priming and other work, but generally I hope this might give the OP some ideas what could be done with treating the chassis.

Steve.
 
I can't really get behind the removal of rust with acid. It will remove the rust, but it is destroying metal in the process. Since nobody else has brought this up, here is how old tool collectors and many museums deal with rusty metal parts: Electrolytic Rust Removal. This will preserve the maximum amount of original metal. Many more links on this process are available with a little googling. Here's a pretty good one.
 
Last edited:
Thanks Daveh, and Bobaboba, for technical tips, its great when others share their findings and technical help with similar projects, you guys are way ahead, and have already been there and done it, I'll take on board your advice. At first glance the components in the psu appear visually in good shape, I let you know how things progress.

Steve.. the results after the vinegar treatment on your tank, looks far better than I imagined! Interesting to know how you came across the process using vinegar??

.....Harry
 
Back
Top