• Please review our updated Terms and Rules here

Fixing an AT "buckling springs" membrane keyboard.

flynth

Member
Joined
Nov 20, 2022
Messages
28
I've recently got a buckling spring keyboard for the price of postage. Unfortunately the case is cracked in few places (all pieces are present so I can glue it back) and it has few issues.

First was that 0 woukd press itself all the time. It turned out the spring under that key was slightly longer. Swapping it with another appeared to fix it.

Then a number of keys on the num pad didn't work at all.

I've disassembled it and I cleaned the membrane with contacts cleaner (including board connections), but still I have keys that don't work. It appears two traces are not making proper contact from the membrane to the pcb.

I tried contact cleaner on qtips plus alcohol with no results. Is it worth using very fine sandpaper? (2000 grit automotive bodywork kind)?

This is how the membrane is connected to the pcbCompress_20221205_123408_8286.jpg

Here is a closeup (both parts can be disassembled and I cleaned it inside, but I didn't take any pictures.
Compress_20221205_123408_8702.jpg

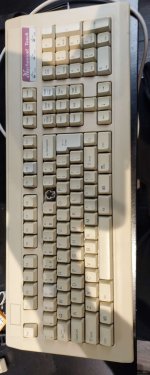
And here is the front (I've removed one keycap and spring)
Compress_20221205_123409_9212.jpg

Does anyone have any advice? (other than buying a working one...)
 

Attachments

  • Compress_20221205_123408_8286.jpg
    Compress_20221205_123408_8286.jpg
    277.3 KB · Views: 3
  • Compress_20221205_123408_8702.jpg
    Compress_20221205_123408_8702.jpg
    48.5 KB · Views: 5
  • Compress_20221205_123409_9212.jpg
    Compress_20221205_123409_9212.jpg
    347.6 KB · Views: 4
I've ended up cleaning the contacts with contact cleaner as well as the sandpaper. I also 3d printed another element to replace that plastic part that pushes the contacts together, but I still have one contact that doesn't work no matter what :-(

Basically if I put a piece of rubber right above that contact I can make it work, but the remaining ones don't. Or if I use a flat piece that provides equal pressure i get all contacts working, but this one... Of course in addition numeric keys of 1,2 3,0 and dot this contact is responsible for all cursor keys other than up and delete key. I can definitely use a keyboard without few numeric keys(on the numpad) but not the cursors.

I'm considering putting some solder on that contact on the pcb side to raise it a bit. Perhaps that will help? I'm so close with this keyboard and yet it is still useless to me with no cursor keys. Another idea would be to maybe put a bodge wire in, but how does one attach a wire to those membrane traces? Can they be soldered to? (I could get some low temp solder). An obvious choice would be conductive glue, but I have no experience with those glues. Do they work well?

Here is a pic of my 3d printed part with the original next to it BTW.
Compress_20221205_232408_8997.jpgCompress_20221205_232408_8799.jpg
 
Don't use solder or bodge wires, get a metallic/copper tape. Cut thin stripes, expose 2 points and connect whole traces with it. Cover it with normal tape and make sure nothing exposed can be touched by anything it shouldn't.. This is not the way to fix a dozen of problems on a membrane in a very bad state, you'll end up in a sticky mess. But works ok for one trace.
 
I didn't even know there was a non-IBM style buckling spring keyboard. I've seen other brands, such as Dell, but they still looked like an IBM keyboard. That's pretty cool. I hope you can get it working. Too bad it's not an IBM style, because you could buy a new membrane from unicomp.
 
Thank you the replies. I haven't done anything else since not wanting to make it worse.

The problem with the membrane doesn't appear to be a broken trace, but one trace not making proper contact with its pcb pad. Visually it looks like it has pretty good pressure applied to it, but despite cleaning until shiny (on both the membrane and the pcb side) it still doesn't contact.

Don't use solder or bodge wires, get a metallic/copper tape. Cut thin stripes, expose 2 points and connect whole traces with it. Cover it with normal tape and make sure nothing exposed can be touched by anything it shouldn't.. This is not the way to fix a dozen of problems on a membrane in a very bad state, you'll end up in a sticky mess. But works ok for one trace.
Now that I think about it again it is possible there is a break in the trace right next to the contact pad that opens only when under pressure.
That could be it. I'll try putting a thin strip of copper tape there.

I could even try to physically place a thin strip on the pcb pad to raise it. Good idea.


I've successfully used a silver conductive pen to redraw traces on membrane keyboards.
Good to know those work. Unfortunately I can't get them locally for some reason(in Poland). Strange, as I remember them on a shelf in a local electronics store not that long ago.

However, I found online some ideas for a diy concoction with a glue and graphite powder. If nothing else works I might try that.

I didn't even know there was a non-IBM style buckling spring keyboard. I've seen other brands, such as Dell, but they still looked like an IBM keyboard. That's pretty cool. I hope you can get it working. Too bad it's not an IBM style, because you could buy a new membrane from unicomp.
This was a surprise to me too. The fact it is not an ibm branded one made the seller list it for such a low price I got it pretty much for the cost of postage (about $5). Unfortunately, he also treated it as a piece of trash when "packaging" as it was sent in one of those super thin plastic supermarket carrier bags plus some sticky tape. Of course it was damaged in transit as a result. (busted corner), but I got all the tiny pieces so I might be gluing it under a microscope once fixed.
 
I've had some time to deal with the keyboard a bit more. It was surprising, but after probing all connections they are all OK.

Additionally on buttons that don't work I have correct voltages (0.9v on one side and 5v on the other.

Then I realised buttons start to work after my measurements and I realised some connections in the membrane must be sticking. So I've cleaned the whole thing with alcohol, but I still am having the same problem.

Some keys section doesn't work, after I spread the membrane manually it starts to work again.

Does anyone have any idea how to fix it? The keyboard hac it's back cover cracked in half unfortunately, perhaps this is the reason why it runs like that? In general it is the key sections that are on the crack and over the smaller piece that are affected the most.

Should such keyboard work fine lying upside down with its back open as on the photo below? Pressing most key contacts with a tip of a pencil works, but some as mentioned before seem to stick. Compress_20221212_173411_1061.jpg
 
I have to confess that I'm not sure that you have all the pieces. On a regular Model M, there's a plastic sheet on the bottom of the membrane, then a metal backing plate. The whole assembly is quite rigid.
 
I have to confess that I'm not sure that you have all the pieces. On a regular Model M, there's a plastic sheet on the bottom of the membrane, then a metal backing plate. The whole assembly is quite rigid.

I'm not sure. It is possible, but there doesn't seem to be enough space there. The keyboard is very cheaply made. Other than the buckling spring mechanism every thing is quite cheap.

This is the back (after it is glued)
Compress_20221212_185920_0847.jpg
There are 4 big screws and 5 tiny ones (equivalent of ibm's model m plastic rivets i believe)

I also took a picture with the electronics removed when I was cleaning the membrane (there is one spot where it is held together, around it all 3 sheets can be separated). The plastic of the membrane doesn't appear worn.

20221212_185641.jpg
20221212_191011.jpg
20221212_191040.jpg
20221212_191034.jpg

Then the electronics itself. I'm going to replace those two capacitors and check the resistors as well.

Compress_20221212_185920_0495.jpg
Compress_20221212_185920_0652.jpg

BTW, I measured about 15~30 ohms on the membrane - pcb connector. So any key press is seen by the chip as double that. Does this sound fine?
 
I tend to agree Chuck, I would have expected an aluminium backingplate for rigitity. Looking to the support area of cracked back, there are areas where the membrane is not supported at all, so there must have been something there originally.

Flynth, maybe it's worth measuring how much room you have, and fabricate a back plate out of hard plastic or aluminium to see if that makes a difference The fact that you say that the keys around the crack are affected the most suggest that there is too much flexibility for the membrane to make decent contact.
 
That cracked plastic back seems hardly rigid enough for the purpose. Since my experience is limited to Model Ms, I can't really offer much else.
I tend to agree Chuck, I would have expected an aluminium backingplate for rigitity. Looking to the support area of cracked back, there are areas where the membrane is not supported at all, so there must have been something there originally.

Flynth, maybe it's worth measuring how much room you have, and fabricate a back plate out of hard plastic or aluminium to see if that makes a difference The fact that you say that the keys around the crack are affected the most suggest that there is too much flexibility for the membrane to make decent contact.

I've had another look. There is no room there at all. I'm positive unless it was paper thin(like a very thin flexible stainless steel sheet - but would something so thin make a difference?). I think there was nothing in there.

The small screw posts are level with the membrane.

Have a look at those macro photos(this is a super thin bic razor blade to demonstrate the dimensions):
Compress_20221213_000022_2481.jpg
Compress_20221213_000022_2243.jpg

The tiny "post" I measured to be 0.3mm tall (that is 0.008in). If a spacing plate was present between the posts clips around the perimeter wouldn't be able to clip.

As for being able to withstand the use. I think the back was broken by the previous person trying to get inside. Interestingly I also found this sticker inside:
Compress_20221213_000825_5000.jpg
Amusing as it is(especially that I'm located in Europe, US made things are quite rare here) ... It has nothing to do with the rest of the parts.

It was stuck to the back of the membrane. I used alcohol to dissolve the glue and lift it as I needed to be able to trace all the connections.

I'm at least pleased the connector works fine.

I'm hoping that replacing electrical components on that little board will help.

Also, I deducted the membrane is "sticking" based on its behavior(not working until I lift back foil, then works). I haven't actually measured it being stuck. So it may be a controller fault. I can't be 100% sure the membrane is faulty.

However, if replacing capacitors/measuring resistors doesn't help and I do measure it really sticking. I have an idea how to potentially deal with it. I'm thinking about making an additional sheet of perforated plastic foil to insert between the existing sheets to have "more space" between the parts that make contact. I have a tiny cnc router I use to make pcbs and I do have a "15W" UV laser attachment to it. I'm not sure what kind of foil I can cut with it(kapton perhaps), but it might be a last thing to try.

Regarding identification of this type on the back there is the following text:
20221213_002806.jpg
 
I'm guessing, but I suspect that the fellow who was trying to get inside the keyboard eventually succeeded...

Yes, this is very likely.

If this turns out to really be the membrane contacting when it shouldn't I might start by sticking a piece of perforated paper in there.(It is much easier to cut with a cheap laser). This way I can confirm it works before I try sourcing adequate plastic foil.
 
Probably won't work but an Osborne has a similar membrane and running a hot air gun across it has successfully revived at least three of them
 
Probably won't work but an Osborne has a similar membrane and running a hot air gun across it has successfully revived at least three of them
Interesting. It is not something I can revert if I mess it up, but I'm sure to try it before I give up on it.

So far I've replaced all the passives on the controller board, but it didn't make any difference. Resistors were way out of spec (1.4k and 1.6k instead of 2.2k), I haven't measured caps.

Unfortunately, in the process of disassembling and reassembling I managed to break one pcb mounting post (the pressure of the screw squished the membrane and pcb together so it is very important). Then I managed to glue it together. It holds for now, but it is unlikely to hold if I need to undo/redo the screw few more times.

So next I'll try to make a perforated paper sheet to insert between the contacting parts of the membrane.
 
"Resistors were way out of spec (1.4k and 1.6k instead of 2.2k), I haven't measured caps."

That's very odd. Resistors, as they age, generally go up in resistance. Did you perform your measurements in-circuit?
 
"Resistors were way out of spec (1.4k and 1.6k instead of 2.2k), I haven't measured caps."

That's very odd. Resistors, as they age, generally go up in resistance. Did you perform your measurements in-circuit?
Yes, I did measure them in circuit, then once I replaced them I didn't bother to remeasure. They are still on my desk in the workshop. I'll test them properly next time I'm there.

However, when I measured voltages on a working circuit the Low voltage did increase to over 1v (1.3 v if I remember correctly). Previously it was 0.93 v. High voltage didn't change. It was and still is 5.1v. So replacing those parts did have some effect, just not the one I wanted...
 
I think the electronics is broken with this keyboard or it is extremely sensitive for slightly higher contact resistance. Despite fixing the membrane issues no matter what I do, I can only get sporadic function of one key group (I measured the chip is getting the right voltage when keys are being pressed, but it doesn't like it).

So I think for now this keyboard will go into storage until I have a better idea what to do with it.
 
Back
Top