• Please review our updated Terms and Rules here

Gridcase 2 - Battery and Ribbon cables

Atomtan

Member
Joined
Feb 9, 2011
Messages
34
Location
Leicester, UK
Hi Folks, I wonder if anyone can help.

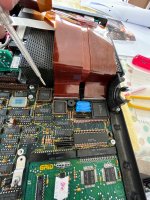
I have bitten the bullet and dived into identifying whether my machine had the Dallas chip battery, or a physical battery itself.

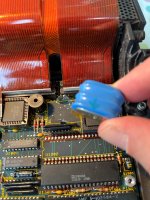
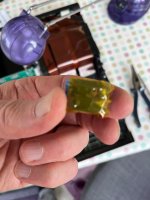
Well I suspect its a battery (the light blue one), though I have never seen one like it before. When closely inspected, it appears it might 'clip out' as there are vertical tangs on either side of the battery, but I don't want to force it.

I was also surprised at the number and density of the ribbon cables coming over the floppy drive from the rear ports and connecting with vertical connectors just behind the battery onto the main board.

Following the logic that I will need to get to the underside of the main board to change the battery, I will need to disconnect these ribbons (at one end or the other). I cannot see any way of accessing the slide out tabs on the vertical ribbon connectors and so assume my only course of action is to remove the rear panel of the machine, release the ports individually from the case and try to release the back of the ribbon cables.

I am getting a little nervous now as I don't want to screw up. Any guidance would be very gratefully recieved.
 

Attachments

  • GRID.jpg
    GRID.jpg
    2.2 MB · Views: 25
Battery looks soldered to me, and it definitely is one, likely a NiCad that’s fixing to leak soon. You can probably just clip it out if there’s enough clearance.
 
Those ribbon cables carry the signals for the rear panel I/O (serial, parallel, external floppy and perhaps video) to and from the motherboard. If by some mistake, you were to sever or cut in to one of them, you would only lose the rear panel I/O connections. The computer should operate just fine without them.
The battery appears to be 2 (maybe 3) button cells connected in series. I can't tell with 100% certainty, but my guess is the contacts are either press fit, or spot welded to the battery. Then, the contacts are soldered to the board.
From where I sit, I think you have a few decisions to make:
How important is it to have the battery replaced?
Do you want an exact replacement? I did a quick search and I couldn't find one like it. A little more time and I could probably find something close.
Are you willing to accept something like this soldered in to place? https://www.amazon.com/Replacement-Battery-Lenovo-Thinkpad-T410i/dp/B076K4WYJJ
To do this properly, the motherboard will need to be removed. Do you want to do the work?

Like anything, if you've done work like this, it's not a difficult job. I would offer to do it. But as it appears that you are in the UK, shipping to and from the US would be expensive. I guess it all goes back to my first question: How important is it to have the battery replaced?
Good luck,
-Shawn
 
You can’t replace a rechargeable NiCad battery with a non rechargeable lithium, or you’ll end up with a fire when the computer tries to charge it. I think this issue can be prevented if you solder a diode in there too, but I don’t the the correct value or configuration.
 
You can’t replace a rechargeable NiCad battery with a non rechargeable lithium, or you’ll end up with a fire when the computer tries to charge it. I think this issue can be prevented if you solder a diode in there too, but I don’t the the correct value or configuration.
I agree with what you're saying (except for the 'fire' statement. These are all low voltage, low current batteries. Assuming the Grid attempts to recharge the battery (which it doesn't), you might get some heat as electrolyte boils off. It's not good for the battery or the computer. But fire would be very, very rare.) The button cells in the picture, and the battery I suggested, do not appear to be rechargeable.
-Shawn
 
Thank you everyone for your reply.

I have worked on machines like PETS and Apple II's before, but this is certainly a 'jump up'.

My worry with the battery was that eventually it might start to leak and so it would need attending to.

I don't plan to sell the machine and so was considering not putting the battery back in the exact spot on the motherboard, but instead removing the old one and then running cables and a battery holder to a more convenient location within the case.

I am happy to continue onwards, and I had hoped (which Shawnerz confirmed) that the ribbon connectors were purely for rear ports and so not machine function critical.

I will have a go at releasing the ribbon connectors but I am nervous at how tightly they are packed in. I will put updates on this thread as I progress.

Thanks again.
 
After much deliberation, and the advice above, I decided to not tear down the machine any more and see if the battery could be 'pried' from the board mounted contacts.

Its fascinating to see the details in the construction back then. The bottom of the battery had a film attached which I assume was some sort of insulation from the board.

After a little persuasion, the solder points gave way on the side of the battery and out came the 38 year old Varta leaving the board contacts. So now I am looking to run wires to a more accessible spot and go from there.
 

Attachments

  • grid battery.jpg
    grid battery.jpg
    2.7 MB · Views: 13
  • battery2.jpg
    battery2.jpg
    1.7 MB · Views: 13
After much deliberation, and the advice above, I decided to not tear down the machine any more and see if the battery could be 'pried' from the board mounted contacts.

Its fascinating to see the details in the construction back then. The bottom of the battery had a film attached which I assume was some sort of insulation from the board.

After a little persuasion, the solder points gave way on the side of the battery and out came the 38 year old Varta leaving the board contacts. So now I am looking to run wires to a more accessible spot and go from there.
Great job. It looks like you'll be able to solder to the tabs still in the board.
Good luck!
-Shawn
 
After much deliberation, and the advice above, I decided to not tear down the machine any more and see if the battery could be 'pried' from the board mounted contacts.

Its fascinating to see the details in the construction back then. The bottom of the battery had a film attached which I assume was some sort of insulation from the board.

After a little persuasion, the solder points gave way on the side of the battery and out came the 38 year old Varta leaving the board contacts. So now I am looking to run wires to a more accessible spot and go from there.
I'm around 95% sure that the battery is *not* rechargeable. But I saw similar batteries that are rechargeable 3.6 NiMH batteries. To be 100% certain, take a DMM or suitable volt meter. With the cover off of the Grid, remove the CMOS battery . Power it on. With the DMM in DC volts mode, measure the voltage. If you measure around 3.6 volts DC , then the computer is attempting to recharge the battery and I was wrong. I would expect to measure about 0 volts.
Next power off the Grid but leave it plugged in to (mains?) AC power. Again, with the battery removed and power off, measure the voltage at the terminals on the motherboard. Again, I would expect around 0 volts. If you measure around 3.6 volts, then the Grid is attempting to recharge the CMOS battery while the power is off.
I did this test on my 1520's because I was curious. Without the battery, the voltage at the terminals was always around 0 volts. I think you have a 1535. Perhaps Grid did something different on that model.
Thank you,
-Shawn
 
Back
Top