• Please review our updated Terms and Rules here

How to make an head cleaning kit for 5.25" floppy drive (my way)

giobbi

Veteran Member
Joined
Dec 23, 2012
Messages
987
Location
São Paulo country, Brazil
Hi all,

after a couple of days fighting with some old 5.25" floppy drives and *very* old (and **very** bad) 5.25" floppy disks, I discovered that probably the worst problem using old floppies, is the dust they tend to leave on the floppy drive heads. A single, bad floppy is enough to make your drive useless, until you clean its heads. It took some time to understand that; I believed I was having some troubles with a not reliable drive, but later I discovered that cleaning the heads solved the problem.

So, I had to find a simple way to clean the heads (I mean: avoid to put my fat fingers inside the drive ^_^ ). A cleaning kit would be fine, but those kits costs >15$ plus shipping, and take [eternity^2] to arrive here (thanks to the brazilian custom...). Since problems require solutions, I found a way that works quite fine, easy and for free...

I wrote a guide (well, just a couple of instructions), you can find it there: http://www.verrua.org/cleaning_kit_floppy/cleaning_kit_floppy.htm

I tested this method many times in these two days, and it worked fine and harmlessly.

Hope it can help.

cheers,
Giovi
 
I tested this method many times in these two days, and it worked fine and harmlessly.

You really want it to rotate. You're going to end up with one contaminated streak under the head.

I would think a coffee filter would work pretty good for this. Just cut it round with a scissors and cut
the inner hole with a hobby knife
 
I wonder if a clean round coffee filter might do the same job.

since you didn't put a smile, I'm not sure if you're serious or not ;-)

Serious answer: the laser copy paper is enough smooth to avoid damages; a rougher material could catch and break the thin foil where the head is mounted.
 
You really want it to rotate. You're going to end up with one contaminated streak under the head.

Of course you must to change the paper at every cleaning (I realized I didn't write this detail in my guide, but I will add it soon).
And you need to repeat the cleaning until the paper is clean.
And this method is just for heads that aren't too dirty.

The disk tends to be "glued" to the sleeve by the alcohol, so it could be hard to make the disk to spin. At least, with a paper disk the result isn't good (of course it was my first test).
 
No I was serious. A coffee filter is more porous than a sheet of paper. The problem that I have with ordinary white bond/laser copy paper is that it often has additives to increase the whiteness, such as titanium dioxide.

I believe that the original cleaning disks were nonwoven spunbond polyester mat, today used in roofing materials and such. Unfortunately, I don't know where one could buy small quantities of the stuff.
 
Since the real thing is still readily available I can't see wasting all that time and energy re-inventing the wheel. No pun intended! :)
 
Well it seems the op doesn't have any readily available and made do with what he had on hand. Looks like it worked.
 
I'm sure this works as described. However, since the head movement is only on one axis, I agree with Chuck that something a little softer and nappier, like the coffee filter paper, would likely give the head a more thorough scrub and also hold more alcohol. Being softer, it might need to be placed on either side of paper to provide the support.

Another thought - instead of discarding the original cleaning linings from the sacrificed floppy, why not re-orient those linings to present a surface in the head aperture for the head-cleaning function?

Rick
 
Since the real thing is still readily available I can't see wasting all that time and energy re-inventing the wheel. No pun intended! :)

Well, simply I needed one and I hadn't, so I chose the DIY way (I love DIY ^_^ ). Time and energy? Five minutes opening a floppy sleeve and cutting a paper, LOL

It worked, it was easy... why not? :)

@Alex (amadama): I don't know if it will work on a 1541 drive, but it should. If you have some software or basic source code that can move the 1541 heads back and forth, I'm really interested in that (I have some 1541 and soon or later they will need a good cleaning) :D
 
bravo.. this is something i've always wondered if it would work, but never had the backbone to try because i didn't have the time or money to deal with damages.. so if i didn't have a disk cleaner, out came the q-tips.
i've typically owned disk cleaners and the cleaner texture made me think coffee filter every time i pulled one out.
 
Everybody who uses floppy drives repeatedly is going to need a disk cleaner sooner or later. It's just the nature of the media being used. That's why I've had and used them for 25 years. Otherwise you might wind up... dead in the water, so to speak.
 
How to make a cleaning kit for 5.25" floppy drive at home (for free)
Since my old websites are now done, as request by another member I'm making the guide available here.

Old 5.25" floppy disks tend to leave dust and debris on drive heads. Sometimes a single bad floppy can make a difference from a working drive and a not working one. So you would need to use a cleaning kit floppy disk but you haven't at home, and a brand new one on eBay tends to cost 10 or 15 US$.
I find and successfully tested a way to clean the drive heads: it isn't as good as a real cleaning floppy, but it's good and safe enough to solve most problems; of course your heads can't be soooo dirty, or it won't work.

Note: if your heads are really dirty, you would need to open the drive and clean them with alchool and some paper or a cotton swab, at least once.

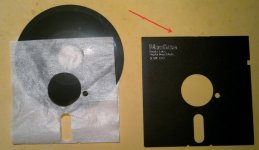
Take and old and useless floppy disk and open it cutting the upper side (see red arrow). Remove the disk and the internal cleaning tissue from the sleeve. Keep the sleeve, discard the rest.

floppy_01.jpg


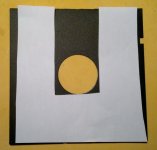
Take a paper like premium copy laser or inkjet white paper (simple, common paper, not glossy). The thicker it is, the better will work. Cut it how shown in this picture. You need to leave a space inside. Don't try to cut it in a disk shape: it won't spin, the spin motor will rip it off and you will have to clean your drive from many little pieces of paper.
floppy_02.jpg


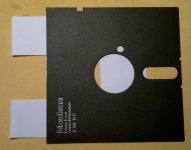
Insert the paper stencil inside your floppy disk sleeve, as shown in these two pictures.
floppy_03.jpg floppy_04.jpg
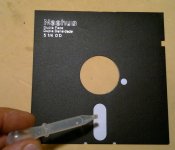
Put some alchool on the paper, as shown, both sides. You must to put enough alchool, so don't worry about the quantity: the paper must stay wet and soggy for at least 30 seconds (but it can't drip).
floppy_06.jpg
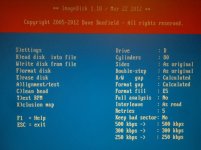
From pure Ms-Dos, run Image Disk (zip attached). If needed, set the drive unit (A: or B:) from Settings, then type "C" to enter the Clean Head function.
floppy_05.jpg
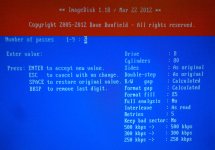
Enter the number of passes: 5 passes should be ok, but since it's your drive, you choose! :)
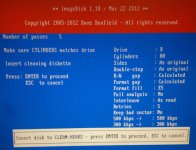
Insert the home-made cleaning kit an press Enter twice to start the process.
floppy_08.jpg
The cleaning process will start.

Note: of course, the original cleaning kit disk spins while the heads move back and forth, while using our "disk" the heads can count on themselves only: so, in case of very dirty heads, you would need to replace the paper stencil with a fresh one and repeat the process. But in case of a "not-so-dirty" heads, it should work fine.
floppy_09.jpg
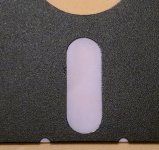
As you can see, the heads movement doesn't peel or rip off the paper. Since I used it just to take some pictures, the paper is clean. But you can find some brown marks of dust, meaning the heads were (or still are) dirty. In this case, a second pass would give you better results.
Repeat the process until the paper will be clean.
floppy_11.jpg

Wait for some time before to put a floppy disk in your drive, the heads must dry! Usually I wait for at least 5 minutes, or more.

DON'T LEAVE ANY DISK INSIDE THE DRIVE WHILE THE HEADS ARE WET !!!


Attachments

  • ImageDisk118.zip
    115.6 KB · Views: 9
Seems like it shouldn't be that hard to cut a circular insert if one could find the right material - whatever that might be.

These days probably good to point out that one should always inspect, and potentially clean, the surface of any disk they have not used previously before inserting it in to a floppy drive.
Concur completely. Recently, I have been going through some 5.25 floppies of mine from 35-40 years ago. See this thread here. A strange thing happened. After getting the drives in order as best as I could, which included cleaning the heads with gentle IPA swabbing and muddling through the Greaseweazle and so on I was able to read a dozen disks or so. M1 TRS-80, MIII TRS-80, C-64 and old IBM. Then I hit a wall? Trying to figure out what I had done differently, checking the wiring, cfg files - all that stuff. I couldn't read any more disks, AND, I could not read disks I had previously read.....the proverbial wtf moment.

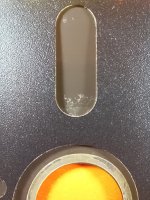
Then I cleaned the heads and all was right in the world. Now, I had been looking carefully at the disks before inserting them, but I got careless and I think this one was the culprit.

DirtyDisk20230510_141035.jpg

No damage done but when you read about these resuscitations, I can underscore this particular point.
 
Last edited:
Back
Top