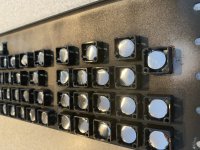
So I am going through my keyboard and I’ve put all new pads on and am reinstalling the keys. At the end I have two small springs that are smaller in diameter than any of the others and of course I’m short two. Does anyone know which two keys would have the smaller diameter springs? I had watched a few videos on this and one said to keep the space bar spring separate so I did that but I didn’t notice these other two being smaller. I am trying to avoid taking them all off again because I’m sure you can only do that so many times before they start breaking
- VCF South West - June 14 - 16, Davidson-Gundy Alumni Center at University of Texas at Dallas
- VCF West - Aug 2 - 3, Computer History Museum, Mountain View, CA
- VCF Midwest - Sept 7 - 8 2024, Schaumburg, IL
- VCF SoCal - Mid February 2025, Location TBD, Southern CA
- VCF East - April 2025, Infoage Museum, Wall NJ
-
Please review our updated Terms and Rules here
You are using an out of date browser. It may not display this or other websites correctly.
You should upgrade or use an alternative browser.
You should upgrade or use an alternative browser.
Keytronics keyboard rebuild question model 2
- Thread starter TXNathan
- Start date
Thanks Pete
I looked at those and the pegs appeared to be about the same as the others but it does work! The smaller springs fit differently than I expected. With fresh paint and the new badge from Jay it looks a lot better than it did. Progress
I looked at those and the pegs appeared to be about the same as the others but it does work! The smaller springs fit differently than I expected. With fresh paint and the new badge from Jay it looks a lot better than it did. Progress
Attachments
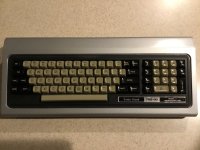
So I have the entire Model 2 back together and the keyboard has fresh Texelec pads on it. The system boots but there was no sign of life on the keyboard. I pulled the top cover and expected to find no power at the keyboard pc plug but it’s has 5V. The caps light works when I press the key but the lock key doesn’t none of the other keys work. Is there a common issue to look for?

When you say the system boots, you mean to a TRSDOS prompt or to INSERT DISKETTE? If you're at INSERT DISKETTE you will not get any keyboard response, you need to insert a bootable disk to proceed. Try reseating the keyboard/video card and the keyboard plug on the card. Did you clean the keyboard circuit board pads well? I needed to do this with the Texelec pads as they are a little more finicky than the original foil key pads. After that, it's time to troubleshoot the keyboard/video card.
Hi PeteWhen you say the system boots, you mean to a TRSDOS prompt or to INSERT DISKETTE? If you're at INSERT DISKETTE you will not get any keyboard response, you need to insert a bootable disk to proceed. Try reseating the keyboard/video card and the keyboard plug on the card. Did you clean the keyboard circuit board pads well? I needed to do this with the Texelec pads as they are a little more finicky than the original foil key pads. After that, it's time to troubleshoot the keyboard/video card.
When I power up it comes up to insert disk. When I insert the boot disk I got from you the diagnostic menu comes up after the Tandy Corp logo. I didn’t clean the keyboard circuit board because it looked very clean but perhaps there is a layer of oxide. I’ll try that and reseating the card. I figured since the display worked the cars was seated well. I will also check the clock signal at the card
shirsch
Veteran Member
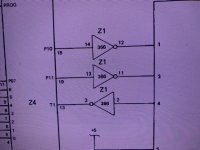
Take a look at the 74LS366 data buffer in the keyboard. That part can get static-zapped when keyboard is not connected to unit. They are difficult to find, but I was able to substitute in a 7404 by offsetting one position in the socket and adding a jumper to the chip for power.
So starting with the easy stuff I cleaned the pad contacts on the board with isopropyl alcohol and cotton balls. Not a lot of dirt but some. It did look cleaner. Upon reassembly the other lighted key now lights and the 6 key on the number pad works because I was able to enter the video diagnostics menu on the diagnostic menu. Sadly I could not exit. Since the single key worked is it safe to assume the card is working and the keyboard logic is working? It seams like that’s the case and I need to perhaps clean more? I’ll look at the pads also but they seem to be installed correctly. I have extra pads so I might try removing the key assembly again and seeing if I can complete a circuit with just a pad.
Tried some deoxit on the board and all the number keys work but none of the letter keys. There are some suspect traces. I assume I can just ring them all out as far as possible with a meter? The way it scans the matrix I imagine a bad trace could wipe out a whole section?
shirsch
Veteran Member
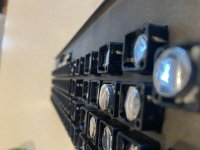
I have at least one batch of foam disks from TexElec that were slightly too short to work properly in an M2/12/16 keyboard, but my understanding is that these were from a very early production run and that the issue was long since fixed. When you sight across the bottom of the keyboard plate and depress a key, do you see it rise clearly above the bottom of the frame? What color is the foam in the disks you used?
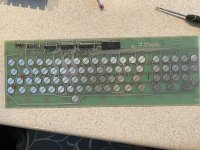
Tried an eraser but they are so clean I didn’t see a difference. I’ll attach a pic of the board and the foam pads. I found a couple of pads that came loose but I don’t think that’s the issue. I also used my meter to ring out as many traces as my eyes could follow and they all appear good. Even the few that appeared tarnished were fine. The entire number pad on the right works and the black keys seem to work but the letters appear to not work at all. I’ve been able to get into most menus on the diagnostic menu but since the sub menus are all letter driven they are not appearing to work. Are the letters and numbers on separate circuits? Since the numbers work I would thing the chips and on board logic are good. Is there some kind of test point I could meter or monitor to see if a key is pressed?
any other test suggestions? Of course I don’t have a spare keyboard to try And don’t know anyone in DFW with a model 2.
any other test suggestions? Of course I don’t have a spare keyboard to try And don’t know anyone in DFW with a model 2.
Attachments
shirsch
Veteran Member
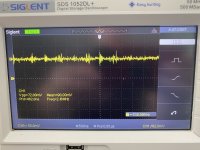
If the letter keys are projecting as much as the one in the photo it doesn't seem likely that the foam is to blame for your problems. You posted a waveform for the clock that didn't look at all reasonable. Can you try that again to be certain it wasn't something in the measurement setup?
JonB
Veteran Member
Agree with shirsh it's definitely not the pads or PCB. I can show you what those traces should look like in mine if you like. Just let me know where you attached your 'scope.
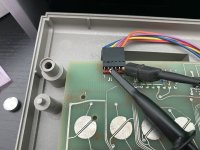
The problem with my oscilloscope is that I dont really know how to use it. Here is how I hooked it up. And the display. I just hit the auto button for setting. In the tech reference manual it says the orange wire inside the keyboard housing is ground and the yellow is the clock from the keyboard
Attachments
shirsch
Veteran Member
You need to probe the clock on the input side of that LS366 in addition to the output on the connector.