• Please review our updated Terms and Rules here

Model 4 Restoration

Tincanalley

Experienced Member
Joined
Aug 26, 2019
Messages
176
Location
Los Angeles, CA
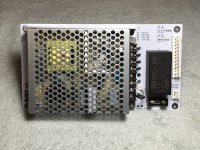
I finally got around to restoring my M4. I had planned on doing it since '97, but it just kept working and working, so I figured it wasn't a priority. That was until yesterday. It started making some horrible drive noises in both drives. They have been noisy for a bit, but not this bad. So I decided to clean up the drives, but couldn't stop there once I saw the inside. I had to completely disassemble, clean, inspect and put it back together. I all went well, but while inside I noticed one of the power supply caps had gunk on the top, but it wasn't bulging and the supply worked. I figured it must be leaking around the side and pushing up to the top. I have ordered all new caps and will rebuild the board next week. Until then, it is working fine and the drives are so quiet now it doesn't seem normal. Hardly any noise from the stepper motors or spindle.

I'm going to attach a few pics of before and after. The pain part was cleaning the wire bundles. I wasn't about to cut all the ties, so it took longer. Also, I'm attaching a pic of a jumper taped to the bottom of the unit. Seems it has been there all this time, but why? I find no jumpers in the unit, so why tape one down as a spare? Lastly, this unit has parts from '83, '84 and '85. The lid and base are months apart and the drives are years earlier.

Oh, lastly, I know the space between the motherboard mounting cage and the back of the CRT's neck board were close, but this one has a piece of tape on the back of the board and then a piece of duct tape
over that one. Very odd. Maybe the quality control person noticed it was too close, so they settled on this? TRS-80 1.jpgTRS-80 2.jpgTRS-80 3.jpgTRS-80 4.jpgTRS-80 5.jpgTRS-80 6.jpgTRS-80 7.jpgTRS-80 8.jpg
 
Last edited:
Here are a couple of things you need to check on your Model 4.

1. Power Supply - Looks to be a Tandy Power Supply with the row of PINS on the edge of the PCB
that plugs into the Pins. VERIFY that ALL PINS are Soldered firmly to the PCB and there are no
rings around the pins in the existing Solder.

2. The floppy drives are Tandon TM-100 series, and you need to open the door and look inside at the
Hinge part and see if the Hinge Pins are two short White Nylon Pins, or one 3/32" Full Length Brass Rod.
If there is no Brass Rod for the Hinge, the white Short Pins need to be removed, and Brass Rod inserted.
This will prevent the Hinge piece from breaking, if it isn't already broken.

3. You probably have already replaced the Square RIFA Caps, but if not, they need to be replaced ASAP.

4. I use Dri-Slide to lubricate the Guide Rod's for the Head Carriage Assembly. It will last for years and makes
the floppy's step quietly. A couple of drops is all it takes.


Larry
I check for bad solder joints, but will reflow some on those pins with I replace the caps. As for the RIFA, those will get pulled in order to help identify proper replacement. The SM has 3 different PS boards listed and I don't trust them getting the values correct.

The drives use the brass rods, so all is good. I cleaned them and the tracks and lubricated.

I use X10S from Caig to lubricate the slides, spindle bearings and drive door pins. It is 100% silicone oil. It won't migrate, collect dust or gunk up. The drives are so quiet now it seems wrong. Been listening to the Tandon drives in all my machines for so long dirty that I forgot how quiet they once were. I've not cleaned 7 of them and am getting pretty good at it.
 
As for the RIFA, those will get pulled in order to help identify proper replacement. The SM has 3 different PS boards listed and I don't trust them getting the values correct.

I see at least one RIFA in your pics, they're pretty easy to identify without removing them. The one in the picture is a 0.1uf (labeled 0,1uF@X). Anything that looks like that will be the RIFAs. They don't really matter and can be replaced with X2 capacitors that are pretty cheap purchased just about anywhere.
 
I see at least one RIFA in your pics, they're pretty easy to identify without removing them. The one in the picture is a 0.1uf (labeled 0,1uF@X). Anything that looks like that will be the RIFAs. They don't really matter and can be replaced with X2 capacitors that are pretty cheap purchased just about anywhere.
Much appreciated. Could you provide a link so I can make sure I am looking at the right thing? Last time I replaced a safety cap was in a Zenith TV and it was easy as there was only one (orange). 🤣
 
The M4 PSU (single PSU in model 4 instead of 2xM3 PSUs) is described with a complete parts list in the technical/Service manuals, links below:
Radio Shack M4 technical manual: https://drive.google.com/file/d/1eZGOEsckPiBtBDKcMdNR7AjF1KvaXg_T/view?usp=sharing
Sams ComputerFacts for Model 4: https://drive.google.com/file/d/1AzZ7RNVQ5R12ZYtcc2kvUyfb5No38FTO/view?usp=sharing

Also as you can see in this picture I made it to help peop[le identify what is what... C1, C2 and C13 are your RIFA Caps marked as indicated in Sams manual Page 30

Here are easy google terms to find the right ones
C1 = Polypropylene Film Safety Capacitors 0.1uF 275VAC X2
C2 & C13 = Polypropylene Film Safety Capacitors 0.01uF 275VAC X2

You normally can get 20 for like 10$ of each,.
I use the newer models some people prefer to use the old style (harder to find and cost like 10$ each), mine look like
LUnMszk.png


Cheers

hawAVWg.jpeg
 
Last edited:
These are exactly what I needed. Exact style would be nice, but since it is inside and no one sees it, I am okay with newer style. Just want to make sure I don't get any cheap ones like I keep seeing ebay (no brand).
 
Looks don't matter. Just want quality. So many unbranded for sale.
as for quality, I have not had any issues with the ones I bought off amazon. and they were 20 for a few bucks. the older style has the same specs. and it's all made in China so who knows what's better than the other, to be honest but any failure of these three will not stop your PSU from working anyways. it's just a power filter capacitor. you can cut all three off the PSU board and use the PSU just fine without them.
 
We never used duct tape on any products at RS, so the tape on the circuit card on the back of the CRT is someone else's addition.
I figured the duct tape probably wasn't from the factory. It is placed over a black piece that is similar, if not the same, to the wrap you find in automotive wire harnesses to wrap them up. I was thinking that the black piece might have been factory, but the sharp solder poked through and they covered that with duct tape. There are raised areas of the duct tape from the solder poking through. I removed the duct tape, but the black stuff is on there pretty good.
 
Back
Top