• Please review our updated Terms and Rules here

Osborne 1 Debug

MicroCoreLabs

Experienced Member
Joined
Feb 12, 2016
Messages
283
I recently acquired an Osborne 1 which I had some fun spending an afternoon debugging. It was a good opportunity to test my MCLZ8 drop-in Z80 emulator in another vintage computer!

I found that there was a faulty DRAM which took just a few moments to isolate using a few lines of code added to the MCLZ8 - It's hard to beat a debugger which sits in the CPU slot so has access to everything on the board!

Once the DRAM was replaced I found that the keyboard also has a stuck key. Thankfully I was able to "emulate" an Enter keypress by shorting pins 3 and 15 on the keyboard connector which allowed the machine to try to boot from the diskette, however I don't own any! :)

I had success using the MCLZ8 to quickly isolate the faulty DRAM, so with this achieved and the computer running and trying to boot I will let the next Osborne 1 enthusiast take the next steps debugging this machine.

Here's a link to my blog which has a few more details and some pictures: OSBORNE 1 DEBUG WITH MCLZ8
 
Here is a picture I took when I first powered it up. This one uses a ribbon cable for the keyboard which I believe they changed to a coiled wire. Not sure how many of these were made...

1659937018025.png
 
I had the computer apart today to clean and swap the disk drives. One of the drives has developed a short circuit which keeps the computer from powering up. I pulled the ribbon cable from the motherboard and now it boots to the Insert Disk prompt. It appears that this machine is resisting being restored...
 
Good thing is that you machine is basically working. The rest should be fairly easy.

I tend to replace the tantalums in 12V lines with either fresh ones (preferably) or electrolytics. Either case will result in a much more reliable computer for the foreseeable future. For reasons unknown, tantalums in 5V lines don't seem to fail as much.
Of course, I also replace Rifas in the power supply. And, for switching power supplies, I also pay close attention to output caps, as they tend to be leaky more than the main filter caps.
 
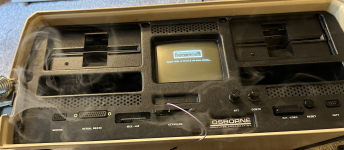
I just got an Osborne 1 today. I brought it home plugged it in as was reminiscing of the good old days with my previous Osborne 1, it started popping and I got the same smoke as this picture. I have not opened the case yes as I had to get it out of the house before the wife discovered it. LOL. Anyway, will it be obvious where the problem is? Will it be capacitors in the power supply area? Any help would be appreciated. Also, is there a good source for Osborne parts or capacitor kits? My Osborne is a 1A if that changes the issue.
 
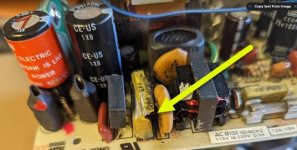
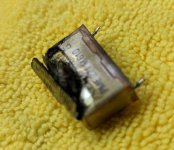
It was easy to locate the RIFA caps on my machine which is an Obsorne 1. Probably just as easy for the 1A. And yes, it will definitely be obvious which cap blew up. Will be a black, greasy, smelly mess ! :)
 
Also, is there a good source for Osborne parts or capacitor kits? My Osborne is a 1A if that changes the issue.
I would suggest to just go to Mouser or Digikey and search for the capacitors you need. They are reputable sources for brand name capacitors and have everything you may need.
 
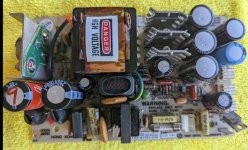
Well, it wasn't too hard to find, I see one that popped. Hopefully there are not other casualties. I pull most of the system apart. A little bummed I don't have the double sided disks as I don't see a daughter board. I guess this CAP can be removed and not even replaced. I will do that until the CAP kit comes in.
 

Attachments

  • Popped-Cap.jpg
    Popped-Cap.jpg
    39.9 KB · Views: 5
  • Full PS.jpg
    Full PS.jpg
    73.4 KB · Views: 5
CAP extracted. I may reassemble and test the unit tomorrow if I have time since I heard it will run fine without the CAP and my fresh CAPs won't be here for a couple of days.


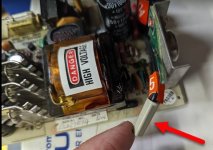
If this wire (RED ARROW) supposed to be floating around or connected to something? I don't see/know where it plug into on my finger tip side.
 

Attachments

  • Exploded CAP.jpg
    Exploded CAP.jpg
    27.7 KB · Views: 7
  • Red Arrow - Loose Wire.jpg
    Red Arrow - Loose Wire.jpg
    35.8 KB · Views: 7
Daft thing of course is that the PSU doesn't actually really need these capacitors as they are there to reduce radio interference, but I always replace them like for like as I like my machines to be as complete as possible.
 
Thanks Gary,
I bought a kit and replaced the 3 RIFA capacitors. I left the other cylindrical ones as they were as they looked pretty good.

Today I bought another Osborne 1 from the same guy. One was his dads and the other his as a college kid. The first one, his dads is much better condition on the exterior and that is the one I replaced the RIFAs one. I'll buy another kit and replace the other Osborne's RIFAs.
 
Does anyone have an easy solution for Osborne stuck keys? :) I read that emerging the keyboard in solvent sometimes fixes it, and other people have removed all of the keys, which I believe are difficult to re-install because the plastic needs to be broken off. Maybe just banging the keyboard would work? The shock could loosen/separate the stuck membrane layers?
 
I have repaired three Osborne membranes by running a hot air gun over them. I dont know why it worked, but it did.

I took mine to bits and removed every key then used my rework stations hot air gun. The plastic softened slightly and you could see the dome pop back up. I used about 160C from about 2" away but had to be careful not to melt anything.

The switches have studs that are melted over when installed and you have to cut the blobs off, then I used an old soldering iron to melt the remains back into the hole. Worked fine but takes some time. Each key has two springs. One is a tiny one that pushes down on the membrane and is easy to loose and easy to get misaligned when you put it back together (you do it upside down)
 
I wonder if the keyboard could be placed in an oven for a short time to let the rubber soften and then hit the keys until the domes pop back up. :)
 
I recently acquired an Osborne 1 which I had some fun spending an afternoon debugging. It was a good opportunity to test my MCLZ8 drop-in Z80 emulator in another vintage computer!

I found that there was a faulty DRAM which took just a few moments to isolate using a few lines of code added to the MCLZ8 - It's hard to beat a debugger which sits in the CPU slot so has access to everything on the board!

Once the DRAM was replaced I found that the keyboard also has a stuck key. Thankfully I was able to "emulate" an Enter keypress by shorting pins 3 and 15 on the keyboard connector which allowed the machine to try to boot from the diskette, however I don't own any! :)

I had success using the MCLZ8 to quickly isolate the faulty DRAM, so with this achieved and the computer running and trying to boot I will let the next Osborne 1 enthusiast take the next steps debugging this machine.

Here's a link to my blog which has a few more details and some pictures: OSBORNE 1 DEBUG WITH MCLZ8
Nice work. Once fall comes I should have time to resume my efforts at getting the MCLZ8 working on the Kaypro 10.
 
Back
Top