• Please review our updated Terms and Rules here

PET reset switch circuit with a condensator for pulling the diagnostics line down

One of the problems I had thought about was unintentional interaction between the /RESET and /DIAG signals. Of course, this can be avoided if you use a 2-pole pushbutton...

To the bat cave Robin...

Dave
 
I have attached a circuit that works fine on my PET.

One of the interesting things about the 555 IC, it requires a reset pulse on pin 2 that 1) drops to below about 1/3 of the supply rail, or 1.66V for a 5V supply and 2) is shorter than the timing cycle of the IC's output.

Therefore the reset pulse is a dynamic affair.

A capacitor of a larger value (Cx in the diagram attached) if in a discharge state, will share charge with the 0.1uF reset capacitor when switched across it, using the principle of the conservation of charge the new terminal voltage across the combined capacitance is easily calculated. The data sheet for the 555 says worse case trigger voltage = 1.45v for a 5V supply.

Solving for a minimum value for 1.4v is 0.26uF, so a 0.33uF is selected or a 0.47uF would also be ok.

It is important that this capacitor starts out with a zero terminal voltage (provided by the 4.7 Meg parallel discharge resistor) which is large enough that it allows pin 2 still to rise to around 4V. So holding the button down permanently does not affect the timing cycle of the 555 once it is triggered.

In the simulator it showed the button press transiently dropped the pin voltage down to around 1.18V and by 0.35 seconds the pin 2 voltage had already climbed to 3V and being about 4V by the end of the 1.1 second timing cycle of the 555, so this "capacitively coupled trigger arrangement" doesn't come close to altering the about 1.1 second timing cycle of the existing 555 with the reset button held in.

If the reset buttton is held in longer than the timing cycle of the 555, which is about 1.1 seconds, then when the computer is released from reset by the 555, it finds, via the 1N4148 diode, that the DIAG line is low so in that case it boots to the Monitor.

The Resistor R1 is to avoid any excessive currents on the PIA pin PA7 (DIAG line). The resistor R2 limits the capacitor discharge currents via the switch. If a switch is used directly to discharge the 0.1uF reset capacitor in the PET without some added series resistance, it can result sometimes in erratic resets and its not good for the switch either.

When the switch opens the voltage in the circuit assumes 5V and the diode uncouples the PIA so there is no interference. If the PIA pin went low for any other reason internal to the PIA, the diode just gets reverse biased. So another way to look at the diode is it effectively open collector style, OR gates a low onto the PIA pin when the button is held on.

PS: another variation of the circuit could take the right hand side of the discharge resistor R3 to the +5v rail rather than pin 2. I decided against that because it would require an additional wire from the circuit to the +5V rail. Currently it just requires three wires and the components could be mounted on a small pcb on the back of the switch and or stuck in some heat shrink sleeve.
 

Attachments

  • PETRESETMON.jpg
    PETRESETMON.jpg
    142.4 KB · Views: 19
Last edited:
Hugo.

The slight 'niggle' is that the reset line doesn't feed the 555 timer but the connector that connects to the 1k pull up resistor and directly onto the CPU /RESET pin.

This configuration means that the external box connects to the PET only via valid external edge connectors. I think, therefore, that the in-built 555 circuit is used for the power-on reset only.

Dave

Well I guess the same idea could be in an external box with extra parts like another 555, set up like the one in the PET, to create the PET's expected 1 second reset. I will have a look, but it seems like extra parts to duplicate what is already in the PET. That would be required for a plug on box though.

What I posted works, and it is suitable if one wants to put a reset button into a PET. I noticed on the lower metal tray of my PET on the left hand side there is a pre-existing U shaped cut out where it would be easy to mount a push button switch, without having to make any new holes.
 
According to Andy (and the external posts I have read) the external box had very few components and interfaced to the PET via three wires/connectors:

1. 0V/GND.
2. /RESET (after the O/C buffer directly on the CPU pin).
3. /DIAG port.

There is supposed to be in existence a schematic (somewhere)...

Dave
I'll post the way I configured this into my PET, it is removable and doesn't hog any rear connectors. Just a small end connector that can be unplugged on J9 inside the computer.
 
Hello Hugo

Pin 22 and 25 of j4 … reset and ground …. Then pin 20 j9 .. diag. from the exterior it’s a simple push button in a small rectangular box (maybe 2 inch long by 1 inch high, not by the machine just now), mounted on the side of the pet. The switch is sealed onto the box so do not want to dismantle as not sure how it was fixed in.

If I read your schematic right (from my phone!) the external connections go to pin 2 of the 555 in the PET, ground and pin 20 of J9 … is that correct ?
 
Last edited:
If I read your schematic right (from my phone!) the external connections go to pin 2 of the PET, ground and pin 20 of J9 … is that correct ?
Yes, the pin 2 though, is the pin 2 of the 555 timer IC, that is on the PET main-board and is responsible for the power up reset. It is not connected to a peripheral connector.
I am working on a way to power the whole thing from J9 and J4, so it will work just plugged onto those.
 
Clearly, the interesting thing is how they got the original unit to work without a +5V supply.

Ideally I would think, the pulse applied to the /RES was a solid predictable pulse. On power up at least that is about 1 second, but once powered up obviously it could be shorter for a predictable reset. But ideally that pulse would not be determined by the time the user held the reset button. Without the 5V though, it is difficult to make a predictable monostable timer with sharp rising & falling edges. Some current can be sourced via the /RES pullup resistor to create a pseudo +5v supply and store charge in a filter capacitor. It looks like it could be done with a couple of transistors and a few caps and resistors. I will keep working on it.
 
According to one of the original contributers (to reverse engineering the box) it just used passive components - and may be as simple as a C/R network (hence my original circuit).

My current guess is that the pushbutton just jams the /RESET signal to 0V.

I know one of the original contributors, so I will send him an email to test his memory.

I think this circuit is just crude (by your standards) Hugo!

I suspect, on power-up, the /DIAG signal is relying on the longish 555 RESET pulse to charge up any capacitor thus preventing the PET entering TIM.

If you press the RESET button for a 'short' time, it will definitely reset the CPU. My expectation here is that the short length of time the button is pressed will not significantly discharge any capacitor on the /DIAG pin by much - so a HIGH will still be seen.

Pressing the RESET button for longer will discharge the capacitor enough for a logic LOW to be seen on the /DIAG pin. The capacitor will then charge up further so that a HIGH once again appears on the /DIAG pin.

I am currently unsure about the behaviour of my circuit posted earlier at power up and when the sounder is operated.

I might do a little more playing later...

Dave
 
This is what the switch looks like …
 

Attachments

  • IMG_1289.jpeg
    IMG_1289.jpeg
    1.3 MB · Views: 17
Can you confirm that there are only three wires connected into this unit, the /Reset. the DIAG and ground, and no other connections to +5V etc ?
That is correct ..l connected it up and used in both modes several times myself
 
I perfected a couple of quite different circuits to do this, with the three wires, I will post these later today. Interestingly one requires quite a large capacitor, maybe this explains the apparently large size of the original box. It look like they might have potted that in resin to conceal what was in there, an old trick and very popular in the automotive industry.
 
Last edited:
I have attached the most simple unit I could design and it be reliable and predictable.

(I designed other units with two mosfets that also worked well but it used more parts, and I think somehow the original unit would not have had these, so I am just presenting the one design to avoid any confusion).

It may well be deceptively simple.

One of the interesting challenges with this one is to make a design that works with a paucity of available electrons and keep isolation between the DIAG & /RESET lines (I know Daver2 was concerned about that too).

The only current that can be sourced to charge capacitors and power the circuit is from the /RESET line and the DIAG line.

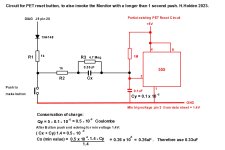
I decided the best way to do it was to use the current in the reset line, when the Reset button was closed, to accumulate charge on a large value capacitor.

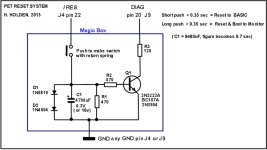
The total stored charge, when the button is pressed for an indefinite period is limited by the uF value of the capacitor and the terminal voltage, which is limited to 0.95v by the series combination of a normal 1N4004 diode and a common garden 1N5819 schottky diode. Anywhere above 1.2v low on the Reset line, the reset starts to become unreliable. While a resistor could have been used instead of the diodes, it would not allow for different pull up resistor values that might be in different PET's, mine has a 470 Ohm but they might be 1k on some PETs. The diodes ensure the circuit works regardless of the exact pullup resistor value.

The base-emitter junction voltage drop of the transistor is used as the "comparator" . It is important that the capacitor is able to charge up to 0.95v, which is above above the the transistor's approximately 0.6V B-E threshold voltage, so that when the button is released (after is is held down for > 0.35 sec) there is still current flowing into the transistor's base circuit, so that its collector voltage is stable and low to control the DIAG line. In this minimal condition, or threshold area, the collector voltage stays low for around 40mS after the button is released, so the the DIAG line is held low and stable when the PET comes out of reset initiating the Monitor. If the button is held low indefinitely (or for many seconds at least), the maximum stored charge results in the DIAG line being low for about 0.4 sec after the button is released.

In the region below 0.35 seconds of a button push the transistor has not been pushed into conduction yet and the DAIG line remains high, so a short button push results in the PET resetting to BASIC.
I found this figure of around 0.35 seconds, on practical testing, to be good for discriminating between a long and short push, but you can double up on that to around 0.7sec simply by doubling the capacitor value if you wanted but I think that is a little long.

To an extent at least, this sort of circuit; its exact threshold of operation is affected a little by the transistor's hfe. I tried 3 different types of Silicon NPN signal transistors and they all performed the same with my PET. The BC107A is easy to get in the UK and the 2N3904 & 2N2222A easy to get in the USA. Watch out though, the 2N3904 has a different pinout. In the simulator testing it was modeled as a BC338 with a collector load of 1k. I built it first and when the design was perfected, I put it in the simulator later to find out the exact timing threshold.

The resistor in series with the transistor's collector is just a little insurance in case the PIA pin somehow got deployed high as an output when the transistor was conducting.I'm not sure if that can happen, but the resistor doesn't hurt.
 

Attachments

  • PETRST2j.jpg
    PETRST2j.jpg
    91.2 KB · Views: 15
For momentary press ( less than ~1 seconds, /RESET and /DIAG go low and high in unison. So by the time the CPU has started looking for the /DIAG line, it is high and a normal RESET is performed.

Screenshot from 2023-05-31 11-59-59.png

For a longer press, /DIAG is held low, and /RESET slowly ramps up to HIGH ( about 3.8v, though may be more or less depending ) over a matter of seconds. Once /RESET reached logic HI, the RESET operation starts while the button is still pressed and /DIAG is LOW.

Screenshot from 2023-05-31 12-01-05.png

When the button is released, both go high, but as /RESET is already HI and /DIAG has been read, so it won't matter. This design does not require a bi-level switch, and only GND, /DIAG and /RESET. This should work if reset action actually occurs from a LOW --> HIGH transition. You can probabaly futz around with the value of the capacitor and resistor. "At least in the simulator" LOL It also assumes /RESET is the CPU's reset line which halts on logic low, and performs the reset transitioning back to HIGH.
 
I made one of these for my first PET but unfortunately I sold that one and don't have any notes; ISTR that it was a little simpler than what's proposed so far though, but I could be wrong.
Mike, was that your "Soft Reset" for the PET from about 100 years ago? As I recall, it would somehow reset the PET but would keep the user program and variables intact?

I wonder if these new circuits will also do that? I think so if the monitor is exited right away?
 
Back
Top