• Please review our updated Terms and Rules here

Rack Panel "Latch Molding" Bracket Repair

Lou - N2MIY

Veteran Member
Joined
Apr 1, 2008
Messages
1,306
Location
Albuquerque NM / Potomac MD
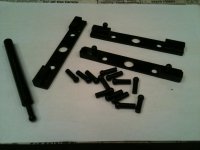
This thread is about the plastic piece that was used by DEC through the 70s to hold cover panels onto 19" racks. In the drawings and parts lists it is called the "Latch Molding". It seems to be of a design that is not so robust. Almost all of them I have ever seen have at least one ball and post broken off (http://www.vcfed.org/forum/album.php?albumid=410&attachmentid=45318). This is a link to a rendering that Vince has done of this part : http://svn.so-much-stuff.com/svn/trunk/3D/rack-bracket/bracket-screws.jpg . He also has .STL files for 3-D printing these, which I have done and discussed in an earlier thread. However, the way I have to orient the parts for my 3-d printer, the balls still break off.

I have come up with something more robust. I drilled and tapped a countersunk 8-32 hole centered where the original posts were. I then threaded in a flat head 1" long screw and put a sleeve of 6mm OD polyurethane tubing, cut to length, over it. (see here: http://www.vcfed.org/forum/album.php?albumid=410&attachmentid=45319 and http://www.vcfed.org/forum/album.php?albumid=410&attachmentid=45321) The balls were originally 1/4" OD to engage the holes in the back of the panels. There was somewhat of an interference fit, and panels needed to be pulled straight off so as not to break the posts. The plastic tubing offers friction to grab the holes in the panels and the steel screw is now a very strong post. This mod repair can be done for original brackets as well as newly 3-D printed ones. http://www.vcfed.org/forum/album.php?albumid=410&attachmentid=45322 I have more panels than brackets and so going forward I will 3-d print more of Vince's brackets and modify them with the steel screw post.

1/4" OD tubing is likely too large. I eyeballed the center of the old sticks before drilling (on a drill press) and so there is some locational error. The smaller (than 1/4") OD 6mm tubing allows some forgiveness across the four locations where the panel engages the tubing-covered posts. The 6mm tubing I have was used for factory automation pneumatic lines for connecting between solenoid valves and actuator gas cylinders (what I originally bought it for). It seems to be pretty common online. Of course the ID should fit tightly over the 8-32 screw, so it seems 4mm ID is best. Polyurethane is somewhat rubbery, and Tygon should be good, but polyethylene would be too stiff accommodate the misalignment.

The finished part looks fine and is very strong: http://www.vcfed.org/forum/album.php?albumid=410&attachmentid=45490 . They are holding on the panels in this picture quite securely http://www.vcfed.org/forum/album.php?albumid=43&attachmentid=45454 .

Lou
 
Nice fix, Lou. More the Harley Davidson philosophy - if it breaks, make it bigger/stronger - than the Colin Chapman Lotus approach - if it doesn't break, make it smaller/lighter.

Happy Mother's Day, everyone.

Jack
 
Hi Lou, I Have just been doing a few of the same repairs to these panel retainers, I used some black acetal bar, and machined some new ball ended stubs, I then drilled holes where the broken stubs were in the back plates, and bonded the new ball ended stubs in, using a simple depth stop to keep the protrusion the same. I altered the diameter of the ball slightly, to make them a better fit into the panel sockets. The acetal in much stronger than the brittle original type, and works a treat.

....Harry
 

Attachments

  • 014.jpg
    014.jpg
    87.5 KB · Views: 3
Harry,

Your repair is much more elegant. You must be turning the repair parts on an NC lathe. I have no proper machine tools at home (no room for them either!)

Lou

Lou,

Do you know about Sherline? Incidentally, NC is not necessary to produce those parts.

Matt
 
Lou,
I take it you saw my rendition of the bracket on Thingiverse: https://www.thingiverse.com/thing:2899599
I had also started on a new bracket using a piece of aluminium bar, tapped for M3 screws and machined scraps of polyurethane for the post knobs, got as far as finishing those parts but not the complete bracket.
However yours is a great idea, just drilling out the old post location for a steel screw.
I've incorporated your idea (hope you don't mind?) back into my Thingiverse thing, so just the bases can be run off, with a countersunk hole instead of the post so a 8-32 or M4 screw can be used.
It's great to have multiple ideas and solutions to these problems, can't hurt I guess.

Steve.
 
+1 on Sherline, though my mini-lathe is a Taig. Either way, super useful for stuff like this, capstans for tape drives, etc.

I had never heard of Taig. I wonder if you need any accessories. I have a DoAll that may have compatible parts. I bought a Sherline to replace my DoAll a few years ago and thought about adapting some parts. The DoAll is built to a different standard that is probably like other lathes. You're less than an hour drive from me, and my DoAll is collecting dust.
 
The Taig Micro-Lathe II is a US-built machine that is remarkably cheap, has a pile of accessories and is definately the most popular for CNC conversion. It's also great quality and value for the price. Its shortcomings are no fine-feed tailstock or fine carriage movement but people have done many mods for them. I fitted a larger motor and quick change toolpost to mine.
The Sherline was originally designed in Australia as the Clisby lathe then the licence sold to Sherline, I've never used one, they appear pretty capable but AFAIK don't have the range of accessories other brands have. My personal favourite in the mini lathe category is the Unimat 3 which I have been using regularly since 1982 or so. For some reason it is not popular in the US, but the older Unimat SL with the steel rod bedways is much more common there. I have one, its centre height is pretty limiting but the Unimats have the largest array of factory accessories then just about any lathe going. There are knockoffs such as the Seig which are cheaper as the Unimats are pretty much collectors items these days. There are also numerous accessories for mini lathes on Thingiverse you can print off.

They are all good machines, vastly underrated as machine tools and as Jack says extremely handy for capstans and so on.
 
I initially looked into buying a Unimat 3, but as you say they are collectible, and as such it was not as valuable a purchase as a new Sherline. I had thought the Sherline was the only non-Asian currently manufactured mini-lathe, else I would have considered the Taig as well. What I really like about the Sherline though is that nothing is metric and the parts are all very easy to make. Their prices are very reasonable though so it's hard to justify making parts, except for the fun and experience.
KIMG0943.jpg

You're correct that these machines are all highly underrated. They are precise machine tools no different than their larger counterparts. Most models will even double for watchmaker service. Even the cheapo Asian imports are probably a good value for their price.
 
I had wanted a Unimat since reading about them in Popular Mechanics as a pre-teen (back in the days when they were also advertising WWII jeeps for $99, still in cosmoline - but that's another story). Unfortunately, their collectible status has pretty much priced them out of consideration - I'd rather spend my money on over-priced collectible minicomputers. The Taig II is a much better value and support is excellent. When I had questions about their collet system, sales put me through to their chief engineer and that pretty much sold me on the brand.

I will definitely not be sucked into the CNC wormhole. Probably.

Jack
 
My immersion in CNC from ye bad olde dayes to the present day is why I like manual lathes. I'd have a manual mill too if it weren't for the fact that I already have an NC one.
 
So the reason I thought Harry that you must have an NC lathe are the ball ends you have machined directly on the end of your posts. I have only ever used a fully manual lathe, just for basic turning with tool bits in a standard tool holder (turning cylinders and at most cutting o-ring gland grooves.) To turn the ball end, I would have imagined advancing the tool like sine and cosine. NC makes that easy. I just now googled how to do it manually and see the pivoting toolholder that is pictured about 2/3 of the way down this page: http://www.lathes.co.uk/rivett-918/ . Very simple and clever.

Someday I would like a small tabletop mill and a jeweler's lathe. I just don't do enough of that work. The 3-D printer in the house is actually my older son's.

Steve, I like your flexible post design. I will have a go at printing some.

Lou
 
You don't need a fancy toolholder, or NC, to cut a ball, especially not one that small. Alls you gotsta do is grind a tool bit with a 135° (more or less) internal radius. You can do that by hand with a round file, a die grinder, even a diamond disc in a bench grinder.
 
For turning balls in soft material, especially balls which need be only roughly spherical, I have a few tools knocked up for the purpose. Essentially they are just bits of steel half-bored through, finished and case-hardened and I do it much the same way as you'd do some primitive wood turning. A few minutes is all.
 
I had wanted a Unimat since reading about them in Popular Mechanics as a pre-teen (back in the days when they were also advertising WWII jeeps for $99, still in cosmoline - but that's another story). Unfortunately, their collectible status has pretty much priced them out of consideration - I'd rather spend my money on over-priced collectible minicomputers. The Taig II is a much better value and support is excellent. When I had questions about their collet system, sales put me through to their chief engineer and that pretty much sold me on the brand.

I will definitely not be sucked into the CNC wormhole. Probably.

Jack

CNC shines when you need to make lots of something. For a "one off" you'll likely spend more time programming than machining unless you go all the way to CAD/CAM with CNC at the back end.
 
Lou
I did find some spare time to use one of our cnc lathes to produce the ball ended spigots, this did make life a little easier, but anyone who has access to a small lathe could as KC9UDX mentioned, make a small form tool to produce the ball ends, they could be made in other material even alluminium, or brass for strength, it does'nt need to be that accurate, as it only relies on friction to hold the panel in place, a little trial and error would soon sort it. Probably various other ways to repair these mounts, as you, and others have well shown, I just thought I would share what I had done, using black acetal to keep things original looking.

....Harry
 
A form tool for this post could be made by drilling a ball-diameter hole in a piece of suitable material as mentioned, then cut away the straight bit and perpendicular edge where the ball tip is, then file those edges flat and relieve slightly. That should give a more accurate round ball than hand shaping the ball profile.
 
Theoretically yes. But not always, especially if your drill doesn't make a round hole. I don't know if I can anymore, but for a long time I could eyeball radii from .016" to .125" so light wouldn't shine between a radius gauge and the part.

When you have to file perfect corner radii on sharp corner endmills four times a day every day for years, you get pretty good at it.
 
Back
Top