Using AMIGA to ATX adapter and any kind of modern ATX PSU.
SCHNEIDER EURO PC PSU ATX GUIDE
1)Well i manage to operate this dinosaur with success.
Now i will upload a small guide to help others.
Schneider Euro PC uses a 7 pin DIN plug. Some pins are not necessary to connect. For example if you have EXTERNAL Floppy or HDD both +5V lines must be connected. -12V is ABSOLUTELY necessary to connect because if
you don't use it the image on the screen will be faded.
If you use AT or ATX psu pins necessary are +12V (Yelow), one +5V (Red), one GND (Black) and -12V
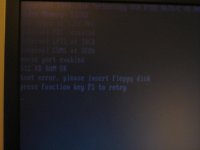
1)Photo number 1 shows how the boot screen must be. Without errors.
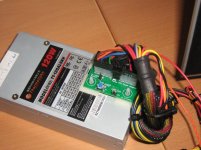
2)Photo number 2 + 3 shows the 1U ATX psu and the AMIGA ATX adapter along with extra +5V and -12V (in my case orange) connections.
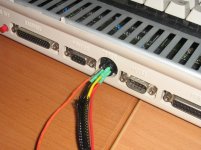
3)Photo number 4 shows the connections
4)Photo number 5 shows what happens if you don't connect the -12V line
I used both +5V connections but this is not necessary if you don't have external floppy or HDD. Also i used both GND connections but you need only one of them to operate.
SCHNEIDER EURO PC PSU ATX GUIDE
1)Well i manage to operate this dinosaur with success.
Now i will upload a small guide to help others.
Schneider Euro PC uses a 7 pin DIN plug. Some pins are not necessary to connect. For example if you have EXTERNAL Floppy or HDD both +5V lines must be connected. -12V is ABSOLUTELY necessary to connect because if
you don't use it the image on the screen will be faded.
Code:
  +12V  o     o  ON
  +5V  o       o  -12V
   +5V  o     o  GND
o GND1)Photo number 1 shows how the boot screen must be. Without errors.
2)Photo number 2 + 3 shows the 1U ATX psu and the AMIGA ATX adapter along with extra +5V and -12V (in my case orange) connections.
3)Photo number 4 shows the connections
4)Photo number 5 shows what happens if you don't connect the -12V line
I used both +5V connections but this is not necessary if you don't have external floppy or HDD. Also i used both GND connections but you need only one of them to operate.
Attachments


Last edited: