• Please review our updated Terms and Rules here

So I finally got my hands on a Compaq Contura 3/25! But, backlight issues...

TH2002

Experienced Member
Joined
Jan 6, 2020
Messages
364
Location
California, United States
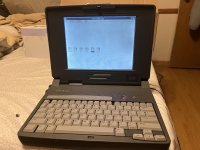
As per the title of this thread, I have finally acquired a Compaq Contura 3/25 from a seller on Bonanza! I've been wanting one of these for a good while, and this one is in very good physical condition. Even the rubber pad on the bottom of the computer has not deteriorated in any way, which seems to be a common issue with these.

First order of business was to see if the thing powered on per the seller's description, and it does, but I was confronted with two major issues: the hard drive was dead, and either the backlight or the inverter board is shot (the CMOS battery is also dead, but that's an easy fix since it's a standard coin cell).

Took it apart to see if I could get the old hard drive working - and my efforts to resurrect the old Conner drive inside were successful! The computer now boots into Windows 3.1.
IMG_0001.JPG

So this leaves the backlight as the remaining major issue. I assume the inverter board is somewhere in the LCD assembly, but I have yet to attempt removal of the screen bezel, and I'm still entering unknown territory in that regard. I know the panel itself is fine, since the image on the screen is definitely legible when holding it up to the light at the right angle, as per the photo above.

So, the question is: does anyone have any experience working on these computers, and would I be better off trying to recap the existing inverter board or replacing it completely? Any advice is appreciated!
 
well first of all, I can spot a surface mount cap on the board there. That will need to be replaced along with any others. The inverter board issue could be caps, but could easily be a dead backlight tube as well that needs to be replaced.
 
Far as the surface mounted capacitors go, there are four of them. They look okay at the moment but I'll definitely replace them soon, as whether they're related to the backlight issue or not, they'll start leaking sooner rather than later.

If the problem with the backlight is the tube itself versus the inverter board, what are my options?
 
Inverter board is now the confirmed culprit. Knew something was up when I smelled burning, and opened up the bezel to this glorious sight:
circled.JPG

Also left a burn mark on the inside of the bezel itself:
IMG_0001.JPG

Not really sure where to go from here. Is this board even repairable or am I better off just replacing it at this point?
 
The board might be repairable--you'll need to check out the components. I'd start with that output transistor.

I've repaired kaput backlights on fairly old LCD monitors by replacing the entire inverter board with a generic one. I don't know if that will work in your case.
 
Same here Chuck. Years ago, CCFL backlights were all the rage in pimping your pc. The inverters were plentiful and cheap. If I was op, I just get some display around same size width wise, and pull the led backlights and retrofit. How wide is the display , I can help finding you something...
 
Last edited:
Not really sure where to go from here. Is this board even repairable or am I better off just replacing it at this point?

You need to figure out why the board failed. The two most common failures are old capacitors and worn out CCFL tubes. Since there's only one electrolytic cap, I would lean towards the CCFL tube being worn out.

When CCFLs get old and the electrodes start sputtering themselves onto the glass, they'll start drawing heavy current and fry the transformer or the mosfets. You could repair the inverter only for it to burn up again trying to power a bad CCFL tube.

You'll need to pull the LCD panel apart and look at the CCFL. If the ends of the tube are black, you need to replace it, or substitute in an LED backlight.
 
So, sounds like I now have a bad CCFL tube (yes, one end is black) AND a fried inverter board to deal with... great. Fortunately the inverter board should be easy to tackle since replacement parts (and replacement boards) are readily available, but finding the correct backlight tube could be a nightmare. I did see a thread on VOGONS where one guy modded his Contura 3/25 to use an LED strip for the backlight, but that seems too complex for my skill level.
 
Measure the CCFL tube and find a replacement of that size, then solder the old wires to the terminals. Shouldn’t be too difficult.
 
Measure the CCFL tube and find a replacement of that size, then solder the old wires to the terminals. Shouldn’t be too difficult.
That's some good news. The size of tube I need (6.4 in) are in abundance on eBay and other sites, and I know how to solder (poorly, but I successfully repaired my C64 a while back) so I'll go ahead and get some replacement tubes and a new inverter board ordered and will update.
 
The board might be repairable--you'll need to check out the components. I'd start with that output transistor.
Looks like the transistor burnt because the transformer melted, causing a short. I would start with the transformer - because if you can not figure out its specs, any further repair attempt makes no sense.
 
Finally got the replacement tubes in the mail today - still waiting on the inverter board but I'd like to make some progress at last.

I did take note that on the new tubes, one end is flat and the other is rounded (I assume the rounded end is negative since there's also a stripe there.) Also, the existing wires to solder are two different colors, and there are some colored dots on the inverter board connector. How can I tell which wire is positive and which is negative? Want to be 100% sure I don't get the polarity screwed up and burn out the new tube, blow up yet another inverter board or anything along those lines.
IMG_0495.JPG
 
Okay... good news and bad news.

Good news is that the new backlight and inverter board are working.

The BAD news - the right screen hinge broke on me! But that's not all, the display ribbon cable started shorting out as well. Upon close inspection I realized two of the contacts on the cable were bridged, causing a short. First tried cleaning the cable with alcohol, no dice. Then tried scraping off whatever was conducting power between the two contacts to no avail, and as a last resort simply sliced the cable (trying to the best of my ability to avoid cutting the wires themselves, which I failed at) between them. That resolved the shorting out problem but now the screen shows no data other than an occasional line on the screen - in other words, what I'm saying is the ribbon cable is shot. How can I go about finding a replacement for this? I'll attach a photo of the cable.

Not sure what I'll do about the broken hinge... at this point would I be better off just buying another Contura (when another one shows up on eBeh or wherever for a fair price) and creating the best possible unit with the parts between them?
IMG_0500.JPG
 
I also spy with my little eye some potentially leaking surface mount capacitors. May have to replace those.
 
I would get a set of electronic calipers (Believe me, these are life-savers.), and measure the pitch between loaded/filled positions on the flex cable. (The middle of one conductor/wire to the middle of another. This is going to be small, probably in the range of half-a-millimeter.) Then, measure the length of your cable along with the piece that you cut off. You should be able to find one online at Mouser electronics: https://www.mouser.com/c/wire-cable/ffc-fpc-jumper-cables/
 
Upon close inspection of all four of the SMT capacitors they actually look okay at the moment. I'll still get around to replacing them, but I want to get the ribbon cable and broken hinge sorted out first - because I'm confident the caps are not the source of my current display problem, and it does no good for me to risk destroying the motherboard if other issues are what is causing the computer to not function properly.

That's some good advice regarding finding a replacement ribbon cable. For the hinge repair, I enlisted my grandpa's help and we'll see what can be improvised using some longer screws, nuts and perhaps a metal backplate for additional support - it won't be the prettiest repair, but with any luck it'll at least work!
 
That's some good advice regarding finding a replacement ribbon cable. For the hinge repair, I enlisted my grandpa's help and we'll see what can be improvised using some longer screws, nuts and perhaps a metal backplate for additional support - it won't be the prettiest repair, but with any luck it'll at least work!

You can try potting the whole area where the hinge screws into in resin after you set the knurled inserts the hinge screws into. It makes a very strong repair, better than trying to superglue all of the tiny bots back together.
 
Until a few days ago this project of mine was put on hold, mainly because life gets in the way of everything fun... but here we are.

Wasn't really sure how to continue with this since my main help for the hinge repair (my grandpa) was out of state for much of the month, but I was browsing eBay recently and came across another Contura 3/25 for a reasonable price. Untested, but pretty much impulsively bought it figuring I could salvage the parts I needed from it... turns out, the opposite happened and the computer I originally started this thread about has become my parts machine. One thing I notice about the "new" unit is that the screen hinges are much looser off the bat, while the hinges on the first one I bought were somewhat stiff and creaky. I presume it got more use, especially since this one was also a little dirtier before I cleaned it. Although, I know the same thing WILL eventually happen and the plastic surrounding the hinges will snap again if I don't do anything, so are there any potential mitigation measures to make that less likely, at least for the time being?

Anyhow, I plugged it in using the power supply I got with the first one, and to my amazement it works perfectly - backlight and all, except for a dead HDD and CMOS battery. Unfortunately, my attempts to resurrect the HDD in this one were unsuccessful, but I was at least able to save its gasket and a couple screws to complete the other drive, which I installed into the "new" Contura. I might revisit trying to get this drive working at some point.

Have also noticed a couple other odds and ends with the second unit, namely that it has a different motherboard (at least the color is different) and when I opened it up I discovered that one of the four SMT capacitors wasn't even making contact with the board, yet there don't seem to be any ill effects. Note the SMT cap in the left side of the attached photo - that was rattling around inside the computer you see powered up. Should I be worried?

I suppose the first one I bought will be kept around just for parts... for obvious reasons I feel really bad about simply trashing it. I suppose if anyone needs a part for one of these systems, feel free to PM me.
 

Attachments

  • IMG_1263.JPG
    IMG_1263.JPG
    4.5 MB · Views: 12
Coat the area around the standoffs with some kind of plastics epoxy or just JB weld. Will keep them intact if you do it right. I have a couple of WinBook 486 laptops where the plastic where the hinges mount split off completely from the back housing. JB weld has held together for at least 30 hinge actuations so far and it’s solid. More is better here, as much as you reasonably can to relieve the most stress from the brittle plastic.
 
Back
Top