• Please review our updated Terms and Rules here
  • From now on we will require that a prefix is set for any items in the sales area. We have created regions and locations for this. We also require that you select a delivery option before posting your listing. This will hopefully help us streamline the things that get listed for sales here and help local people better advertise their items, especially for local only sales. New sales rules are also coming, so stay tuned.

Wanted Drive Rails for mounting FDD, HDD, etc. into case

Shadow Lord

Veteran Member
Joined
Jun 16, 2010
Messages
3,231
Location
California
Hello,

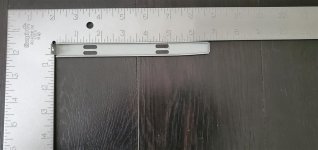
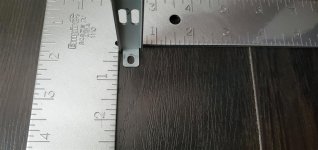
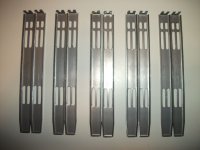
I am looking for a few pairs of drive rails to install drives into an AT tower. It seems like an easy enough item to find on eBay but I am having one heck of a time as my eBayfu is completely failing me. I need a minimum of three pairs and ideally five pairs but will take what I can get. Please see pictures for shape/design and sizes. TIA!

length.jpg

header.jpg
 
I can measure them, but the 5170 plastic ones look to be a bit too wide. The 5170 uses little metal clips that screw into the face that keep the plastic rails from sliding out, per your photo.
 
I can measure them, but the 5170 plastic ones look to be a bit too wide. The 5170 uses little metal clips that screw into the face that keep the plastic rails from sliding out, per your photo.

Yeah. If I can't find something already out there I may have to go out to the shop and socially distance myself for a weekend bending sheet metal and punching holes... ;)
 
I could probably 3D print a few of those if I had a bit more information about the dimensions.

I was thinking the same thing. I bumped into ShadowLord once before, so I know he's in my general area. I could probably print them and meet up, but I held off on offering that up because of coronavirus.
 
I was thinking the same thing. I bumped into ShadowLord once before, so I know he's in my general area. I could probably print them and meet up, but I held off on offering that up because of coronavirus.

Thanks guys for the offer. I may have the situation covered at this point. Out of curiosity how strong are the 3D printed stuff? Are they soft? Brittle? I have no experience with 3D printing at all but believe that it will become key in this hobby eventually once tools become easier to use....
 
Thanks guys for the offer. I may have the situation covered at this point. Out of curiosity how strong are the 3D printed stuff? Are they soft? Brittle? I have no experience with 3D printing at all but believe that it will become key in this hobby eventually once tools become easier to use....

More than strong enough to hold hard drives. I've made numerous items out of PLA, ABS and PETG which held far more weight than what drive sleds ever would. I've also made rubber parts with TPU to replace dry rotted rubber fittings, feet and vibration isolation mounts.

I don't often print with ABS anymore since PETG is becoming more common and cheaper. ABS is a pain to print because it requires high temperatures and an enclosure to prevent warping, which it loves to do.

PLA is also good and strong, but not suited for extended outdoor use since it is intolerant to high heat and sun exposure, which can make it warp and be brittle. It's also biodegradable, which makes it more eco friendly than ABS or PETG, which are common plastic pollutants. I've made computer brackets out of PLA which had no issue holding up large fan assemblies and radiators.

If you do want some 3D printed drive sleds, I'd need a few more measurements to get the thickness and hole spacing correct. I can print them out and mail them to you.
 
More than strong enough to hold hard drives. I've made numerous items out of PLA, ABS and PETG which held far more weight than what drive sleds ever would.

Yeah, seconding this sentiment. I only have experience with ABS since that's what my printer is designed for, but when it actually prints right it's pretty sturdy. You can also always increase the infill to make it sturdier in cases where something really needs to be sturdy but I've found it's usually not a problem. Overall, something printed with no warping and with the grains in the right direction is probably no worse than normal plastic for most uses.
 
Thanks for the info guys. How easy is it to use these printers? I guess the real question is more how easy is it to draw the 3D item to be printed? I know you can DL premade designs (e.g. rails for 5170 - see above) but what about something that is not out there? Any particular brands of printers that you guys like or are they all good enough now a days? i.e. If I got one from monoprice would it be good enough? TIA!
 
I'll echo the sentiments about 3D printer filament types already mentioned. PETG would be my choice as well, I have replaced ABS with it for most jobs.
You could use a regular CAD program but then you have to learn:
a) what shapes to pick off menus and
b) how to position, align, push, pull, prod, poke, pinch, stretch your geometric primitives and
c) possibly use a cloud-based app that will not guarentee your model will always be hosted.
That all takes some time.

Or, since you are on a vintage computer forum, you likely know something about programming. You can programmatically create CAD models for 3D printing with a tool like OpenSCAD.
Not only that, they are inherently parametric - ie. you define lengths, positions, radii and the like as variables. It's on Windows, Mac and Linux and open source so you are not going to have your model hostage to any app.

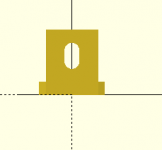
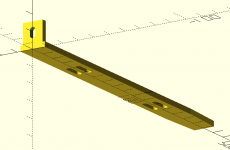
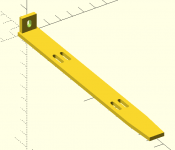
So, here is my basic take on the drive rail using OpenSCAD, from about an hour's doodling on a quiet Saturday morning. All measurements are just eyeballed from the two photos of the rail and are in imperial units as some people are more comfortable with those. There is plenty of room for improvement, such as a fillet between the base and the tab, or a recessed centre of the rail, or rounded corners. etc. etc.

After installing OpenSCAD (openscad.org) just paste in the following, press F5 to preview, and F6 to final render. Then press the STL button to output your model for the slicer. It's that simple.
In the slicer, the print would have the most layer strength if it were printed on its side, so the tab layers are incorporated into the rail base extrusion layers (ie. printer hot-end describes an L traversal).

Code:
// Drive rail thingy
// ALL MEASUREMENTS ARE APPROXIMATE - YOU PLUG IN THE EXACT ONES

FACETS = 100;
$fn = FACETS;

INCH = 25.4;

RAIL_LENGTH = 6.75 * INCH;
RAIL_WIDTH = 0.625 * INCH;
RAIL_THICK = 0.125 * INCH;
TAPER_WIDTH = 0.5 * INCH;
TAPER_START = 5.75 * INCH;

// Screw obround slot
SLOT_WIDTH = 0.125 * INCH;
SLOT_LENGTH = 0.5 * INCH;

// Slot positions
INTER_SLOT_GAP = 0.25 * INCH;
SLOT1_CENTRE_FROM_END = 1.5625 * INCH + SLOT_LENGTH/2;
SLOT2_CENTRE_FROM_END = 4.5625 * INCH + SLOT_LENGTH/2;

// Tab
TAB_HEIGHT = 0.625 * INCH;
TAB_WIDTH = 0.5 * INCH;
HOLE_WIDTH = 0.14 * INCH;
HOLE_LENGTH = 1/4 * INCH;

HOLE_CENTRE_FROM_BASE = 0.375 * INCH;

// Generate the model
DriveRail();

module DriveRail()
{
    HalfRail();
        mirror([0,1,0])
            HalfRail();
}

module HalfRail()
{
    linear_extrude(RAIL_THICK)
        HalfRailTemplate();
    HalfTab();
}

module HalfRailTemplate()
{
    railPoints = [ 
                    [0,0], 
                    [0, RAIL_WIDTH/2], 
                    [TAPER_START, RAIL_WIDTH/2],
                    [RAIL_LENGTH, TAPER_WIDTH/2],
                    [RAIL_LENGTH, 0]                
                 ];

    difference()
    {
        polygon(railPoints);
        // Obrounds
        translate([SLOT1_CENTRE_FROM_END, INTER_SLOT_GAP/2])
            Obround(SLOT_LENGTH, SLOT_WIDTH);
        translate([SLOT2_CENTRE_FROM_END, INTER_SLOT_GAP/2])
            Obround(SLOT_LENGTH, SLOT_WIDTH);
    }
}

module HalfTab()
{
    difference()
    {
        cube([RAIL_THICK, TAB_WIDTH/2, TAB_HEIGHT]);
        translate([0, 0, HOLE_CENTRE_FROM_BASE])
            rotate([0,90,0])
                linear_extrude(RAIL_THICK)
                    Obround(HOLE_LENGTH, HOLE_WIDTH);
    }
}

// obround: geometric racetrack (stadium) shape
module Obround(someLength, someWidth)
{
    square([someLength - someWidth, someWidth], center=true);
    translate([someLength / 2 - someWidth / 2, 0, 0])
        circle(r = someWidth / 2);
    translate([-someLength / 2 + someWidth / 2, 0, 0])
        circle(r = someWidth / 2);       
}

drive_rail_1.png drive_rail_2.png drive_rail_3.png drive_rail_4.png
 
Last edited:
Thanks for all the info and the examples guys. 3D Printing is definitely on a list of skills I would like to pickup. Unfortunately, for now I still have a few other things ahead on the list of to dos: learning to use and Oscilloscope, programming SQL, more electronics knowledge, more programming knowledge, more hands on tinkering... Too many interests not enough time. Plus I don't have a 3D printer at this time and it is far easier for me to just bend/punch sheet metal (easy access to a shop) but I think as more and more stuff breaks down/plastic falls apart a 3D printer is going to become essential in many hobbies...
 
Back
Top