• Please review our updated Terms and Rules here

WinBook 486SLC Laptop quit posting!

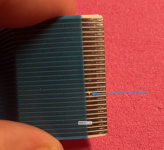
Sometimes the layers need to be exactly layered. If it happens again at the top where the layers meet, use some rubbing alcohol lightly to make sure that area is clean.
 
Also I’m wondering how I would use that conductive glue? Where should I put it to repair the keyboard?
 
You will need a multimeter and a sharp probe, and go down the matrix key by key, or use an magnifying glass to find any breaks and use the glue/paint to fill them.
 
Thanks for the info on this. I'm just wondering what the issue could be as I have already scrutinized the membrane and found no obvious damage. What makes me thing there isn't any physical damage like a break is that the F1 key just randomly worked once, yesterday! It's dead now, which makes me thing there's an intermittent connection somewhere. Nothing else could explain why it worked, didn't work, worked again once, then broke again. It's the same issue as my PS/Note keyboard, each time I'd unplug it and plug it back in, a different group of keys would start and stop working, but never all of them, and some never worked. I'll definitely do some multimeter probing though, I'd like to get to the bottom of this.
 
Do these contacts look abnormally dull to you?
52BF88B7-CA91-46AE-9F3B-E76761C74EF8.jpeg
No shininess at all. Both my PS/Note keyboard connectors look the same (working one included).
 
Aha! Found the break.
F35B74EE-1974-4E3A-8EBE-E0D359C6ECAB.jpeg
Bingo! How would I go about stripping back the protective coating to repair this without causing further damage? It's right where the cable was bent when sitting for 30+ years, I suppose being unbent after so long cracked it.
 
Last edited:
If the cable is strained and bent in that location, there's no real easy way to fix it.

I'd probably chop the bad bit out of the cable and connect both ends of the chopped cable with something like IDE ribbon cable. To deal with the width, you could double up the conductors and put splits in the cable to cover the rest of the distance.

You could also look around on Mouser or Digikey at their FFC stock and see if there's anything close you could use to replace the bad section.
 
Provided you superglue a support other side, that ink/goo I linked works great for repairing these cables. Other option is replacing the cable. You will need a small clamp to get that cable straight and glue down some plastic. Then scrape other side how you wish, and use that ink/goo taping each trace off only 1 exposed at a time. Use a pin or toothpicks to place a dot. Wait 20 mins for it to set and do next. Have had good luck with this method. If for some reason its too runny, leave a few drops on something plastic and wait 10 minutes and check on it, should be really thick. Try again then. Mines a few years old, and has gotten thicker with age. Just repaired a friends ZX Spectrum keyboard ribbon this way. 👍

Be patient take your time. You got this!


EDIT: This is the clamp I use... Just got another one free today thats really tiny, maybe 8" so they have smaller. (were out of the free microcloths) lol. Popsicle sticks work great, but whatever you have handy works too , even old school rounded hex pencils. Make sure the pressure is on the joint as much as possible. You want the glue to hold it stiff to the plastic on that break. Best advice I can give without creating a youtube video lol. Maybe I should stop being lazy and do that already.

 
Last edited:
Thanks for the guide you gave! What do you use personally to strip back the cable to access the actual tracks encased in the plastic?
 
thank you! I'll try out that method on my dead PS/Note keyboard that I don't need first, will have to pick up that conductive glue. Thank you so much for all of your help through this, I really hope I can make this WinBook into a happy little 486 again.
One last question: What do you use to insulate the cable after surgery?
 
Well, I finally ordered that glue stuff, shipping from china so it may be a while before I get it though.

And I also bought... another WinBook. I know, I know. It's a 486C2SX-25C model that's been on eBay for ages really cheap. Probably hasn't sold because: untested, cracking hinges, missing battery and cover, no AC adapter, and the weird socket makes a generic not available. That won't be an issue for me though and bad hinges are inevitable. Mine was perfect when I got it, only took 10 openings before it snapped. It should be faster than the SLC, and it's got a color screen, fancy! Mainly bought it for a parts keyboard if the repair plan falls through, would be nice to get it working though and have both models. Maybe I could become a WinBook historian haha!
 
I used conductive glue to repair a keyboard connector.
Because it is so simple to glue the wire next to it, smear this stuff nearly drove me insane.
I had to use a knife to scrape them apart.
 

Attachments

  • 微信图片_20230310095306.png
    微信图片_20230310095306.png
    1.6 MB · Views: 10
  • 微信图片_20230310095404.png
    微信图片_20230310095404.png
    750.5 KB · Views: 10
Why I recommended the masking tape approach, glad to see you were able to make do though with the same approach. :)
 
Take your time, make sure the paint/glue is dry before doing next connection. Should be able to do it in 3-4 passes if you cut the masking tape thin enough. Make sure to reinforce the other side with some superglue and plastic.
 
Main thing I worry about is scraping back the top layer of the ribbon to get the copper. Applying the glue should be fairly straightforward with a careful hand and masking tape as you said.
 
Back
Top