• Please review our updated Terms and Rules here

IBM 5151 Tilted Video

Lorne

Veteran Member
Joined
Jul 27, 2008
Messages
1,164
Location
Chandler, AZ, USA
I thought maybe I was going nuts and seeing things, but the more I look at it, the more it looks like the video is tilted down to the right.
I know there are vertical hold, vertical size, and vertical line controls I can adjust, but I don't know if that's the problem here.

Is this adjustable, or is there something wrong with the 5151?
Any ideas?

Tilted Video.JPG
 
I thought maybe I was going nuts and seeing things, but the more I look at it, the more it looks like the video is tilted down to the right.
I know there are vertical hold, vertical size, and vertical line controls I can adjust, but I don't know if that's the problem here.

Is this adjustable, or is there something wrong with the 5151?
Any ideas?

View attachment 2105

My guess is that it may be that the yoke (the big inductor around the neck of the CTR) is sligthly off. If you really like to live risky, you may open the screen and try to twist it back. As I say, this is only guessing, but it sounds logical to me.

*Edit*
See here: http://repairfaq.ece.drexel.edu/sam/monfaq.htm#montilt

My guess correspond to point number 7.
 
My guess is that it may be that the yoke (the big inductor around the neck of the CTR) is slightly off. If you really like to live risky, you may open the screen and try to twist it back. As I say, this is only guessing, but it sounds logical to me.

*Edit*
See here: http://repairfaq.ece.drexel.edu/sam/monfaq.htm#montilt

My guess correspond to point number 7.

I agree. I assembled a Heathkit monitor one time and had to mount and adjust the yoke as part of the assembly. It isn't hard to do. There should be a metal ring clamp with a screw through it that you loosen up before you can rotate the yoke. Also, be careful not to bump the focusing rings or knock off any little magnets that may be glued around the yoke area.
Awhile back I bought an H/Z 89 from eBay. I always inspect the inside of electronic equipment that has been shipped to me to check for hardware or components that may have been jarred loose in shipping before I apply power. I found the yoke had slipped about an inch toward the back of the tube. I also have a TRS-80 Model II with the same tilted display problem. Just haven't got around to correcting it
.
******Be advised that there are lethal voltages at the neck of the CRT, 400-600 volts!***** If you are not comfortable with making the adjustment, a repair shop should be able to do it for a small price.
 
3 tricks here...

1. Mark the starting point on the neck of the tube and on the plastic of the yoke. This way you know where you are starting from if you turn too much.

2. When facing the back of the monitor, turn the yoke OPPOSITE of what you see on the front. Remember, you are looking at the back of the tube. So if you need to rotate the image counter-clockwise, you turn it clockwise when looking from the back of the monitor. ;)

3. Do all this with the power off on the monitor. You don't have to tighten the yoke before powering it back on. Just turn it slightly then power it back up. When you get it set the way you want then tighten the screw back down.

Also, make sure you do NOT over tighten the screw when you clamp the yoke back down. You don't want to risk cracking the neck of the tube.
 
3. Do all this with the power off on the monitor. You don't have to tighten the yoke before powering it back on. Just turn it slightly then power it back up. When you get it set the way you want then tighten the screw back down..

I just put a rubber electrician's glove on my hand and have at it with power on. Keep the other hand in your back pocket. It's just easier that way.
 
3 tricks here...

1. Mark the starting point on the neck of the tube and on the plastic of the yoke. This way you know where you are starting from if you turn too much.
Who cares; you don't want to go back there anyway.

2. When facing the back of the monitor, turn the yoke OPPOSITE of what you see on the front. Remember, you are looking at the back of the tube. So if you need to rotate the image counter-clockwise, you turn it clockwise when looking from the back of the monitor. ;)
Huh??? Use a mirror!

3. Do all this with the power off on the monitor. You don't have to tighten the yoke before powering it back on. Just turn it slightly then power it back up. When you get it set the way you want then tighten the screw back down.
You really want to make it difficult; like Chuck says, a rubber glove's all you need

Also, make sure you do NOT over tighten the screw when you clamp the yoke back down. You don't want to risk cracking the neck of the tube.
Now _that_ I'll agree with.
 
Who cares; you don't want to go back there anyway.

If you turn it the wrong way, it's nice to know where the starting point was... Duh.

Huh??? Use a mirror!

If he has one handy. Who wants to carry it into the bathroom or bedroom to use a mirror on the wall?

You really want to make it difficult; like Chuck says, a rubber glove's all you need

If he's unsure about grabbing it with the power on, it's a valid point to make.

Now _that_ I'll agree with.

Well, at least you found SOMETHING nice/positive to say. :rolleyes::rolleyes::rolleyes:
 
Thanks for the tips/instructions guys.

I want to make sure I've got this right.

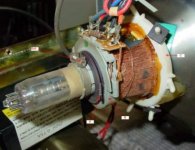
After I loosen the bolt, am I better off turning at point A, B or C on the photo below?
(And where is the high voltage that I want to try to avoid? Is that at all the copper windings?)

5151 adjustment.jpg

Edit: note the glob of silicon sealant below my note C.
Is that supposed to be there, or does this mean someone has messed with it before?
The sealant seems prety well stuck - I may have to cut it away, and then replace it if the yoke needs to turn very much.
 
Last edited:
Turn C

DO NOT TURN A. That's one of the rings that was mentioned earlier in the thread.

Also, it looks like there's some yellowed silicone at 5 o'clock on between the yoke and the tube (look at point C) that you'll need to remove or slice through.

RJ
 
If you turn it the wrong way, it's nice to know where the starting point was... Duh.
Well, if you *really* want it back the way it was, there's a nice picture up above to show you where it was; just turn it until it has just that right amount of tilt.
If he has one handy. Who wants to carry it into the bathroom or bedroom to use a mirror on the wall?
True enough; I didn't realize that there are folks like you who only have two mirrors in the house, one in the bathroom and one in the bedroom; some kind of superstition, is it?
If he's unsure about grabbing it with the power on, it's a valid point to make.
True enough, and adjusting it without seeing what you're doing just adds that extra bit of fun and challenge...
Well, at least you found SOMETHING nice/positive to say. :rolleyes::rolleyes::rolleyes:
I thought to use a mirror and a rubber glove *were* kinda positive suggestions...
:rolleyes::rolleyes::rolleyes:
 
Go Lorne!

De-yellowing cases is for wimps. Gloves, high voltages, delicate parts, masses of exposed copper wires. This is the thrill-seeking, adrenalin-charged edge of vintage computing!

If you live, let us know how it goes :D

(just kidding. Go for it. I have a screen a little similar so I'm interested in what happens)

Tez
Right on, Tez!!!

And *real* men don't use the rubber gloves!
 
Well, after all the tips and instructions, that was a piece of cake.
I used a rubber plasterers glove, put my left hand in my back pocket, had the power on, and didn't need a mirror. I just stood in front of the screen, and with the back half of the case off, reached over the top and turned the white plastic thing. That way I could see what was going on as I turned it. Then I tightened the bolt, and put some more silicon sealant on the tube to hold the new position in place.

And here's the result:

5151 adjusted.jpg

For any wise guys thinking of suggesting that it looks like it's tilted down to the left now, keep your comments to yourselves, and go see your optometrists.
I like it exactly the way it is.

Thanks guys for all the info on how to do this adjustment.
 
Back
Top