• Please review our updated Terms and Rules here

Removing Yellowing from Plastics - Part 4

Haven't tried this in a while, but I just realized I had questions if I were to do it again. Are you guys using the "Nappisan" only in that in a big bucket of water? I thought you needed peroxide.

I managed to clean some keys a while ago with it with extra strong peroxide and oxy cleaner. Discolored the letters, but the keys were good.


That is correct. Just simply add water. These 'oxy cleaners' of which Nappi-San is one particular brand, contain sodium percarbonate, which releases hydrogen peroxide when mixed with water.

I just purchased some generic 'oxy cleaner' from the supermarket. About $2.50 for a 1kg container. This one is stronger than 'Nappi-San' as it has 34.6% sodium percarbonate. The label also states 'equivalent to 4% W/W available oxygen' I would guess that it would equate to a 4% hydrogen peroxide solution when made up as directed (1 capfil in 7 litres water). Next time I will be trying 3 capfuls in 5 litres water and see how effective it is.
 
Ok, here is an experience with "Oxy-Magic" only (no H2O2). Oxy-magic is a laundry whitener that contains 35% sodium percarbonate.

I mixed 500g Oxy-Magic with 5 litres of warm water until most was dissolved then made up the volume to an estimated 15-20 litres with cold water (in a small plastic wheelbarrow). I then placed a Lisa Keyboard top panel into this mixture. The keyboard was weighed down with lots of blu-tack underneath so it stayed under the water.

There was a lot of foam after mixing. I skimmed most of this off so that light could get through to the keyboard under the water. I couldn't remove all of it though so a thin layer of foam on the surface remained

I then put the wheelbarrow and it's contents outside for about 8 hours. The day was partly cloudy so all up I reckon only about 4 hours full sunlight.

The results weren't too bad. Here are some before and after photos (no labelling required).

2011-01-10-lisa-keyboard-deyellow-before.jpg


2011-01-10-lisa-keyboard-deyellow-after.jpg


Considering that 500g of Oxy-Magic is about $NZ 4.50 (compared to $NZ 15 for 500 mls for H2O2) and there is no messy mixing or reapplying, it's a recipe I might use again!

Tez
 
Glad you got some pretty good results there, Tezza.

I was hoping to experiment some more with this too, but its been very grey and wet here the last few days.

Next time I have the top half of the VIC-20 case to try and a case from a 1970s digital clock, both badly yellowed.
I also have a slightly yellowed Amiga 4000 keyboard, to see how effective this is on less badly affected items.

I'll be using 250g of Oxy-cleaner in 5 litres of warm water, which is half as strong as my previous experiment. I'm also aiming for a bright sunny day with no clouds for a more consistent experiment.

Incidentally I did try half of the VIC-20 top in the strong mixture before, so I'll be able to compare for any other side effects on the plastic between strong and weak mixtures.
 
The sun has finally come out in flood-bound Australia, so its time to do some more experimentation.

The victims:

The top half of the VIC-20 case I had tried earlier:
VICBefore.jpg

The case from a 1970s digital clock:
ClockBefore.jpg

This time I used some generic laundry soaker, "Coles $mart buy napicare plus", which contains 34.6% sodium percarbonate.

I used 500g, or half the container, and dissolved it into 3L of hot water. Once dissolved it was added to 7L of cold water for a total of 10 litres. This is half as strong as my previous experiment. I made 10 litres because I was also doing two Amiga A4000 keyboards as well. I did not take pics of these as they were not badly yellowed. The 10 litres was split into two containers and put out in the bright summer sunshine at 11:30 AM. The foam on top was skimmed off. I did not remove it all as it does not seem to harm the process.

The VIC was put out first, Within 10 minutes, the yellowing had faded noticeably. After an hour it was about 75% gone. By the end of two hours it was almost all gone. At the end of the third hour it was removed and rinsed.

VICAfter.jpg

The clock was also put out at the same time. This had been the subject of a few previous experiments that were not entirely successful. Like the VIC, all traces of yellowing had gone by 3 hours.

ClockAfter.jpg

Next was the bottom of the VIC-20 case which was put out at 3:00 PM. I decided to give it another go as I had not completely removed the yellowing in the previous experiment. I also wanted it to have undergone a longer treatment than the top, to confirm a theory I have regarding 'blooming'. It was removed at 6:00 PM, and all remaining traces of yellowing had gone.

Blooming:

There was a fair amount of blooming on the VIC-20 top case and on the digital clock case. There was no blooming on the VIC-20 bottom case, or any of the Amiga keyboard items, which had been soaked in the same solution for the same time under the same sun.

In addition, the VIC-20 top case had a label on it which I removed before treatment. The plastic under the label had not yellowed at all. After treatment, there was no blooming where the label was.

VICLabelafter.jpg

Contrast has been enhanced to make it easier to see the difference between where the label was and the lighter (bloomed) remainder of the case.

My theory on blooming is that it is a result of damage caused to the surface of the plastic by many years of exposure to sunlight. The quality of the plastic may have something to do with it too. The VIC-20 bottom was exactly the same as the top except it (obviously) did not get exposure to direct sunlight, and it didn't bloom. People experimenting with Retr0brite had noticed it also occurred when too strong a mixture was used. Given that my results were so rapid, its quite likely that my mixture is too strong too.

Some people may have noticed some marks on the clock case near the rectangular flap. This was caused by a previous experiment where I tried dunking the case in the same solution used here in an ultrasonic cleaner. I ran it for 30 minutes. There was some reduction in yellowing, but no more than I got with a UV light for the same period of time. The blemishes were caused by the case rubbing against the bottom of the ultrasonic cleaner tank, and also where I scratched it with a fingernail, showing that the 'blooming' is porous and chalky.

There is no doubt that bright sunshine is the way to go for the best and fastest results. I had tried the clock with a UV light for 6 hours and the yellowing was only halved.
 
Last edited:
I was so impressed with the Lisa keyboards de-yellowing results using laundry whitener only, I wrote a blog entry on it. For those interested see:
http://www.classic-computers.org.nz/blog/2011-01-21-deyellowing-with-oxy-only.htm

If anyone can work out how much H2O2 is released into solution from a gram of sodium percarbonate it would be very useful for comparison with the published retr0bright recipies. I'm sure I could do this years ago, but I've kinda forgotton the mathematics involved. The reaction is shown here.

Tez
 
A few further thoughts on my experiment the other day.

The items that suffered from blooming showed faster results than the items that were not bloomed. Considering my theory that these items already have damaged surfaces from the sunlight that caused the yellowing, I suspect the damage is in the form of microscopic pits, cracks etc, which allows the solution to penetrate into these, causing a faster reaction....and a chalky finish.

The clock had a very matte surface before treatment. In fact the yellowing looked even darker if the plastic was wet.

In order to maximise UV light, I had used a shallow white plastic container, which helps reflect light through the solution better. The liquid level was also no more than 1cm above the surface of the item.

I believe the solution becomes spent after a period of time. In an earlier experiment using a UV light and a small container, I had de-yellowed an A4000 spacebar after about 4 or 5 hours. I then placed the clock case (mentioned in my post above) in this solution, but got very poor results after 3 hours. Replacing the solution then gave me about a 50% reduction of yellowing after 3 hours of UV light.

In my next experiments, once I get hold of some more severely yellowed plastic, I'm going to try masking off areas with a protective lacquer to see if it can be used to protect labels etc. I'm thinking of trying "Servisol protective circuit board lacquer" Jaycar Cat no. NA-1002. This can be removed after use with "Servisol Circuit board cleaner" Jaycar Cat no. NA1008.

I'll also be trying a weaker mixture, hopefully with plastic that may be prone to blooming, to see if blooming can be prevented.
 
Very interested in this stuff for yellowing white-vinegar won't budge. So just to add my thanks in advance to the OP really :)
 
I have just been to the supermarket, and was about to buy a jumbo container of a generic oxy-soaker which was on special, when something new caught my eye.

White King Oxy-Lift liquid gel, in a 1.1L bottle. Price $8.50.

I have never seen this before, so I bought a bottle. Upon investigation, the bottle contains a clear, colourless, thick gel. According to the label, it contains hydrogen peroxide, 59grams per litre. My rough estimate would be that it is equivalent to about 6%. Unlike the dry laundry soakers mentioned here previously that contain sodium percarbonate, this gel contains actual hydrogen peroxide. This is because sodium percarbonate can only exist in a dry form. When wet it becomes hydrogen peroxide and sodium carbonate. This product is so new, I failed to find it at all on the web, even on the manufacturer's website. However, it seems that there is also a gel version of Nappisan. http://www.vanishstains.com.au/product.php?id=4

I don't know if this gel contains TAED. If it does I would have guessed the shelf-life would have been non-existent. (according to my bottle, it expires in June 2012).

Tomorrow, I'll give it a try, using it just like the Retr0brite gel.
 
It sounds unusual to find a product for sale so new the manufacturer's web department yet haven't catched up unless they have a purposedly neglected website of course. Good luck in using the gel, and the rest of us across the world could start looking for similar products.
 
I've done some de-yellowing over the past couple of months.

Using the Retr0bright gel on a microwave oven door, I eventually saw what has been described as 'blooming' appear (just like the photo at the Retr0bright web site). I just continued with the process and that 'blooming' disappeared.

I tried the "generic oxy cleaner from a supermarket" on many items. It works. A badly yellowed Microsoft mouse is now as good as the day it was bought. I found it to be significantly slower than using Retr0bright gel, but it does work.

I also saw 'blooming' on some items that I processed in a bath of generic oxy cleaner. Continuing the process fixed/reduced that.

At one point, I left a CD-ROM case and keyboard keys sitting in a bath of generic oxy cleaner for too long. Both items now have a slightly damaged surface although it is only apparent when light reflects off the plastic at certain angles. After the items had been thoroughly rinsed then left to dry, a white powder formed in small quantities on some parts of the plastic (on both case and keys).
 
Here are my results from trying the new 'White King Oxy-Lift liquid gel'

I had four items under test:
2x computer drive bay covers, both identically yellowed.
1x A1060 Sidecar front panel, very slightly yellowed.
1x VIC-20 top panel, moderately yellowed.

As I was unsure if the new gel contained TAED, I decided to use the two identical covers as a comparision of the gel with and without TAED.

One panel was treated with the gel straight from the bottle. For the other panel, and all other items, I mixed 1 teaspoon of laundry whitener powder in 1 teaspoon of water in an old teacup. Then I added the gel until the cup was half full. I used two separate paint brushes to apply the gel to the items to avoid mixing. Incidentally, the gel is a clear light blue colour. Apart from the colour, it looks and feels very much like a 'personal lubricant' <ahem>

The items were all put out at 11:00 AM on a hot, sunny day. Temperature was 31C. Due to the hot, dry conditions, I found I had to reapply the gel every 5-10 minutes to avoid it drying out. I must confess it was a bit of a chore.
At 1:00PM the items looked ready, so I brought them in. By then the temperature was 33C. The items were rinsed and cleaned, and the masking tape I used to blank off areas for comparison was removed.

The results:

The computer blanking plates:
Comparison.jpg

Unfortunately the masking tape did not do its job very well, but the comparison of treated and untreated areas can still be easily seen. Its interesting to note that the gel appears to work just as well without the added laundry booster, so either the gel already contains TAED, or, the Aussie sun is so strong it works just as well without.
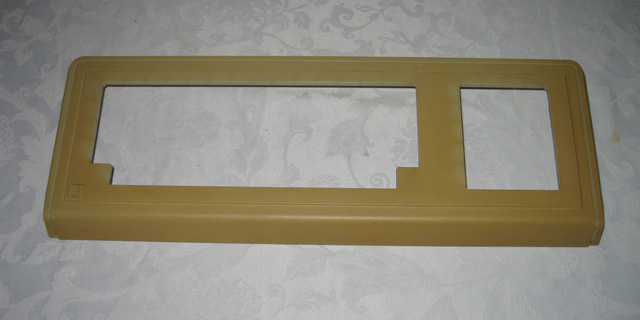
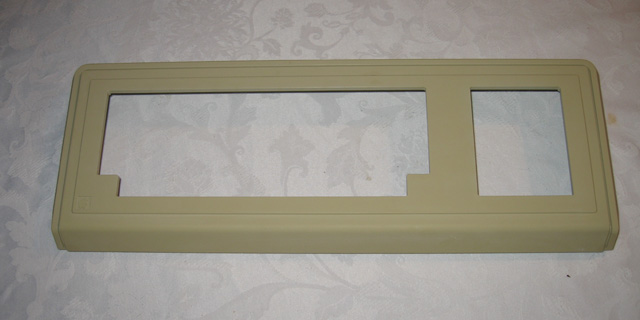
The VIC-20 case:
VICtop.jpg

For comparison purposes, this was treated on the right hand side only. The plastic appears to be the same as in the other VIC case I tried last time, except that the yellowing was not as bad. Nearly all the yellowing was gone after the 2 hour treatment. There were no signs of 'blooming'. One interesting thing I noted was that this VIC case was slightly yellowed underneath, something I did not notice until I rinsed it afterwards, and noticed that some of the gel had run inside. Even though there was little sunlight there, the gel still removed this slight yellowing. See below:

VICunderneath.jpg

I did not take pics of the A1060 Sidecar front as it was very slightly yellowed and the comparison would have been hard to see. What yellowing that was there was removed, and there was no blooming.

From the results here, I consider the gel to be successful, and an ideal substitute for the brush-on version of Retr0brite.

My personal preference is still for submerging the item in a bath of dissolved laundry whitener, due mainly to the nuisance of having to reapply so often during a hot Aussie day. However, it is a good method for large items, or on a cooler day.


Oh...and I almost forgot. The old teacup, which was heavily stained with tea residue, and was almost impossible to clean, is now sparkling clean!
 
Last edited:
Mac 512K

Mac 512K

Just de-yellowed a few bits (front & battery cover) on my first ever Apple product - a Mac 512K.

It's actually the first time I've ever had anything to do with a Mac. Now if only someone could tell me how to get the disk out (there's no eject button - is there supposed to be?).

I managed to get it back to the original color as can be seen when looking at the battery cover, and the two areas to the left that were under the metal Apple & 512K plates.

Mac 512K - battery cover.JPGMac 512K.JPG

I used the original liquid formula but reduced the H2O2 from 30% to about 15%.
This took a total of three hours, which I thought was pretty good seeing as it was very yellowed.
There was no "blooming" or blotchiness, which is what I was afraid of when I started, seeing as beige had previously been tough to de-yellow properly. This one was no problem at all.
 
As far as I know, the Mac only has software eject. That is you drag the disk icon to the trashcan, and out the floppy disk comes. Probably a talented programmer could make an overlay that will eject the disk whenever a key on the keyboard is pushed too, but no mechanical button. The same goes for some CD-ROM drives by the way.
 
As far as I know, the Mac only has software eject. That is you drag the disk icon to the trashcan, and out the floppy disk comes. Probably a talented programmer could make an overlay that will eject the disk whenever a key on the keyboard is pushed too, but no mechanical button. The same goes for some CD-ROM drives by the way.

If it's very much like the Lisa 400k drives I've been playing around with (and I think it is), once the drive is out of the case, you can push on the front right hand side of the eject assembly and it should pop up (and the disk out).

The Mac itself should spit it out if it can't boot from it. It it doesn't, it's likely the eject assembly is gummed up (a very common problem with these drives). It just needs some disassembly and cleaning off of the hardened gunk from the various movable bits.

There is a website or two on this fix, but I don't have the URL on me right now.

Tez
 
Now if only someone could tell me how to get the disk out (there's no eject button - is there supposed to be?).

see if there is a small hole on the right side of the disk opening.
if so straighten part of a 2" (50mm) paper clip and push into the hole. This may take a bit of force (why you need large paper clip as normal size is too weak)
From memory.. the push pad is only 10mm in.. so if paper clip goes further than that, then you have missed it

I'm not sure about the early Mac, but these holes don't exist in the 400K 3.5 inch Lisa drives. Are you sure they weren't a feature only of the later 800k drives and 1.44 MB ones?

Tez
 
Interesting.

The Lisa drive has no such hole and there is no hole in the plastic casing either. Mind you it is a piece of cake to pop the front off a Lisa. The same cannot be said for a baby Mac!

Tez
 
The eject mechanism was pretty gummed up, so I took it apart and lubed it.
The paper clip and the software eject both work fine now.

Tezza: the Lisa link you sent me seems to show an eject button on the Lisa drive, which the 512K Mac doesn't have. The eject lever is hidden behind the case, and is only accessible though the hole.
 
Back
Top