• Please review our updated Terms and Rules here

The TRS-80 4 experience - Getting it working

Frank S

Experienced Member
Joined
Mar 31, 2013
Messages
271
Location
Germany
Hello ,
yesterday my first TRS-80 was delivered from the Netherlands.
It is manufactured by Matra-Tandy in France. The serial number is pretty low (121).
First i take it apart, to see if there any parts flying around inside.
The lower drive is a Texas Peripheral, the upper drive a TEAC FD-55A.
After switching on i get a "Diskette" prompt on the screen.
Both drives are not able to boot the TRS-80.
Using a known good drive, it boot immediately and i get a Scripsit menu on the screen.
Pressing the "d" key, nothing happends.
Pressing the key a few hundred times, suddenly i get a directory of the disk.
After a few hundred keypressings to exit to the OS, i had to find out that all other keys doesn't work.
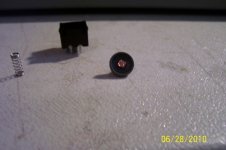
So i solder out on keyswitch to discover what is wrong with it.
The keyswitches are the newer ones from Alps, which have a spring to actuate the rubbercup.
All parts of the keyswitches are slightly oily. Someone in the past thinking it is good for the keyboard.:sarcasm:
Then i decided to take all of them apart, to degrease all the parts and see what happens.
Frank
image0005.jpg image0001.jpg image0002.jpg image0003.jpg image0004.jpg
 
Last edited:
I hope all goes well!
My first TRS-80 (which was a model III) I also took apart the entire keyboard and cleaned it all out as-well.
It was because I got it and keys started to not respond after doing nothing. So I figured instead of just cleaning the keys that went bad I would do them all.
I also repainted the metal plate that's under the keys because I scratched it removing some keys.
I know for mine it was quite a bit of work to get all the key's ohms down so I hope yours goes more smoothly then mine did.
Good luck!
 
Thanks for wishing me luck for "low-res"of the switches.-;)
Yes, it is a Weller VP801EC desoldering station.
It takes me about 30 minutes to desolder all switches without destroying something.
In the meantime i wash all parts in a hot (70°C) concentrated dishwasher solution to degrease everything.
At the moment i dry all parts with compressed air.
I wonder why the little nipples on the contakt plates have so many colours.
It seems that the switches which are used not so often have red "nipples".
But there also ones, that are greenish. The ones are often used are almost silver or grey.
Frank
 
Last edited:
What I did with my Model 4 and Model III was put copper tape onto the bottom of what you call "nipples" I used super glue to hold in place. You must be careful to cut copper tape to right size and just a tiny drop of supper glue. All keys worked great! And that was more than 3 years ago. See picture
 

Attachments

  • M4_key.jpg
    M4_key.jpg
    66.7 KB · Views: 1
Hello Frank,
with "nipples" i mean the little "drops" which are one the contact surfaces on the bottom of the switch.
I measure the resistance of the rubber cups, all are good after degreasing.
A light scrub with a rust eraser (don't know the exact english word) made the contact surfaces conducting again.
All switches are under 130Ohm now. Over the half of them has 90Ohm or less.
Frank
 
Last edited:
After completing the TRS-80 4 with two NOS TEAC FD-55B drives and the HxC-SD floppy emulator all is working fine.
All keys on the keyboard are responding very well.
With the switch nearby the HxC modul i can switch the first drive (HxC or FD-55B).
Frank
image0002.jpg image0001.jpg
 
That's really slick. I'd be tempted to put the two floppy drives in the top bay and the floppy emulator and a FreHD in the bottom.

g.
 
Hello Gene,
on first try i want arrange the two real floppy drives in the upper bay.
That is impossible with the TEACs. The latches from the drive collides with the frame on the the upper and the lower edge.
I do not want to modify the casing.
Frank
 
On the TEAC drives the power cable sticks straight out. On the older drives the power cables were plugged into the bottom of the floppy drive control board. I used TEACs a while back and had to cut the back of the plastic mount to use them so they could be pushed in further into the case & the lever would not interfere with being able to remove the case top. But if it's a newer Model 4 it may have a metal drive mount. And may be out of luck.
 
Hello Gene,
on first try i want arrange the two real floppy drives in the upper bay.
That is impossible with the TEACs. The latches from the drive collides with the frame on the the upper and the lower edge.
I do not want to modify the casing.
Frank

Well rats. That would have made a neat looking mod. My M4 still has the original full height drives in it. I haven't had a chance to get my FreHD even assembled yet...

g.
 
That's a nice HxC SD floppy emulator mod ... you should post a few photos on the HxC forum (http://torlus.com/floppy/forum/viewforum.php?f=26) and show it off! ;)

How did you wire-up the HxC? Are both the drives and the HxC connected to the original internal floppy cable (with an additional plug added for the HxC of course)? Does the switch simply swap the power between the HxC and one of the floppy drives to ensure that only one of them are active?
 
Here it is.:cool:
The two real drives and the HxC are all on the floppy cable and have permanent power.
With the switch i assign the driveselect line 0 to the HxC or the TEAC drive.
Frank
drivesel.JPG
 
Last edited:
Back
Top