• Please review our updated Terms and Rules here

RAM Question: Reviving early 5150 MB from the dead

So, I think you should wait to see what happens in the SuperSoft diagnostics after all socketed RAM has been replaced.

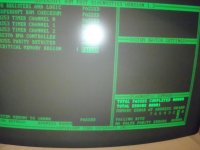
I replaced all socketed RAM with RAM removed from a motherboard that booted with no errors. I seem to be back at square one:
16k critical memory failure
error at address 5040
Failing bit 5 (it was originally 2, but we determined through probing that both 2 and 5 had incorrect readings)

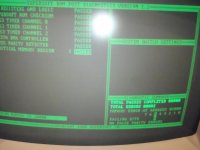
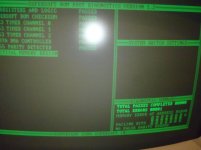
as it proceeds to test "system memory to 10000", I still get the error at address 0c00 but now it is bit 5. Photos of errors below.
P9240287.jpgP9240288.jpg
 
Last edited:
Considering that banks 1 to 3 are not required for the IBM 5150 BIOS to at least beep and produce on-screen video, I decided to see (partially for my own curiousity) how the SuperSoft diagnostics would deal with a 16-64K motherboard that had those banks depopulated:

* An incorrect indication that the 16K CRITICAL MEMORY REGION test failed.
* In the bottom-right corner of the screen, the diagnostics indicating a RAM fault at address 4000.

Address 4000 is 16 K. That is what I expected. The diagnostics tested the first bank good, and then failed when the (non-existant) second bank was tested.

Unfortunately, the diagostics would not progress past that point.

With my banks 1-3 depopulated, I get:
16K Critical memory failure
the error at address 5040 (still)
Bits 1-7 failed

When it tests "system memory to 10000", I then get the error at address 4000. Photo of the 16K critical memory test error below. I believe that my problem is deeper than faulty RAM.

P9240289.jpg
 
with all socketed RAM removed, my diode mode readings are:

Bad board with DMM black lead connected to power supply and probing pins with red lead:
- between MD0 and +5V-------> nothing
- between MD1 and +5V-------> nothing
- between MD2 and +5V-------> 1.551v
- between MD3 and +5V-------> nothing
- between MD4 and +5V-------> nothing
- between MD5 and +5V-------> nothing
- between MD6 and +5V-------> nothing
- between MD7 and +5V-------> nothing
 
This is driving me CRAZY!!! I swapped the RAM back in that originally passed the 16K critical test and I get the following:
16K critical memory - failed
error at address 8000
failing bit 4

The memory to 10000 now passes!!! I will try swapping the 32k chip but I think I am chasing my tail!
 
This is driving me CRAZY!!! I swapped the RAM back in that originally passed the 16K critical test and I get the following:
16K critical memory - failed
error at address 8000
failing bit 4

The memory to 10000 now passes!!! I will try swapping the 32k chip but I think I am chasing my tail!

I swapped bit 4 in bank 2 and now the "16K critical memory" passes as well as the "system memory to 10000". I get an error on "memory refresh", but again it comes with no error address or faulty bits.

I know that when it comes to the "slow refresh" test which comes after the "system memory to 10000" test, this test is not useful on a disabled computer... however, it is the only test that gives me errors and they are consistent: always faulty bit 1, error address at: 400, 401, 411, or 491. Parity error at 8000.

I have swapped bit 1 in banks 1-3, I have swapped the 32K chip numerous times, and piggy backed bits 0, 1, and 2 in bank 0. nothing changes these errors. Perhaps I can do more chip swaps tomorrow.
 
A set of known good RAMs should be sufficient, no need to swap them.

The readings could also be caused by tolerances in the good chips.
It's still strange that the error bit corellates somewhat with the readings. Could you try to piggy-back U12?
 
A set of known good RAMs should be sufficient, no need to swap them.

The readings could also be caused by tolerances in the good chips.
It's still strange that the error bit corellates somewhat with the readings. Could you try to piggy-back U12?

I will give that a go this evening. Thanks for the advice!
 
A set of known good RAMs should be sufficient, no need to swap them.

The readings could also be caused by tolerances in the good chips.
It's still strange that the error bit corellates somewhat with the readings. Could you try to piggy-back U12?

I piggy backed the U12 (LS245) and it did not help.
SuperSoft results are:
16K Critical Memory = passed
Memory Refresh = failed (no error address or failing bits provided)
System Memory to 10000 = passed
Slow Refresh = failed (error at address 0401, failing bit 1, parity error at 8000)... as stated earlier, slow refresh fails when you have unresolved RAM errors so these readings may be useless..

Now I am thinking that piggy backing would work to bridge an "open" fault by restoring the connection, but probably would not work in an instance of a short... wouldn't the leaking voltage in MD2 indicate a short vs. an open fault?

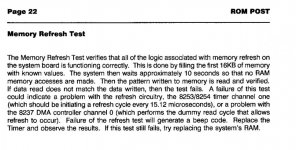
UPDATE: The SuperSoft user's manual states that the Memory Refresh error is likely related to the timer or the DMA controller. It recommends replacing the Timer... see screen grab below. Considering all that has been done so far, does this seem logical?

MR.jpg

Update to my update: My Olivetti clone that I cannibalize for chips does not have an 8253 or an 8237...

Update to the updated update: I have both an 8253 and 8237 in my spare parts kit
 
Last edited:
Update to my update: My Olivetti clone that I cannibalize for chips does not have an 8253 or an 8237...

That's because it is a completely different design: 8MHz 8086, used a different crystal, etc.

I am following this thread with interest. I would have lost patience long past this point and sold or cannibalized the motherboard.
 
Replacing the timer / DMA controller is worth a shot. They are a real pain to desolder; If you rush it and try to pry them out you will lose tracks. Take your time and install some sockets while your at it; that way if you need to remove them again its 1000x easier.

Also you are correct re piggybacking chips. It only works for an 'floating / open' fault. If say the logic is damaged and is holding a certain pin low at all times the piggybacked chip will not be able to pull it high. This is where you need a clip on logic analyzer - it mirrors the inputs of the chip under test onto another known good chip. If any of the outputs differ it will indicate a fault via a series of LED's.
 
Last edited:
That's because it is a completely different design: 8MHz 8086, used a different crystal, etc.

I am following this thread with interest. I would have lost patience long past this point and sold or cannibalized the motherboard.

MB date code is 8136 making it an August/September 1981 board. I have so far been able to overcome any desire to throw it at the wall. Sometimes it takes a village to raise a motherboard. If any village can do it, this one can!

UPDATE: It passed Memory Refresh 3 times earlier, but always locked up immediately after when it got to "Hot Interrupt". I also saw out of place characters and on the screen and it froze up many times. It then began to give CPU/Logic errors and would not boot with the Supersoft at all. I removed and re-seated the 8088 and all is well again... well, it is not exactly well, but is back to the current norm:

16K Critical Memory = passed
Memory Refresh = failed (no error address or failing bits provided)
System Memory to 10000 = passed
Slow Refresh = failed (error at address 0401, failing bit 1, parity error at 8000)
 
Major breakthrough???

I piggy backed the 8253... no change in errors, everything reported exactly the same...

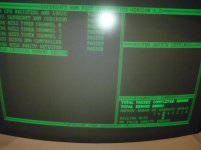
I piggy-backed the 8237 and the 16K Critical Memory fails: address 5040 bit 4.. it skips the Memory Refresh... System Memory to 10000 passes, then Slow Memory Refresh has the same errors reported earlier except the address is 0400 instread of 0401..

I can replicate this pattern repeatedly. When I remove the 8237, the same behavior/errors reported in my previous reply appear. When I re-install the piggy-back, it behaves as listed above.

5040 is the very first error address reported in #1 of this thread (but it was bit 2 instead of bit 4).

It's almost like I'm back to square one... hmmmmmm... what should I try next?

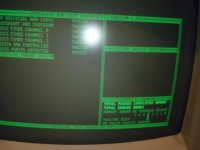
Update: Photos of errors with the 8237 piggy-backed below. I also have since experienced the 16K Critical Memory passing and returning to the previous error pattern even with the 8237 piggy-backed.
P9240290.jpgP9240291.jpg
 
Last edited:
If i let it run multiplepasses using thr SuperSoft ROM, i eventually get a 16k critical RAM failure. The failing bits are always 1,3,5, and 7. I just keep swapping RAM with no change in behavior.. what is the definition of insanity? I just dont know what to try next. Any advice?

I may head to Radio Shack tomorrow to get some chip sockets. I am thinking I might socket all of Bank 0 and the 8237.
 
Last edited:
"Sometimes it's just kinder to turn off the life support system."

I have a faulty 5170 motherboard that I have not looked at in years. It belongs to a friend. It was affected by a leaking battery, and initially, bridging an open circuit track got it fully functional. But then things degraded. I suspect that the battery leakage has worked itself into some of the chips. Even with a logic analyser, I can see that it is doing some really strange things. I have replaced many chips and spent many hours on it. There is a part of me that says, "I am not going to let this motherboard beat me", but unfortunately, me winning could be when nearly every single chip has been replaced. I may end up 'letting it go'.
 
"Sometimes it's just kinder to turn off the life support system."

but it's an 8136.... the world needs it to live! I need it to live! Time for blind chip swapping!

Now I need advice on the best de-soldering techniques... I have been using de-soldering braid which works well, but is VERY time consuming. I have used squeeze bulbs with poor results. Perhaps its my technique with either that slows me down or produces poor results. Can anyone tell me their best method/technique? Should I start a new thread for this? I admit I haven't searched old threads yet and will try that next.
 
I have a faulty 5170 motherboard that I have not looked at in years. It belongs to a friend. It was affected by a leaking battery, and initially, bridging an open circuit track got it fully functional. But then things degraded. I suspect that the battery leakage has worked itself into some of the chips.
What about the traces between the layers? Couldn't the leakage have done some damage there?
 
... Now I need advice on the best de-soldering techniques... Can anyone tell me their best method/technique?
I use a vacuum cleaner; a length of 1/4" ID vinyl tubing stuffed into the vacuum's port or hose with a rag to seal it and a 6" length of 1/4" OD aluminum tubing from a hobby shop plugged into the other end. If you're worried about static electricity connect a jumper between the tubing and the ground plane of the board being worked on.

Or you could buy a desoldering station...
 
Or you could buy a desoldering station...

I've been looking at desoldering stations with a vacuum pump, but the dual use solder/desolder stations seem to just have a hot air gun... no vacuum or anything. I would assume that they only work on surface mount chips or work with desoldering braid? how do they work if they have no pump or vacuum?

does anyone have experience with an affordable desoldering station that they would recommend?
 
Last edited:
I've been looking at desoldering stations with a vacuum pump, but the dual use solder/desolder stations seem to just have a hot air gun... no vacuum or anything. I would assume that they work with desoldering braid? how do they work if they have no pump or vacuum?
Usually with a solder sucker:

https://www.sparkfun.com/products/82

I do use the heat gun in my hot air/soldering pencil combo, but with the vacuum cleaner kludge; a $20 'embossing pencil' also works well, especially if you put a little shroud on it to focus the heat a little better:

https://www.sparkfun.com/news/228

There are true vacuum desoldering stations, but they do tend to be a little pricey...
 
Last edited:
There are 40W desoldering irons on eBay for around $20--basically a pump-type desoldering tool interfaced with a hollow-tipped soldering iron. If you keep the tip tinned and clean, they work pretty well.
 
Back
Top