giobbi
Veteran Member
Hi all,
maybe not the most useful guide in the universe, but it would help some Zenith Supersport owners with a broken hard disk and/or controller.
I'm referring to the 8088 model, but it could work for later models (286).
The HDD used in those machine has an XT-IDE (8 bit IDE) architecture, plugged into a controller card by a small, flat cable for both power and data. Since this drives aren't common, you won't probably find any replacement for it. So, the easiest way is to replace the broken HDD with a 2nd FDD (or, if you can't find any suitable FDD for replacement, simply using it with just one FDD).
Find a suitable FDD
You need an FDD that can be jumpered to supply a valid READY signal on the pin 34. The model that worked for me (thanks to Chuck(G) for the help) is the Samsung SFD-321B 1.44M drive. Other may work too. I didn't try without this mod; please let me know if you have some success with factory standard FDD too.
Open the drive, remove the DC jumper and put a jumper into the RDY (or RY) jumper.
NOTE: if you're replacing the original A: drive, you should set it as DS0 drive (they usually come as DS1). Or, maybe, you can use a twist cable (I didn't test it as DS1).
If you're adding it as B: drive, leave it as DS1 (or, if it's already DS0, you can opt for a twist cable, as I did).
(Lotharek FDD emulator could work fine; I ordered one but I didn't receive it yet so I can't say).
Remove the HDD
Open the machine (quite easy, I will not explain this part... if you have some doubt, youtube has some guides for that), remove the HDD *and* the HDD controller. It is the small card behind the keyboard.
Add an FDD connector
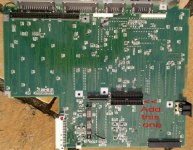
Probably your machine lacks the 2nd FDD connector. You can't use one flat, three connectors cable like desktop PC; but you can see there's a place on the mainboard for a 2nd FDD connector behind the present one. Take a spare connector (you can rip it off from an old, broken PC motherboard) and solder it. Look at the picture.

Zenith Supersport needs the drive A: is set as DS0 (disk 0) while the drive B: is set as DS1 (disk 1). I've read somewhere it will not work with twist cable, but I can confirm it will work with a drive B: set as DS0 and a twist cable. I suppose it will work also with a drive A: set as DS1 and twist cable.
IMPORTANT NOTE IF YOU PLANNED TO CHANGE THE ORIGINAL FFD (DRIVE A") TOO: The existing flat cable for the original drive A: had the plastic guide on the connector (the one that helps you to put the connector in the right way) inverted. I didn't notice it, so I was inserting the flat cable with inverted polarity...
TOO: The existing flat cable for the original drive A: had the plastic guide on the connector (the one that helps you to put the connector in the right way) inverted. I didn't notice it, so I was inserting the flat cable with inverted polarity...
Disable the HDD
Before mounting the mainboard back into the case, remove the 11D eprom. It's a 64k eprom; it may be labeled as HB20B V 2.4. This should avoid the HDD search during the boot.
Setup the switches
Basically there are two setting you can choose from:
1) One FDD only: 1 = ON , 7 = ON , 8 = ON.
2) Two FDDs : 1 = OFF, 7 = OFF, 8 = ON.
Don't touch the other switches
Here you can find more infos about it: http://terminus.tzo.com/zds/switches.htm
Hopefully, it should be enough! Note that even if you're using 1.44 MB drive, the computer won't recognize 1.44 MB floppy disk; 720 KB only. More: I don't know why, but if will format 360 KB only. I tried with DOS 6.22 using the /f:720 parameter: no way. So you need to format floppies from another computer.
If you're using 1.44 MB floppies, remember to cover the size hole with some tape (not the write protection; the other one). Since some FDD could use opto instead of mechanical switches, it's better to cover it with black tape (or at least not the transparent one).
Everything I explained here was tested in my Zenith Supersport; but please let me know if there's something wrong in this small guide, if some section aren't clear of if you need more pictures ...and sorry for my deprecable english!
-- Giovi
maybe not the most useful guide in the universe, but it would help some Zenith Supersport owners with a broken hard disk and/or controller.
I'm referring to the 8088 model, but it could work for later models (286).
The HDD used in those machine has an XT-IDE (8 bit IDE) architecture, plugged into a controller card by a small, flat cable for both power and data. Since this drives aren't common, you won't probably find any replacement for it. So, the easiest way is to replace the broken HDD with a 2nd FDD (or, if you can't find any suitable FDD for replacement, simply using it with just one FDD).
Find a suitable FDD
You need an FDD that can be jumpered to supply a valid READY signal on the pin 34. The model that worked for me (thanks to Chuck(G) for the help) is the Samsung SFD-321B 1.44M drive. Other may work too. I didn't try without this mod; please let me know if you have some success with factory standard FDD too.
Open the drive, remove the DC jumper and put a jumper into the RDY (or RY) jumper.
NOTE: if you're replacing the original A: drive, you should set it as DS0 drive (they usually come as DS1). Or, maybe, you can use a twist cable (I didn't test it as DS1).
If you're adding it as B: drive, leave it as DS1 (or, if it's already DS0, you can opt for a twist cable, as I did).
(Lotharek FDD emulator could work fine; I ordered one but I didn't receive it yet so I can't say).
Remove the HDD
Open the machine (quite easy, I will not explain this part... if you have some doubt, youtube has some guides for that), remove the HDD *and* the HDD controller. It is the small card behind the keyboard.
Add an FDD connector
Probably your machine lacks the 2nd FDD connector. You can't use one flat, three connectors cable like desktop PC; but you can see there's a place on the mainboard for a 2nd FDD connector behind the present one. Take a spare connector (you can rip it off from an old, broken PC motherboard) and solder it. Look at the picture.
Zenith Supersport needs the drive A: is set as DS0 (disk 0) while the drive B: is set as DS1 (disk 1). I've read somewhere it will not work with twist cable, but I can confirm it will work with a drive B: set as DS0 and a twist cable. I suppose it will work also with a drive A: set as DS1 and twist cable.
IMPORTANT NOTE IF YOU PLANNED TO CHANGE THE ORIGINAL FFD (DRIVE A
TOO: The existing flat cable for the original drive A: had the plastic guide on the connector (the one that helps you to put the connector in the right way) inverted. I didn't notice it, so I was inserting the flat cable with inverted polarity... Disable the HDD
Before mounting the mainboard back into the case, remove the 11D eprom. It's a 64k eprom; it may be labeled as HB20B V 2.4. This should avoid the HDD search during the boot.
Setup the switches
Basically there are two setting you can choose from:
1) One FDD only: 1 = ON , 7 = ON , 8 = ON.
2) Two FDDs : 1 = OFF, 7 = OFF, 8 = ON.
Don't touch the other switches
Here you can find more infos about it: http://terminus.tzo.com/zds/switches.htm
Hopefully, it should be enough! Note that even if you're using 1.44 MB drive, the computer won't recognize 1.44 MB floppy disk; 720 KB only. More: I don't know why, but if will format 360 KB only. I tried with DOS 6.22 using the /f:720 parameter: no way. So you need to format floppies from another computer.
If you're using 1.44 MB floppies, remember to cover the size hole with some tape (not the write protection; the other one). Since some FDD could use opto instead of mechanical switches, it's better to cover it with black tape (or at least not the transparent one).
Everything I explained here was tested in my Zenith Supersport; but please let me know if there's something wrong in this small guide, if some section aren't clear of if you need more pictures ...and sorry for my deprecable english!
-- Giovi