• Please review our updated Terms and Rules here

IBM 5150 w/Expansion Unit 1801 post on Boot

What is the Power Good reading now ?, With nothing connected to the PSU, Previously it was way too high,
Information:
- A TTL gate cannot generate a logic HIGH of +15V, and so that was sure to be a miss-measurement.
- The POWER GOOD signal generated by the PSU is not used at all in the 5162.
- Seeing the POWER GOOD signal at crudely +5V (a TTL logic HIGH) would inform the user that the PSU believes that 'all is well'.

... With nothing connected to the PSU ...
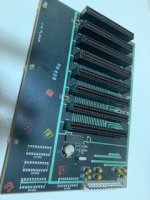
In the photo, it looks like the system board is still being connected to the PSU, either via P8 or P9 (the photo resolution doesn't allow me to make the determination).
If so, we know from post #36, that with either P8 or P9 connected, that one or more voltages on P10 go 'missing in action', and accordingly, we would expect the POWER GOOD signal to go to a TTL LOW level.

And with just the hard drive plugged in ? and does it spin up fully
Yes the hard drive was plugged in and it does sound like it spins up completely.
If the hard drive was plugged into the PSU at post #38, then the 'nothing' that Malc asked for was not met.
 
The tests done in post #20 were done with no load, the PSU open, and the fan removed.
For the test done in post #20, please confirm 'no load' - that is, P8 and P9 not connected to the system board, and P10 and P11 not plugged into anything.

If you confirm that, then there is a little bit of a puzzle, because I have yet to hear of an IBM supplied power supply in the PC family that operates when unloaded. However, IBM did change the 'guts' of the PSU's periodically.
 
Nothing connected Power Good reading 15.3 mV
Okay. So a reasonable deduction is that, at post #20, you recorded the measured figure of POWER GOOD as a V figure, not a mV figure.

15.3 mV is a TTL logic LOW. Seeing a logic LOW on the POWER GOOD line means that the PSU is 'unhappy' about the situation.
POWER GOOD at a logic LOW is because either:
- The PC-family PSU is under-loaded (no load, or not adequately loaded), resulting in the PSU shutting down; or <---- Note: The fan, if AC powered (rather than DC powered) , will probably still turn.
- The PC-family PSU is over-loaded, resulting in the PSU shutting down; or <---- Note: The fan, if AC powered (rather than DC powered) , will probably still turn.
- The PC-family PSU is faulty (resulting in one or more output voltages either not present, or below spec, or above spec).

So in the particular configuration that your 5162 is in now, the PC-family PSU is under-loaded, resulting in the PSU shutting down. So if you were to measure the voltages on the (floating-in-space) P8 and P9, we expect you to see little voltage at all.

A question becomes, for the particular make-model of PSU that you have, what is 'adequate loading'? I cannot see that in IBM's technical document for the IBM 5162.

If you now connect only the hard drive to the PSU, do you see the expected voltages on P8/P9/P10/P11 ?
 
If you now connect only the hard drive to the PSU, do you see the expected voltages on P8/P9/P10/P11 ?
Thank You. With the drive plugged in Power Good reads 13.6 mV
I did perform tests with the drive plugged in on P10 and it was good (reference post 19). With all cards removed from the mother board, once I added a connector to the mother board (either p8 or p9 or both) the voltage on p10 Orange wire would drop from 11.78V to 64.3mV.
 
If you now connect only the hard drive to the PSU, do you see the expected voltages on P8/P9/P10/P11 ?
Thank You. With the drive plugged in Power Good reads 13.6 mV
Suggesting that the hard drive alone is not enough of a load for your PSU.

I did perform tests with the drive plugged in on P10 and it was good (reference post 19).
Post #20. But perhaps at that time, other things were also connected to the power supply, taking the total loading past the 'adequate' point.

Diagnosis is not straightforward here because of the combination of:
- PSU requires adequate loading; and
- You do not know which loads are good (power wise) and which are bad.

People like me have good spares of things and so we can quickly isolate a problem to thing like motherboard, or PSU, or keyboard, or floppy drive, etc.

With all cards removed from the mother board, once I added a connector to the mother board (either p8 or p9 or both) the voltage on p10 Orange wire would drop from 11.78V to 64.3mV.
Indicating a shutdown of the PSU, probably due to over-loading.

So, before you added either P8 or P9, a question becomes, what did you have connected to the PSU to adequately load the PSU ?

If we look at P8 and P9, there are no common voltages. Does this mean that there are multiple causes here, one on a voltage rail on P8, one on a voltage rail on P9 ? No cards fitted, suggesting the 5161's system board. Are you able to perform what is shown on the web page at [here]?
 
Okay. So a reasonable deduction is that, at post #20, you recorded the measured figure of POWER GOOD as a V figure, not a mV figure.
Looking at post #20, and factoring in that the POWER GOOD line measured a figure in mV, a question becomes, the supply voltages appear to be okay.
Why then is POWER GOOD at a TTL logic LOW ?
An answer may be that the PSU considers the +5.6V to be too high (i.e. +5V is out of spec for the PSU).

But the 5161 does not use the POWER GOOD line, and so I think we can discount the state of POWER GOOD.
It would certainly mean that we cannot use the state of POWER GOOD as an indicator of whether or not the PSU is in a shutdown state.
 
So, before you added either P8 or P9, a question becomes, what did you have connected to the PSU to adequately load the PSU ?

If we look at P8 and P9, there are no common voltages. Does this mean that there are multiple causes here, one on a voltage rail on P8, one on a voltage rail on P9 ? No cards fitted, suggesting the 5161's system board. Are you able to perform what is shown on the web page at [here]?
Again thank you. To answer your first question. The Hard drive was plugged and it did sound like it powered up.

I reviewed the web page test. And was able to do one test of a 5V red wire on P8. The results were .453 v. The mother board is still in the unit and I stuck the multi-meter probes into the back of the connector. Is that ok? I'll complete the test later.
 
If we look at P8 and P9, there are no common voltages. Does this mean that there are multiple causes here, one on a voltage rail on P8, one on a voltage rail on P9 ? No cards fitted, suggesting the 5161's system board. Are you able to perform what is shown on the web page at [here]?
I reviewed the web page test. And was able to do one test of a 5V red wire on P8. The results were .453 v. The mother board is still in the unit and I stuck the multi-meter probes into the back of the connector. Is that ok? I'll complete the test later.
As per the webpage you should be taking Resistance measurements not voltage measurements for this test.
Can i also suggest you remove the system board from the 5161 and test on the bench making sure you place the board on nothing conductive. DO NOT connect the PSU or anything else when doing this test.
 
I finally got to the test.

On the +5 v rail, it measured .341 m Ohms. Based on the web page, this sounds like a short. I inspected the capacitors and didn't see any physical damage.

On the -5 v rail, it kept climbing slowly. I held it until it reached 15. m Ohms. It was still climbing. I think that was good.

On the +12 v rail, it measured .1 Ohms. Sounds bad. The webpage suggested to change all capacitors.

I don't have any measurement pictures as I was hold the meter probes during the measurement. But, here are some pictures of the board.
 

Attachments

  • IMG_0458.jpg
    IMG_0458.jpg
    21.1 KB · Views: 4
  • IMG_0461.jpg
    IMG_0461.jpg
    80.8 KB · Views: 4
  • IMG_0459(1).jpg
    IMG_0459(1).jpg
    60.8 KB · Views: 4
  • IMG_0459.jpg
    IMG_0459.jpg
    60.8 KB · Views: 4
On the +5 v rail, it measured .341 m Ohms. Based on the web page, this sounds like a short. I inspected the capacitors and didn't see any physical damage.
0.341 M ohms = 340 K ohms = 340000 ohms

That is nowhere near zero to a few ohms. No problem.

On the +12 v rail, it measured .1 Ohms. Sounds bad.
0.1 ohms is a problem.

The circuit diagram of the 5161 system board shows four capacitors on the +12V line:
- C2 and C3 are 10 μF tantalum capacitors.
- C9 and C11 are 0.047 μF (47 nF) ceramic capacitors.

The tantalum capacitors are well known as being problematic. It is a pretty safe bet that either C2 or C3 is short-circuit.

Remove C2 from the board, then see if the 0.1 ohm measurement remains. If it does remain, C2 was probably okay, and it is C3 that is short-circuit.

1707882679117.png
 
0.341 M ohms = 340 K ohms = 340000 ohms

That is nowhere near zero to a few ohms. No problem.


0.1 ohms is a problem.

The circuit diagram of the 5161 system board shows four capacitors on the +12V line:
- C2 and C3 are 10 μF tantalum capacitors.
- C9 and C11 are 0.047 μF (47 nF) ceramic capacitors.

The tantalum capacitors are well known as being problematic. It is a pretty safe bet that either C2 or C3 is short-circuit.

Remove C2 from the board, then see if the 0.1 ohm measurement remains. If it does remain, C2 was probably okay, and it is C3 that is short-circuit.

View attachment 1273363
Thank you so much. Considering I have no soldering skills, I'm going to seek some help. So I expect it will take a little time before I provide an update. Again, thank you.
 
And what did the -12V line measure ?
It kept climbing over 6 m Ohms and climbing.
That's fine.
Considering I have no soldering skills, I'm going to seek some help. So I expect it will take a little time before I provide an update
If you can and are able to, you could snip one leg of the suspect tantalum and Re-Measure, If no change then you solder the leg back together again and do the same again to the next tantalum which will likely be the shorted one of the 2 and the reading will change.

Do you know anyone local who can help you or are there any 'old school' TV repair shops near you. When i say 'Old School' i mean shops that do Board level repaiirs, These days there are very few left if any.
 
If you can and are able to, you could snip one leg of the suspect tantalum
One leg, because these are two-legged capacitors (based on all of the 5161 photos that I viewed), not three-legged.
Mentioned in case someone goes on to think that snipping only one leg is something that applies globally.

Considering I have no soldering skills, I'm going to seek some help. So I expect it will take a little time before I provide an update. Again, thank you.
C2 and C3 (and C9 and C11) are there to filter a certain amount of 'noise' from the +12V line. A crude analogy is at [here]. In your 5161, the devices using +12V are the IBM hard disk controller, and the hard drive. They will have their own filter capacitors on the +12V line (part of system wide filtering). So, in the diagnosis process, you can leave C2 and C3 off (or legs clipped), and then see if the 1801 error still occurs.
 
One leg, because these are two-legged capacitors (based on all of the 5161 photos that I viewed), not three-legged.
Mentioned in case someone goes on to think that snipping only one leg is something that applies globally.


C2 and C3 (and C9 and C11) are there to filter a certain amount of 'noise' from the +12V line. A crude analogy is at [here]. In your 5161, the devices using +12V are the IBM hard disk controller, and the hard drive. They will have their own filter capacitors on the +12V line (part of system wide filtering). So, in the diagnosis process, you can leave C2 and C3 off (or legs clipped), and then see if the 1801 error still occurs.
Thanks for the suggestion I will consider it. I did find someone who could replace the caps as you suggested, but, I'm not willing to pay his price. So I decided to buy an iron and a test kit. I did a little soldering 40 years ago and I want to develop the skill. I have 2 other 5150's (one running / one not) and lots of equipment (keyboard, other cards, modems, token ring, etc) that I would like to bring back to life.
IMG_0467.jpg
 
A few things to consider when soldering:

  • Don't keep your soldering iron on the parts and board too long. ONLY keep the iron on for the amount of time it takes to You may damage the pad by burning away the epoxy that holds the copper tube (that the wire leg of the board part goes through) in-place.
  • Like a lot of people will say, plenty of flux (yellow/golden stuff) on the legs does wonders. This will usually prevent spiky points from showing up on the solder.
  • A pencil-tip soldering iron does well for small holes. (Be careful with this. You may cause the edges of the tube, that the legs go into, to bend strangely if you put the point straight into it.)

My two cents, though? (I have 15+ years of experience.)

  • Go down to an automotive store and buy either some Fast Orange, Orange Goop, or Gojo soap (ALL WITHOUT PUMICE) and put it on the areas that you soldered. You will have to clean your board with (distilled) water, yes, but be patient and LET. IT. DRY. You won't have to worry about sticky flux on the board later.
  • Despite what I've heard, don't be afraid to put the solder on your iron first, IF, and ONLY IF you have put flux on the holes and parts that you intend to solder.
  • Don't be afraid to use copper de-soldering wick for de-soldering large pads and components, and for clearing smaller holes, de-soldering wick can work, but a solder sucker from the other side works best. (Like I said earlier, be careful about the point going straight in. You may bend part of the edges of the copper tube.

ABOVE ALL, PRACTICE ON PARTS THAT ARE ALREADY BROKEN AND YOU DON'T NEED.
Thank You for the advice. I purchased a test kit. Looking forward to getting started.
 
Oops. I was tired and forgot to add something to the first tip:

"ONLY keep the iron on for the amount of time it takes to melt the solder, and no more, as much as you can. If you do, you may damage the copper pad by burning away the epoxy that holds the copper tube (that the wire leg of the board part goes through) in-place."
 
Back
Top