• Please review our updated Terms and Rules here

Book 8088 discovery and modification thread

Ok so I re-created the event.
When (cold/power-on) booting with a CF card that has never had the "BIOS/CMOS" setup info written to it,
After the memory check, the banner at the top of the screen doesn't have the "A>>[FDD A]" option.
And the system boot (or attempts to boot) from the CF card then the flash drive is mounted as D:
When followed by a warm (ctrl+alt+del) boot, the "A>>[FDD A]" option appears and hitting "A" boots from the flash image successfully.
Hope this helps.

That looks like drive didn't init fast enough. Could you please view it's led activity on cold boot, it it's present?
 
That looks like drive didn't init fast enough. Could you please view it's led activity on cold boot, it it's present?
Sorry. My flash drive with the boot floppy image has no LED.
I did try another drive and I see activity as soon as power is applied but still cold boot is missing the "A>>[FDD A]" option.
Keep in mind that I'm also booting with a CF card that has no setup info written to it yet.

In another test, when setup info is written on the CF, and only when USB floppy enforcement is enabled.
Cold boot works correctly, I can press 'A' and boot from USB.
 
  • Like
Reactions: n0p
Would this floppy disk drive work with the Book 8088?


Even if it works AFAIK you won't be able to boot from those which makes it pointless.

The best solution is using the ISA expansion board with a floppy controller, which can be a cheap ISA Multi I/O card, and a normal floppy drive or even better a Gotek and it's strictly needed only to reinstall the OS.
For everything else you can use the USB or a network card

I just want to use it to load floppies and install programs on the C drive, which is the compact flash card. Here is the image from the side of the box which says that it is compatible with the Book 8088 architecture and has a small DOS driver.

requirements.jpg
 
Sorry. My flash drive with the boot floppy image has no LED.
I did try another drive and I see activity as soon as power is applied but still cold boot is missing the "A>>[FDD A]" option.
Keep in mind that I'm also booting with a CF card that has no setup info written to it yet.

In another test, when setup info is written on the CF, and only when USB floppy enforcement is enabled.
Cold boot works correctly, I can press 'A' and boot from USB.
That might be some logic bug on my side, i need to check that.
It should work on cold boot and w/o setup info if flash drive is inserted and contains correct boot sector, as floppy config byte is zero by default and usb emulation needs to be enabled only if you plan to always use USB emulation regardless of drive presense itself.
Thanks for reporting!
 
I just want to use it to load floppies and install programs on the C drive, which is the compact flash card. Here is the image from the side of the box which says that it is compatible with the Book 8088 architecture and has a small DOS driver.

View attachment 1275737
I mean it's your money so whatever, but it's silly to buy that if you just want to load software since you have usb (use the FreddyV driver by the way) and if you don't have the ISA expansion board you can get that for much less than $250...
 
Finally :) Drawing of "schema" :D, if anyone needs it:
and here's an updated installation of it. (now with switch).. so it switches between full time 8mhz turbo or 'hot key controlled turbo' (and since hotkey defaults to slow, that's fine). and proof benchmarks (again).
 

Attachments

  • IMG_20240317_183941218.jpg
    IMG_20240317_183941218.jpg
    1.2 MB · Views: 23
  • IMG_20240317_183227675~2.jpg
    IMG_20240317_183227675~2.jpg
    295.9 KB · Views: 24
  • IMG_20240317_185836362.jpg
    IMG_20240317_185836362.jpg
    1.5 MB · Views: 24
  • IMG_20240317_190000474_HDR.jpg
    IMG_20240317_190000474_HDR.jpg
    2.7 MB · Views: 17
I mean it's your money so whatever, but it's silly to buy that if you just want to load software since you have usb (use the FreddyV driver by the way) and if you don't have the ISA expansion board you can get that for much less than $250...
I believe it would be a good idea to set up an external docking station on the basis of the existing ISA expansion board, providing a possibility to connect a floppy drive, a keyboard (if possible), a joystick, a network card, etc. It would be nice to compile a list of compatible 8 bit ISA hardware cards which could serve this purposes. That could be good for those who would prefer to use the book 8088 as a semi-stationary unit.
 
I believe it would be a good idea to set up an external docking station on the basis of the existing ISA expansion board, providing a possibility to connect a floppy drive, a keyboard (if possible), a joystick, a network card, etc. It would be nice to compile a list of compatible 8 bit ISA hardware cards which could serve this purposes. That could be good for those who would prefer to use the book 8088 as a semi-stationary unit.
Hi,

it looks like you are describing the PicoMEM :)
 
I believe it would be a good idea to set up an external docking station on the basis of the existing ISA expansion board, providing a possibility to connect a floppy drive, a keyboard (if possible), a joystick, a network card, etc. It would be nice to compile a list of compatible 8 bit ISA hardware cards which could serve this purposes. That could be good for those who would prefer to use the book 8088 as a semi-stationary unit.

In this https://yeokhengmeng.com/2023/06/teardown-and-review-of-hand386/ post author used some external GPU holder for that purpose (Hand386 uses just the same ISA expansion).
Network, joystick (most probably via port on sound card) and a sound card would work as long as they're 8-bit ISA and it's driver (if required) compatible with 8088 CPU.
For example https://www.tindie.com/products/kdehl/8-bit-isa-sound-blaster-15-clone-with-cms/ if you don't want to deal with e-bay necroware (i bought an advanced Covox from David for my Pentium - and it works fine, though i had to mod connector a bit)
For a newer floppy controller - you may look at @sergey 's https://www.tindie.com/products/weird/monster-fdc/
And you might ask him - maybe he could make a one or two of his https://www.tindie.com/products/weird/isa-8-bit-ethernet-controller/
That's not an ad in any way, just some pointers.
 
Last edited:
I just had great success on my V2 using n0p's modified BIOS.
I used rufus to copy a DOS 5.0 install floppy image to a 1GB flash drive and after a couple of tries it booted
allowing me to format and install DOS 5 on a blank CF card.
Thanks, but yeah, that's not what I wanted. Not a big fan of Floppy emulators. Would be cool to make small controller, single floppy for that pin-connector at the back
 
Hey all,

It's taken a bit of time but I wanted to post a summary of my journey with the Book8088 v2.0 so far - I don't think anything here is going to be particularly new or ground-breaking, but I think it summarises much of the excellent work that has been done by others and hopefully it'll help anyone just getting started on their journey.

BIOS - definitely flash the BIOS - not only to put the correct attribution back into it, but also because you'll benefit from it hugely. I'm using @n0p's 1.0.6 BIOS in mine, flashed to a Winbond W27C512 chip. I bought 10 of these from AliExpress, and a XGecu T48 (TL866-3G) programmer. If you're doing this as a one off I'm sure there's more cost efficient ways, but I'm sure I'll want to update the BIOS again in future, and I do enjoy tinkering with things from time to time so I opted to buy the programmer. One of the best features of n0p's BIOS is the USB floppy boot emulation, which I've used with great success to install MS-DOS onto a blank CF card. Also I love the emulated floppy seek sound - so much nostalgia!

CF cards - I knew I'd want to keep the original CF card as a reference, but that I'd want to build my own, so I bought some low capacity cards off of AliExpress. I'm currently testing an unbranded 512MB card - I bought 3, and all identify as different brands when I connect them to my laptop. One is apparently a SanDisk, so not sure of their providence. I was a bit wary of unbranded CF cards from Ali, but I tested all 3 with https://github.com/AltraMayor/f3 and they passed.

Installing software - Once I had n0p's BIOS installed, immediately wanted to build a new CF card so I could build my own image. I used Rufus on a Windows 11 laptop to write the MS-DOS 6.22 disk 1 .IMG file to an old 128MB USB stick, and then put it into the (powered off) Book and powered it on. I pressed A whilst in the BIOS to request boot off the "floppy", and it successfully booted and I was able to run FDISK on the blank CF card, reboot, and then install MS-DOS. I have two old 128MB USB sticks which nearly went in the recycling some time back but thankfully didn't! I'm sure bigger stick's would work, but I haven't needed to test yet. Once DOS is installed and you can boot off the CF card, you can install software by writing floppy images to the USB stick and swapping them out at the requested points. Interestingly, if the USB floppy is present at boot time, I don't seem to need the CH375 USB driver loaded in DOS which saves a little memory. For the most part I'm working with floppy images written to small USB drives with Rufus, and on the odd occasion I have a stray file or executable I want to transfer, I write them to a blank .IMG file using the venerable WinImage and then write this to the flash drive with Rufus. I'm sure this is unnecessarily complex (you could just format the USB stick as FAT16 and copy the files over), but writing 1.44MB image files with Rufus is super fast so I'm happy :) Windows 3.0 installed with EGA support looks great - haven't had a chance to revisit VGA support since the new LCD driver board arrived (see below):

CH375 driver - On the subject of this driver, if you do use it, make sure you grab the updated version by FreddyV - I downloaded mine from here: https://www.vogonsdrivers.com/getfile.php?fileid=1991&menustate=0 - the original version supplied with the Book8088 v2.0 wouldn't even read my USB sticks so I never even got as far as worrying about performance - as soon as I replaced the supplied version with the FreddyV version, it worked straight away. I got the replacement driver onto the CF card using a USB to CF adapter on the Windows 11 machine in case anyone wondered!

Mouse - I wanted a mouse for Windows 3.0 - 9-pin serial mice are hard to come across and aren't cheap - I did try a cheap PS/2 mouse I found in a charity shop with a PS/2-DB9 adapter, but it didn't work - my understanding is that the PS/2-DB9 adapters are passive and don't perform any signal conversion and that this capability is either built into the mouse or it's not. I ended up buying a Microsoft Mouse 2.0 from ebay - spending a little more than I had wanted but it works.

LCD Driver board - like so many, my Book v2.0 was supplied with a LCD driver board flashed with the CGA firmware - this was confirmed with n0p's mode12h.com utility which produced a blank screen. I had owned the Book v2.0 for about 6 weeks at this point so I wasn't sure how responsive the seller on Ali would be, but they were great and sent me a replacement driver board free of charge. I did also purchase the EEPROM's needed to reflash the chip on the old driver board, but I haven't tested this yet as I received the new driver board and it works. Replacing the driver board is easy with some care - just remove the bezel around the LCD, and with some care you can replace the board.

Keyboard - a one off, but a portion of my keyboard was really unreliable and unresponsive. I raised this with the seller at the same time and they sent me an entire new top cover for the book with the keyboard built in (at the same time as the LCD driver). I replaced this last weekend and it works much better. Replacing the top cover is simple and easy, just take care with routing cables through the holes, and releasing the hinge covers without breaking the tabs off.

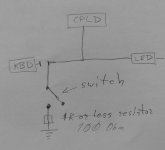
PSU - I ordered my Book on a promotion on Ali and only the US PSU was in stock. The input voltage is universal so this worked fine with a travel adapter, but I wanted something with a UK plug on it. I also wanted to be able to power the ISA expansion board which I ordered with it. I found the schematics for the Book v1 online and the 12V from the external PSU looks to be fed straight into a 5V switching regulator (and to a pull-up on the power present logic if I've understood correctly), so I concluded there was nothing special about the PSU other than it being 12V. I ordered an external USB to IDE/SATA kit off Ali for minimal money - I didn't need the actual USB part of it, but it came with a 12V/5V PSU with a standard 5.25" drive power connector on it. I bought some PC power splitters, and some 5.5x2.1mm DC connectors, and soldered the 5.5x2.1mm DC connectors to two 5.25" drive connectors (only the 12V + ground) - this way I can power the Book and external ISA expansion board from the same PSU (with the correct mains plug!), and I still have a spare 5.25" power connector for powering a floppy drive or similar if I choose to (again I don't need to - the USB functionality in the replacement BIOS is awesome but purely for nostalgia purposes!). It works really well so far. I'll post a photo of this so it makes more sense if anyone is interested?

Expansion boards - I finally have everything in place to test this - I haven't had time to try out any expansion cards yet but I have an old 16-bit Super I/O card which I hear may partially work in the 8-bit slot. I do also have a 3.5" floppy drive coming (happy memories - still have a few disks around!) so I'm going to try this all out together at some point just to see how I get on. No great expectations but looking forward to testing. Other cards of interest are network card (not yet purchased), and I just found out yesterday about FreddyV's PicoMem card - not sure if it works with the Book8088 but I've signed up for one and happy to be the first to test.

Emulation - not on the Book itself, but whilst waiting for various parts to arrive, I used dd (Linux) to take an image of the original CF card. I was then able to attach this to an 8088 machine emulated by PCem and it boots and works fine. I could even dd the modified image back to the same CF card and it would work. However I tried creating a new image from scratch in PCem (FDISK, install MS-DOS from blank) and although it booted in PCem, and did come up with "Starting MS-DOS..." on the Book, it just hung and would not boot. I can't remember where but I did read somewhere that XT-IDE is quite picky about getting the CF card set up just right, and when the Winbond chips arrived and I could boot from a floppy image flashed to a USB stick, I found that as long as I perform the FDISK and format from a "boot disk" on the Book itself, it produces a repeatably bootable CF card so I'm happy with this. I doubt this will be of much value to many people, but posting here in case anyone wondered or has a use case.

I have a few things on my "to do list" to try out and will update as things work/don't work.

One final question for those more experienced than I with the hardware - I've had every part of the Book disassembled apart from actually having the "motherboard" out of the bottom casing. In spite of removing all the screws, it seems to be stuck in there and I can't see how to free it. I don't want to damage the plastic casing - one issue seems to be that I eagerly put the red push button cap on the power button when mine arrived, and I kinda wish I hadn't how this seems to be holding this corner of the PCB in place. Is there a trick to getting the main PCB out?

Hope this was helpful to someone! Thanks so much to everyone who's footsteps I'm treading in!
 
Hi @sparkyjf

I received also a Book8088 this Week, I plan to test the PicoMEM on it and eventually no more use my Sinclair PC200 .

I added a GitHub for the USB Driver :

Currently, the PicoMEM Does not work because the Book8088 did put the XTIDE ROM at F000, so it will always erase the PicoMEM Boot Strap.
To bypass this, I will redirect the BASIC Interrupt to the PicoMEM so that it can be started with the Boot ROM XTIDE Option.
A modified BIOS that start the XTIDE First may also fix this.
 
One final question for those more experienced than I with the hardware - I've had every part of the Book disassembled apart from actually having the "motherboard" out of the bottom casing. In spite of removing all the screws, it seems to be stuck in there and I can't see how to free it. I don't want to damage the plastic casing - one issue seems to be that I eagerly put the red push button cap on the power button when mine arrived, and I kinda wish I hadn't how this seems to be holding this corner of the PCB in place. Is there a trick to getting the main PCB out?

You will need to remove power button cap with pliers (first times i was putting some thin cloth not to damage it), CF card (i forgot to put it out at least lwo times :)).
Remove battery (i couldn't in V2 rev. 1 tbh)
On Book V2 you might also remove 5 screws that hold ports board, as there holes for that, but that's not needed at least for me.
Trickiest part - audio connector.
It's really easy to break off the board. Together with solder pads and traces :) And it seems like in V2 that part is less repairable.
I suggest using plastic pry tools for that, like https://www.amazon.com/KINGLAKE-Panel-Removal-Radio-Installer/dp/B00HNMLQAG/
but if you can, visit your local automotive shop for that - choose harder ones, some of those are made from clay, not plastic :)
You'll need to make some more space between board and case and pull (or rather push with tool) the board gently up.
Last - push power button a bit and you can pull the board fully.
If you did - shave 0.5mm or more from audio connector - it will be much easier next time to disassemble/assemble.
 
Thanks @n0p - sounds tricky, especially the audio connector. I might (if I think I'm going to be doing this more than once) get the Dremel out and modify the lower casing a little to make the board easier to get in and out. Haven't decided yet but maybe...

I had a question about your BIOS as I'm using that (v1.0.6) - today I finally had time and all the pieces to connect up the ISA expansion board. I picked up a cheap PT1227W multi-I/O card from ebay - no special reason for that particular card other than it was cheap and advertised as testing and working. It's from 1994 so a bit after the 8088 era, but still well into ISA territory.

I haven't played with any of the jumper settings yet - all of them look to be set to the factory defaults. However I can see that the Book can talk to the card as when it's plugged in, I see COM2 at 0x2F8 enumerated by the BIOS. COM1 and LPT1 are overlapping with the built in ports so I need to either change these or disable them - will come back to the jumpers later in the day when I get some more time.

The bit I was really interested in getting working was the floppy controller - given the USB emulation that's in your excellent BIOS, would an external ISA floppy controller be expected to work? Would I need to alter the base address? The jumper table on the back of the card shows that the FDC is set to 0x3F0 but I can change it to 0x370. I'm not seeing any floppy drives enumerated in the BIOS even with a 1.44MB floppy drive attached to the I/O card. There's no floppy seek on boot either.

I know there's a myriad of possibilities here - I'm working with second hard hardware that someone else says works, and a 16-bit I/O card in an 8-bit slot, so all manner of things could be happening here (or not happening). Just curious from your work on the BIOS if there were any known complexities of adding a floppy controller like making sure the base address doesn't clash.
 
The bit I was really interested in getting working was the floppy controller - given the USB emulation that's in your excellent BIOS, would an external ISA floppy controller be expected to work? Would I need to alter the base address? The jumper table on the back of the card shows that the FDC is set to 0x3F0 but I can change it to 0x370. I'm not seeing any floppy drives enumerated in the BIOS even with a 1.44MB floppy drive attached to the I/O card. There's no floppy seek on boot either.

The only "real" FDC i have tested BIOS on is MiSTer FPGA PC XT core :)
BIOS expects FDC at port 0x3Fx, but for that to work you need to set floppy type - enter settings (press F1 before mem test completes) and select drive 0 and/or drive 1 type, as there no autodetect.
I've described logic here: https://github.com/jinshin/8088_bios/wiki
English is not my native so that might be somewhat unclear, sorry.
I would love to know if that works on your FDC.
 
Thanks @n0p! I think your English is awesome, personally :)
Ok so I made some time for testing - I can't believe how much of this I have forgotten! I used to build PC's in the early 1990's and onwards, and today I had to remind myself that the red stripe on a ribbon cable is for pin 1 :rolleyes:. It's also been a long time since I had to think about jumpers, or indeed BIOS settings (auto-detect has spoiled me!).

So here's the outcome:
  • I set the two COM ports on the Super I/O card to be COM2 and COM3 respectively so they don't clash with the onboard serial port on the v2
  • I set the LPT port on the Super I/O card to be LPT2, again so it doesn't clash.
  • I tested both base addresses for the FDC. Your logic as documented is also my experience - if I set the FDC to 0x370, then it does not work at all (at least I couldn't figure it out). However when I set it back to 0x3F0, and I set the floppy disk type in the BIOS, AND I remember that A drive is the connector after the twist in the ribbon cable, then it works perfectly. So much knowledge I haven't needed for over 20 years!
    • For feedback, the Floppy drive is a Mitsumi D359M3 - not clear on manufacture date but it's definitely a 1.44Mb drive
    • The Super I/O card is a PT1227W from 1994 - hardware rev 3.2 - key chips on this appear to be the W83758P and W83757F, both by Winbond.
I don't have a use for 3 x COM ports and 2 x LPT ports, but it's very cool to see this old hardware coming back to life and working with the Book 8088. I'm quite excited about the Super I/O controller because this card also has a game port on it - it didn't come with the ribbon cable and D-connector, but I can probably make one up. Also I would need to find an old PC joystick... A project for another time/shopping expedition.

One thing I did learn - the Book 8088 (at least my unit) didn't like it when I powered the ISA expansion board only with the Book running off internal battery. The testing wasn't extensive, but I found:
  • Floppy drive powered by external PSU, Book 8088 and ISA expansion board both powered by the battery in the Book - OK
  • Floppy drive and ISA board powered by the same external PSU, Book running on battery - unstable, crashes, often will not POST.
  • Floppy drive, ISA board and Book all powered from the same external PSU - OK
I'm guessing this is a ground problem, as the Book running on battery will have a floating 0V rail, and cheap switch mode PSU's (like the one I bought) can be rather noisy, including the 0V rail unless it's actually tied to earth in the PSU. Connecting all 3 devices to the same PSU means they are all sharing the same 0V rail so I think that's why it works - but that's an educated guess and I could be wrong. Offering that in case it helps anyone else trying to power peripherals and use the Book 8088 at the same time.

Anyway, awesome, amazing work - I can confirm that the BIOS works with a real Super I/O controller and Floppy drive from the 1990's!!
 
  • Like
Reactions: n0p
Back
Top