simmiv
Member
I’ve had a Compaq Portable III pc in storage for quite some time. I finally decided to pull it out of storage and get It up and running. After setting it up on the bench, it was quite obvious that the coiled keyboard cable had to be replaced as the outer sheeting had gone hard and was falling off. Apart from that it looked to be in good nick.
I took the back off and removed the motherboard to get access to the power supply.

A visual inspection and cleaning I decided it would be ok to plug it all together again and try to power it on. At power on, it tried to start, but shut down again. This can be seen on the red led on the motherboard i.e. it flickers on and then off.
This indicates that there is a short on the motherboard itself as the power supply detects an overload on one of the power rails and shuts down.
To diagnose, you just have to disconnect the power supply from the motherboard and use an ohm meter to measure between the power rail and ground.
In my case it was the -12v that measured 0.3 ohms. (I had also disconnected the floppy and hard drive power cables.) Next I measured the resistance across the taller tantalum capacitors i.e. the 16v 10uF ones. After measuring and if it was ok, I marked it with a black marker. This way, I found three shorted ones, which I marked with a red marker. I simply snipped all three out and replaced them with electrolyte caps I had handy.

When I measured them, two of them were shorted.
.jpg")
Now the -12v power rail was measuring high resistance. This method can be used to find shorted caps on other power lines as well, although the 5v one would have lots of them!
After putting it all together again, I powered it up and it booted normally. The screen complained about the configuration and wanted the diagnostic disk. I managed to find the image online and create a 720k floppy on another PC. (This Compaq has a 720k floppy drive and a 20MB HDD). Once I had the diagnostic floppy in the drive, it booted happily into the diagnostic setup. Once I had run through the setup and set the date/time, I re-booted and it now booted from the hard drive into DOS 3.12 and a preconfigured menu with Displaywrite 4, and Quattro Pro Spreadsheet options with a company logo. So it seemed to be fine.

Next I booted into the diagnostic disk and ran the test routines. They cleared everything as fine, except the keyboard. It has some lethargic keys that simply had to be hard pressed to do anything.
As I had to take the keyboard apart anyway to replace the coiled cable, I disconnected it and began to take it apart. First you have to pull off all the key caps to get access to the screws that are hidden under them. Be careful with space bar as it is the only keycap with a spring! Then you take all the screws. Once done, carefully turn it over and take the bottom off. I didn’t do that! I took the top off and through that all the key stems fell apart and got disorganized!
.jpg")
I cleaned all the keycaps, the keyboard motherboard and the keyboard rubber. I of course also replaced the coiled cable with a second hand one I had on hand. When I was assembling it, I discovered to my horror that I had three of the key stems missing! After crawling on the floor, I managed to find two, but I couldn’t find the last one!
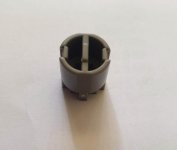
The key stem isn’t a simple plastic, it’s a complex piece.

Despite that I measured it up and re-created it in 3D by using Tinkercad. After some experimentation I printed it on my cheap 3D printer. It was a bit rough, but with some minor filing and finishing it worked fine! I’m sure you can spot my printed key stem!

I then proceeded to re-assemble the keyboard and put in all the key stems first. It all came together and finally the keyboard worked fine! Here is the keyboard with the old and replacement coil cable..

Then another re-boot and loading up a game to try it out!!

It does have one vertical line that seems to be on all the time. When attaching a CGA monitor it is fine.
.jpg")
I now need to replace the battery on the motherboard and then see if I can do anything with that vertical line..
I took the back off and removed the motherboard to get access to the power supply.
A visual inspection and cleaning I decided it would be ok to plug it all together again and try to power it on. At power on, it tried to start, but shut down again. This can be seen on the red led on the motherboard i.e. it flickers on and then off.
This indicates that there is a short on the motherboard itself as the power supply detects an overload on one of the power rails and shuts down.
To diagnose, you just have to disconnect the power supply from the motherboard and use an ohm meter to measure between the power rail and ground.
In my case it was the -12v that measured 0.3 ohms. (I had also disconnected the floppy and hard drive power cables.) Next I measured the resistance across the taller tantalum capacitors i.e. the 16v 10uF ones. After measuring and if it was ok, I marked it with a black marker. This way, I found three shorted ones, which I marked with a red marker. I simply snipped all three out and replaced them with electrolyte caps I had handy.
When I measured them, two of them were shorted.
Now the -12v power rail was measuring high resistance. This method can be used to find shorted caps on other power lines as well, although the 5v one would have lots of them!
After putting it all together again, I powered it up and it booted normally. The screen complained about the configuration and wanted the diagnostic disk. I managed to find the image online and create a 720k floppy on another PC. (This Compaq has a 720k floppy drive and a 20MB HDD). Once I had the diagnostic floppy in the drive, it booted happily into the diagnostic setup. Once I had run through the setup and set the date/time, I re-booted and it now booted from the hard drive into DOS 3.12 and a preconfigured menu with Displaywrite 4, and Quattro Pro Spreadsheet options with a company logo. So it seemed to be fine.
Next I booted into the diagnostic disk and ran the test routines. They cleared everything as fine, except the keyboard. It has some lethargic keys that simply had to be hard pressed to do anything.
As I had to take the keyboard apart anyway to replace the coiled cable, I disconnected it and began to take it apart. First you have to pull off all the key caps to get access to the screws that are hidden under them. Be careful with space bar as it is the only keycap with a spring! Then you take all the screws. Once done, carefully turn it over and take the bottom off. I didn’t do that! I took the top off and through that all the key stems fell apart and got disorganized!
I cleaned all the keycaps, the keyboard motherboard and the keyboard rubber. I of course also replaced the coiled cable with a second hand one I had on hand. When I was assembling it, I discovered to my horror that I had three of the key stems missing! After crawling on the floor, I managed to find two, but I couldn’t find the last one!
The key stem isn’t a simple plastic, it’s a complex piece.
Despite that I measured it up and re-created it in 3D by using Tinkercad. After some experimentation I printed it on my cheap 3D printer. It was a bit rough, but with some minor filing and finishing it worked fine! I’m sure you can spot my printed key stem!
I then proceeded to re-assemble the keyboard and put in all the key stems first. It all came together and finally the keyboard worked fine! Here is the keyboard with the old and replacement coil cable..
Then another re-boot and loading up a game to try it out!!
It does have one vertical line that seems to be on all the time. When attaching a CGA monitor it is fine.
I now need to replace the battery on the motherboard and then see if I can do anything with that vertical line..
.jpg")
.jpg")
.jpg")
.jpg")