• Please review our updated Terms and Rules here

Elektronika DVK-3, a Soviet PDP-11 clone micro

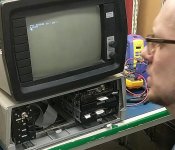
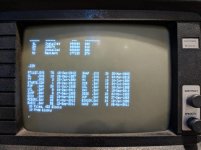
IT LIVES!

DVK first boot.jpg

I didn’t know what to do at first. After I got home, I watched some of the videos Mihail posted on using it, and learned the command you write in order to get it to do anything (namely, even enter RT-11 in the first place -- maybe not quite RT-11 per se, but "ФОДОС-2"). I’m not really sure what mode it boots up into, but you have to type B and then MY0 for it to enter that. (MXn is for other I/O devices.) This is my first experience with PDP-11, having grown up with DOS & Windows, so I'm not 100% sure what's going on but am feeling my way around.

Now, to get the floppy disks for it…
 
Nice!

There are jumpers that control how it starts up -- right now these are set to "start in ODT" (simple loader and debugger). This ODT version is modeled after Digital's, so PDP-11 manuals will be of some help. Try running self-tests -- 'T1' ... 'T5' at the @ prompt.
 
I finally got a step-up transformer for it so now I no longer need to go to the Makerspace to use it; I can keep it at home. :-D

Where are these jumpers you speak of that could adjust the boot modes? I was hoping that some magic M[A-Z][0-9] would launch BASIC for me, but no luck on that front thus far, even with trying the variations of this listed on Page 201 of the programmer's manual. It seems like MX0 is the top disk drive and MX1 is the bottom, and that MY0 would be the hard disk drive. Meanwhile, I have been able to make some very basic programs in the ODT with PDP-11 machine code. (Man, having to write machine code makes you wish for assembly. :p)

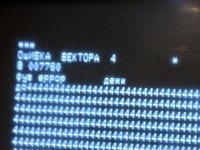
Speaking of the disk drive and the tests, my machine pretty much runs the test in the way that you'd see in one of Mihail's pictures where it shows "Vector Error 4". It comes up with several RAM errors in Test 4 (T4). T0 shows 3 asterisks and then displays the value of the program counter. I haven't tried running the tests without the HDD controller yet; all boards were in place.

This opens up some questions:
1. If I were to write MY0 with the disk plugged in and it doesn't seem to complain about anything, what do I do from there?
2. Is there a way to write to the screen in ODT, possibly by writing to an area of memory?
 
No, no BASIC there :) I am trying to get accurate info on jumpers, isn't as easy as I thought. There are 12 jumpers (most of them are soldered in) plus two sets of DIP switches (SA1, SA2), and on your board SA1 are replaced by jumpers. SA1 is close to crystal, SA2 is close to printer connector (the big IDC one).

Hard drive is DW0, MY0/MY1 would be floppies on a different type of controller. If DW0 boots, it will likely be into a clone of RT-11 5.x -- books and manuals on that will help (Bitsavers has them). Post screenshots of 'SHOW CONF', 'SHOW DEV' and 'DIR .SYS' commands -- this will help identify the OS.

If there's anything on the disk, you'll want to park it before powerdown -- look for STOPDW.SAV or PARK.SAV. But (large warning), don't try to use TESTDW.SAV or TDW.SAV until you know what you're doing -- early versions of it silently format the disk.

Screen on this machine is attached to a graphics card, which emulates a VT52 terminal. Frame buffer on the card is not mapped into host's memory space; access is via console terminal interface at base address 177560 (this is the standard location of console in PDP-11's). So if you write something to data register 177566 (i.e. open this address in ODT and enter new value), it will appear on screen. Quick reference -- http://www.ibiblio.org/pub/academic...hardware/micronotes/numerical/micronote33.txt
 
Whew, October sure was crazy over here! I finally had a chance to try this system again this past weekend, and was trying to get my HxC 2001 SD floppy emulator working with it. I tried a few disk images from http://mirrors.pdp-11.ru/_pdp-11/ and some instructions from the HxC forums http://torlus.com/floppy/forum/viewtopic.php?f=19&t=1384 on how to get MX images loaded (incidentally there's another forum post there about the MY interface). It seems that while the MY driver supports 800K (DSQD) 5.25" disks, and the Elektronika 5305 drives I have should be able to support these formats, the MX driver is set up for some different disk formats ranging from ~110KB to 450KB. It looks like the disk interface is a generic Shugart type with pins 1-5 omitted on the cable. I used the Perl script available from both places (the HxC forums and the image repository), but unfortunately whenever I type "B <Enter> MX0" at the ODT, it returns back with a changed program counter, but doesn't do anything (e.g. move the physical heads on my 5305's nor indicate head motion on the HxC), even if I hit letters that are supposed to continue/resume execution. However, the "Disk Select" light (which is an activity light on all the computers I've ever had experience with) remains lit until I actually power cycle the computer. Also, I'd say maybe 3 out of every 5 times I boot the system lately, it comes up with "VECTOR ERROR 4" (in Russian) when I power it on with the HxC in place.

If there's anything on the disk, you'll want to park it before powerdown -- look for STOPDW.SAV or PARK.SAV.

I've been too afraid to try this on my own without knowing what'll happen if I don't find one of those parking utilities on the disk. :confused: Not to mention, what if no one ever bothered to park it before shipping it from Moscow? Knowing how many things arrived busted at my front doorstep this summer from domestic senders, I can't imagine the data being in good shape if it wasn't parked to begin with. But if I *can* see files on it but no parking utilities... then what?

So if you write something to data register 177566, it will appear on screen.

I tried this expecting some characters to appear in random spots on screen, or at least some gibberish or distortion, but unfortunately it didn't do anything when I tried this. :-( I'll probably have to internalize that document you linked to a bit more, but TBH I've had my head buried so much in Javascript and Python and Tensorflow lately that it's a bit dense to me at the moment. :p

Next thing I might try if I give up on the disks is loading an operating system or some programs over a serial connection...
 
Those "trap to 4" errors can't be good -- let's troubleshoot the hardware first. Later, you can boot the OS without any storage media, via multiplexed serial connection and HX.SYS driver (the emulator you have has built-in support for that).

Worst case, the hard drive is shredded and you'll need another one. But let's not panic just yet :) The point of parking utility is essentially to ensure there's no write in progress -- I've traced one of them, it seeks to a specific cylinder and asks user to turn off power. There's little chance of background I/O happening in RT-11, especially with single-job monitor (kernel), so you could just take your chances.

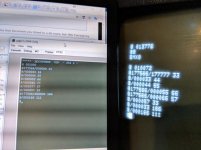
re: writing to the screen -- here's how that would look like


You enter "177566/" and ODT "opens" that memory location for write. Any 16-bit octal value you enter will be written there once you press CR or LF (LF will open next memory location, CR won't). Just "/" will reopen same location.
 
The point of parking utility is essentially to ensure there's no write in progress -- I've traced one of them, it seeks to a specific cylinder and asks user to turn off power. There's little chance of background I/O happening in RT-11, especially with single-job monitor (kernel), so you could just take your chances.

re: writing to the screen -- here's how that would look like... You enter "177566/" and ODT "opens" that memory location for write. Any 16-bit octal value you enter will be written there once you press CR or LF (LF will open next memory location, CR won't). Just "/" will reopen same location.

I figured all a parking utility does is set the drive to the highest cylinder. My dilemma is finding if there's an easy way to do this through some kind of system call if the file doesn't exist. (Hint: BASIC exists on my RT-11 floppy disk image, so maybe that'd help!) Or maybe I shouldn't worry about it that much. Worst case scenario, I guess I could write a file of some size and then hope it lands there.

Anyway, I was about to tell you about all the failures I was experiencing until I recalled that Mihail told me to remove the hard drive controller. Once I did this, I was able to boot RT-11 using a floppy image on my HxC SD FDD emulator! :D:D:D

DVK-3 First PDP-11 Bootup.jpg

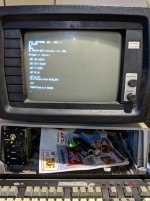
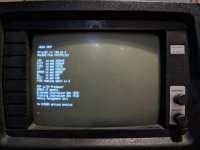
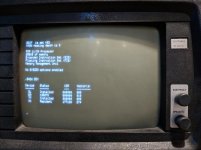
Here is SHOW CONF, SHOW DEV, and the directory listing of the floppy disk:

DVK-3 SHOW CONF from MX0.jpg
DVK-3 SHOW DEV from MX0.jpg
DVK-3 DIR from MX0.jpg

A couple comments on using the system:

1) I haven't figured out how to switch the disk without the system taking forever to read the new disk and then eventually throwing an error & timing out. One thing I could try to get around this is to get the HxC to emulate two drives, but if there's some trick to switch the disk in the first drive without causing problems, then please tell me!

2) I tried emulating the screenshot you sent me about manipulating characters on the terminal through memory, but I was not able to duplicate your output on my system nor my emulator:

DVK-3 no go on serial char rewrite.jpg

I'm hitting the "VVOD" key which resembles the Enter key on an American keyboard number pad, and I'm not sure if that's providing me CR or CR+LF.

And just for good measure, let me show you the latest output that happens when I run the system with the HDD controller installed: :p

DVK-3 really messed up on FDC.jpg

Glad I remembered it was this card, and not some new issue with my floppy disk controller or HxC!
 
Here is SHOW CONF, SHOW DEV, and the directory listing of the floppy disk:

Pretty bare-bones system -- no diags there. I'll see if pdp-11.ru archive has a MX image of TMOS (test monitor O/S, a clone of DEC XXDP).

if there's some trick to switch the disk in the first drive without causing problems, then please tell me!

No idea, sorry.

not able to duplicate your output on my system nor my emulator:

Right, I made the screenshot in emulator of earlier model, which has 16-bit address bus. Your board is 22-bit, and data register is at 17777566.
 
Preparing Disk Images for an Elektronika DVK-3 MX Controller

Preparing Disk Images for an Elektronika DVK-3 MX Controller

Ok, get ready, I'm dumping a whole lot of information here about practical use of a DVK-3! :D

Now that the HxC is known to be a viable way to run software on the DVK-3, I have researched where to get software and found this wonderful repository at http://archive.pdp-11.org.ru/ukdwk_archive/ . I've found various games, utilities (like PARK.SAV & STOPDW.SAV), and programming languages. (I'd love to know if this computer has any GPIO or at least how to interface with the serial port in code.)

Since I have the MX disk controller, my drive supports the following formats (with 11 sectors per track, 256 bytes per sector):
40 tracks, 1 side, 112640 bytes
40 tracks, 2 sides, 225280 bytes
80 tracks, 1 side, 225280 bytes
80 tracks, 2 sides, 450560 bytes

Unfortunately, the format of the DSK files used for a DVK-3 isn't anything understood by WinImage, MagicISO, CPCDiskXP, or even the HxC software itself. However, with enough searching, I came across a "packer plugin" for Total Commander that will allow you to read & write the correct format of DSK files for the DVK-3. Here's the link to the forum: http://zx-pk.ru/threads/11015-rt-11-dsk-total-commander-wcx-plugin.html

This will make a DSK file of arbitrary size that totally wraps up all the content you selected. It's easy to use, but has some idiosyncrasies that were not intuitive to me and required experimentation to get around:

* I couldn't figure out how to install it by unzipping the archive and then navigating the plugin settings of Total Commander to direct it to the plugin file. It is easier if you navigate to the ZIP/RAR file itself that contains the plugin, and then try to open that archive in Total Commander. Then, TC will recognize it contains a packer plugin and will install it.
* Beware of these three things that could possibly cause an error with the plugin:
- You try to save the DSK file to a location you don't have write permission to (for me, the default C:\ is still write-protected by Windows, and I'm too lazy to change that, so I end up having to type out the whole path where I want it to save the file each time).
- You have files that do not follow the 6.3 naming convention (xxxxxx.xxx), or have spaces, or have illegal characters.
- You have file paths that are not plain ASCII and/or have spaces. For instance, the plugin refused to open files in C:\<user name with a space>\Downloads\ДВК-3 , but did open files in C:\Utilities\DVK-3.

The second step of this is to seek out a utility that converts DSK files into HFE files useful with the HxC hardware. Luckily, someone has written a Perl script that does this. The script is easy to find, being mentioned in the HxC support forums http://torlus.com/floppy/forum/viewtopic.php?f=19&t=1384 and also available at this software archive https://mirrors.pdp-11.ru/_pdp-11/_soft/MX/ . The script only manages the four formats listed above, so it won't be useful to make any 800K disk images for MY controllers. (Maybe I'll cross that road when I get there, but it's unlikely I'll go out and seek an MY controller.)

This next part is important: the Perl script will complain if the size of the DSK file is not exactly as specified above. This means you need to add padding into the image to make it fill out the entire disk capacity. For this, I make the disk image as usual by selecting the files in Total Commander and using File -> Pack. Once the image is made, I subtract its size from 450560 and then use a hex editor to write enough zeros to a file to fill up the image. I select this "zeros" file and File -> Pack it once again, specifying the same path I wrote the image to earlier. This adds the zeros file to the image and increases the image's size on disk. To make it truly unused space, I can delete the zeros file from inside the DSK archive while it is open in Total Commander, and the DSK image file will remain the same size but now show "Unused" space.

(I'm sure this whole process could be automated inside Perl anyway; I'll have to look into it if this toolchain becomes too time-consuming for me.)

Unfortunately, once you convert the DSK image to HFE, the HxC software itself still won't be able to show you the contents of the disk. You'll just have to trust that the tools worked correctly and put it into your computer.

Running the HxC as two floppy disk drives is easy. Since I haven't figured out how to make my own bootable disk yet, I'm still using a completely filled-up half-size disk (a 225280-byte image) to load RT-11 and then using my own DSHD images as my secondary. Since I'm pretty sure the LCD panel & buttons on the HxC only allow you to change what's in the "A" drive, I put the RT-11 image onto the "B" drive (specified by means of the HXCSDFE.CFG config file set to load both STARTUPA.HFE and STARTUPB.HFE) and then tell the DVK-3 to boot with MX1: rather than MX0:. I haven't tried changing disks on MX0: yet in this manner, but previously, when loading the OS from MX0: and then changing the MX0: disk image on the HxC, the system would become unresponsive upon further queries to the disk drive.

Now, I'm going to grab a blank 5.25" disk and see if I can get RT-11 to format it with a real FDD as MX1: and the HxC as MX0:.

Your board is 22-bit, and data register is at 17777566.

I tried this address and it worked as expected. Thanks, shattered, for all your help & insights so far!

And here's a pic of the computer in action (showing the Tetris welcome screen) at Saturday's local Retrocomputing meetup in Dallas:
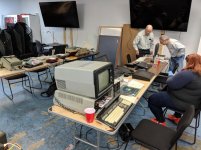
MVIMG_20171111_174430.jpg
 
Nice progress!

> (I'd love to know if this computer has any GPIO or at least how to interface with the serial port in code.)

No GPIO on the board, but it has a printer port (XP1 connector). Maybe you could hook up a Covox to it :)

> The script only manages the four formats listed above, so it won't be useful to make any 800K disk images for MY controllers.

You won't need it -- MY is an altogether different controller, and uses regular PC-compatible MFM track format.

But you'll probably want the manual for MX driver -- http://hobot.pdp-11.ru/ukdwk_archive/dwkwebcomplekt/DWKFiles/mx/README.mx1
 
Back
Top