• Please review our updated Terms and Rules here

Epson SD-600 5.25" floppy drive - not sure how to reassemble

Canned Noodles

New Member
Joined
May 31, 2023
Messages
4
Last edited by a moderator:
I think that would be the lever that stands between the lever handle and the arm that lowers the read/write head. Without a service manual, I could not definitively place the spring. I have an Epson floppy drive but I would prefer not to remove the front plate just to figure out where the spring is mounted.
 
Update: I found what I needed!
There was this one listing on eBay with a top-down view, and what I thought was a hair in the photo was actually the little spring. This helped me figure out the orientation of the plastic piece.
The whole thing was really tedious to put back together.
1700182158515.png
Now being able to see to see the whole mechanism, it makes sense why it all broke in the first place - I tried closing it without a disk inserted, and the plastic part in question breaks the part on the metal axle when doing so.
 
Update: I found what I needed!
There was this one listing on eBay with a top-down view, and what I thought was a hair in the photo was actually the little spring. This helped me figure out the orientation of the plastic piece.
The whole thing was really tedious to put back together.
Now being able to see to see the whole mechanism, it makes sense why it all broke in the first place - I tried closing it without a disk inserted, and the plastic part in question breaks the part on the metal axle when doing so.
Wow, the timing of this post is kind of crazy considering these drives are 30 years old. Less than a month after you posted this I find myself trying to fix the same parts on an SD-600. Someone gave me a Gateway 2000 4DX-33 a couple years ago and I haven't gotten around to working on it until just now. I noticed the Epson SD-600 wasn't working properly and wouldn't lock in place. Sure enough, the little black plastic sleeve on the drive latch shaft is cracked in half (length wise). I'm sure it was broken by someone trying to force it closed, just as you described. Absolute genius design... as if no one would ever try to latch the drives shut without a disk in place (which many many other drives can do without breaking).

I am thankful that I own another SD-600 so I was able to look at it to compare the placement of the springs, but I still looked up the drive to see if anyone else had experienced this failure. Turns out you did, just a month ago. Your experience has confirmed to me the problem at least. After reassembling all those stupid springs I have put a healthy dose of super glue on the plastic sleeve with a pair of vice grips on it to squeeze it tight so that the notch inside the sleeve is locked securely onto the shaft. I guess we'll see if it works. You can bet this PC is going to have a sticky note stuck to the front saying "Do not force the drive latch without a disk inserted!" .

I am curious... were you able to fix the broken part and make the drive usable again?
 
Last edited:
Whelp... the glue definitely wasn't strong enough, and it seems the plastic sleeve itself is just too brittle to hold up because it cracked in yet another place as well with a very light turn of the latch.

Also, I tried and tried to get that little tiny spring and plastic piece in place (the one you made this thread about) until I realized that it is actually THE PROBLEM with the SD-600. It is the piece that physically blocks the arm from clamping down until a disk is inserted (the disk hits the long skinny part at the bottom and rotates the whole piece with the tension from that tiny spring). If this piece is simply left out of the drive, it most likely would work fine and the plastic sleeve wouldn't get cracked as easily since the latch would never be "locked".

The absolutely integral plastic sleeve that is used to actuate several strong steel components is a bad enough design from a longevity standpoint, but the stopper that ensures that at SOME POINT that sleeve will be broken by accident makes it almost feel intentional. Really sad, because the SD-600 I have that isn't broken is a rock solid drive and I've used it to test and pull data from many floppies over the years.

Sadly, I can't think of a way to fix this without replacement parts... and because of the absolutely moronic way this thing is designed, even if I found a drive to use for parts I don't think it's possible to get any of these important parts out without breaking that sleeve in the process. I need to keep the front of this drive so that it matches the rest of the PC, but the end of the latch doesn't come off, so unless you pull (break) the sleeve off of the shaft there is no way to get them apart.

EDIT: We are not alone...
https://forums.atariage.com/topic/3...oppy-drives-rebuild-repair-refresh-refurbish/
 
Last edited:
@Ozzuneoj
I’m glad my problem helped solve your problem. Do you think it would be fine for these drives to be used without that little latch? It really seems like more of an inconvenience than anything.
Sadly, I can't think of a way to fix this without replacement parts... and because of the absolutely moronic way this thing is designed, even if I found a drive to use for parts I don't think it's possible to get any of these important parts out without breaking that sleeve in the process. I need to keep the front of this drive so that it matches the rest of the PC, but the end of the latch doesn't come off, so unless you pull (break) the sleeve off of the shaft there is no way to get them apart.
It is unfortunate that these parts are unavailable as new ones. I did borrow some help from my friend in 3D printing a replacement for the plastic sleeve, but I wrongly assumed the axle was square and not round (it was modeled after only the sleeve, not with the axle and sleeve). That model was designed to slide onto a square axle, so clearly, it didn’t work. While writing this, I do wonder if this can solve the problem by replacing the stock axle with a square one.
As for the latch, it should come off with a bit of force. I was able to just slide it on/off.
 
Success! Reading the threads linked in my previous post gave me an idea.

For one, I left the stupid tiny spring + plastic piece out that allows people to snap the sleeve in the first place. It is 100x easier to assemble the latch mechanism without that pointless part in there, and now curious fingers are less likely to destroy the drive.

Here is how I reassembled and fixed it:
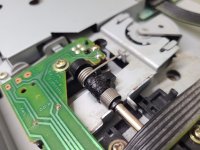
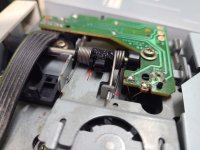
I put the medium sized spring on the metal shaft so that it could hook onto the sleeve as intended (watch the orientation).

I slid the broken sleeve onto the shaft and turned it around until the notch was aligned (you can tell because the crack will close up).

I then got a length of 30awg wire-wrapping wire , stripped the insulation off of it, wrapped it around the plastic sleeve as tightly as I could (it wasn't "tight"... it's just too fiddly for my fingers), put a small vice grip on it in such a way that it would both close the crack\gap on the broken sleeve and hold the end of the wire in place.

Then I used a soldering iron (Hakko set to ~680F) to both melt the cracks that were exposed AND to heat the wire so that it would embed itself into the plastic. I went all around the sleeve doing this. I didn't go too crazy with the iron since I don't have more plastic to "add" to bury the wire properly, but overall the wire is definitely pretty well embedded into the plastic. I found several other cracks in the plastic and melted those over.


I'm not sure if the sleeve is as strong as it would have been originally, but again... without the lock in place to create huge stresses on this part, it may actually hold up to normal use. I also added a tiny bit of oil to the surface (nub?) on the sleeve so that it could latch with a little less friction.

After this, put the large spring on the end of the shaft, lay the circuit board + ribbon cable and mounting system back in place, check to make sure the springs are all laying properly, reinsert the screws, hook the upper part of the large spring on the tensioning-hook, and that should be it.

I'm happy to say that the drive now latches securely and reads perfectly. It even read the first disk I put in it without errors. Additionally, it can be latched without a disk inserted now. I wouldn't necessarily recommend doing this all the time because it was never intended to do this, but at least now it won't cause the internal parts to instantaneously detonate.

I have attached pictures of the repairs as well as the spring placement.
 

Attachments

  • 20231212_131637 (Custom).jpg
    20231212_131637 (Custom).jpg
    368 KB · Views: 9
  • 20231212_133731 (Custom).jpg
    20231212_133731 (Custom).jpg
    339 KB · Views: 9
@Ozzuneoj
I’m glad my problem helped solve your problem. Do you think it would be fine for these drives to be used without that little latch? It really seems like more of an inconvenience than anything.

It is unfortunate that these parts are unavailable as new ones. I did borrow some help from my friend in 3D printing a replacement for the plastic sleeve, but I wrongly assumed the axle was square and not round (it was modeled after only the sleeve, not with the axle and sleeve). That model was designed to slide onto a square axle, so clearly, it didn’t work. While writing this, I do wonder if this can solve the problem by replacing the stock axle with a square one.
As for the latch, it should come off with a bit of force. I was able to just slide it on/off.
Hah, I posted my fix the same time you replied.

Yeah, you can definitely reassemble it without the part that keeps the drive from "locking" empty. I don't know if there are any adverse effects if the drive is locked empty and starts spinning, but it's unlikely to be as bad as instantly destroying the sleeve that makes the entire drive work.

I had thought about 3D printing, because I have a friend that owns one, but I wouldn't know where to start to make something like this. Plus, I don't understand how the sleeve can even be attached to the shaft without breaking it since it is physically too small to go over the ends of the shaft (due to the notch inside), unless it is already broken. It almost seems like this part is made by putting the metal shaft into a plastic mold and molding the sleeve directly onto it. Seems terribly impractical, but I just can't imagine the plastic having enough flex to go over the shaft, while also being able to hold in place solid enough to make the mechanism work properly. Clearly, we can see the result of the sleeve being misaligned... it cracks in half. I guess maybe they could slide it on with the parts hot so the plastic is more pliable, but then it seems like the notch could be squashed and then it would just spin around or not engage enough to work.

I will say, if you have designed a 3D printed part that would work for these and you are able to tweak it in such a way that it will work with the round (yet notched) shaft, AND you can find a way to slide the thing on without it breaking... you should definitely post the model and instructions because this seems to be a fairly common failure point for a common and otherwise reliable drive.
 
Back
Top