• Please review our updated Terms and Rules here

Is this a candidate for 3-D printing?

clh333

Veteran Member
Joined
Feb 22, 2015
Messages
1,443
Location
Cleveland, OH, USA
Our friends at FedEx delivered a Panasonic KXP 1592 printer recently that had enjoyed their signature treatment: Several internal plastic pieces had broken. The most serious casualty was a bushing that served to orient the print-head carrier. The steel rod the head travels across sits in a bushing that prevents the rod from rotating freely but allows adjustment of the head spacing gap. One of the two bushings (one on either side) was obliterated.

Fortunately the other one is in tact. I haven't found any donor machines or parts suppliers for this model so I am beginning to think I might have the survivor copied and 3-D printed. I know nothing about this topic: the few pieces I have had made were crude and fragile and ultimately failed. I suppose casting is another method but I know equally little and it seems like a difficult thing to pull off.

And so I am posting to ask for guidance on getting this part duplicated. Also: There was a discussion of the best cement to use for plastic repair. I can't find that post but Chuck(G) had a recommendation...?

Thanks for your suggestions.

-CH-
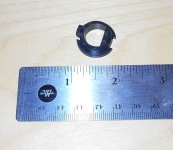
Bushing.jpg
 
Charles,
Hhow about a Sketch (or two) with the actual dimensions for OD & ID and of all the dimensions
of the part? A Caliper will help get the dimensions. Can you take some Photo's in MACRO Mode,
at different angles to make it large enough to see?

Do you have any idea of the material of that good part? Looks like it would be easy enough to 3D Print.

Larry
 
Larry,

Thank you for your reply. I will work on getting dimensions and better photos. I do have calipers and can take macro photos but sketching is not my long suit. The feature of the bushing is that it is eccentric: by rotating it with the attached lever the bushing moves the guide rod closer or farther from the platen, varying the gap between the matrix pins and platen and accounting for different paper thicknesses. If it weren't for that you could make a substitute out of most anything.

The material is perhaps PVC or polystyrene; it softens (a little) with acetone. I don't think it is HDPE or polypropylene. Probably was the "needs-recommendations" thread that I saw; thanks for the link. I'll look for Tenax 7R or Ambro Pro-Weld. I have used acetone successfully in some instances but it works best when you can flow it into a tight crack and let it set. That's not the case with the paper bail lever.

On the other hand, I don't see it being required to bear a lot of stress. I think it broke (along with a plastic piece actuating the paper bail and a small section of the motherboard at a mounting point) because the package was dropped on its end - the end that has the ~10# multi-tap transformer. The shoulder of the steel guide rod probably hit the plastic bushing and cracked it into pieces.

More to come,
-CH-
 
Turns out the two bushings are not identical. I was able to piece together enough of the remains to determine that cloning the "good" one would not solve my problem.

Thank you for your suggestions, though.

-CH-
 
Charles,
Do you have enough pieced together to get some dimensions to allow creating a new part?

Larry
 
I have pieced together two bushings by using super-glue and then filing to fit the aperture. Not pretty but the critical dimensions are there; it appears that the gap adjustment can be resurrected. I will work on measurements from these.

-CH-
 
An update, a coda, an epitaph:

I pieced together enough of the remains of the bushings to reinstall the head support rod. I used super glue and a file to reshape where necessary. I also rebuilt the paper bail support (several times). I found that the glass-filled plastic did not bond well with epoxy, my former go-to material, but bonded well with JB Weld's Plastic Bonder, a two-part adhesive that sets in about 15 minutes and hardens to form an adhesive that is more flexible than epoxy and can be shaped after hardening. It seems to stick to anything.

I reassembled the carriage and powered the unit up. It had a dead fuse on the motherboard (there is also one at the switch box, but that was ok). I replaced the 3 A. fuse and tried again. It blew immediately. I retrieved the variable transformer, put in a new fuse and brought the power up slowly. At about 25 VAC the replacement fuse began to glow. I abandoned further attempts.

After some thought I began examining the motherboard. On a hunch I removed the two 10,000 uF, 50 VDC capacitors near the twin rectifiers, finding one was a dead short and evidence of leaking from one or both. Encouraged, I ordered replacements and bodged the broken traces around the crack in the motherboard that had resulted from FedEx handling. Eventually I replaced all electrolytics and one 7805 plus its filter capacitor before reinstalling the board.

Again I brought the power up slowly, watching the fuse for signs of trouble. At about 55 VAC I could hear a little noise from the steppers, as though they were trying to move, and at about 80 V the head moved to home. Oh, boy!

With the cover in place the unit would go through its power-up routine so I tried the self-tests described in the manual. I was able to print out the DIP switch settings and the continuous printout of the character set so I attached the printer to the PC. When the PC booted the printer came on line and I thought I was home free.

I was not: The printer began feeding paper, unbidden, a line or two at a time, without stopping until powered down. It did this from the C:\ prompt while connected to the PC and it did so after printing self-tests. Rats.

It is possible that the LF key is defective and shorting intermittently but that's a faint hope; I think it should be ignored if the printer is on line. More likely that the problem lies on the mobo, and at that I am out of my depth. I have no service manual or practical experience to draw on, and the 3D printing is therefore moot. As they say at Panasonic, "Sayonara".

-CH-
 
Back
Top