• Please review our updated Terms and Rules here

Love err… Vintage Restoration of an AMI Enterprise III in the Time of Corona

Shadow Lord

Veteran Member
Joined
Jun 16, 2010
Messages
3,234
Location
California
Hello All,

Please indulge me as I start another long winded post on a restoration effort of mine. The last time I got into this much detail was with my Everex Step Megacube restoration oh so many years ago. That is not to say I have not been playing with/restoring old systems. I just haven’t had the time to take photos, gather my thoughts and post. However, the quarantine has changed that, at least temporarily.

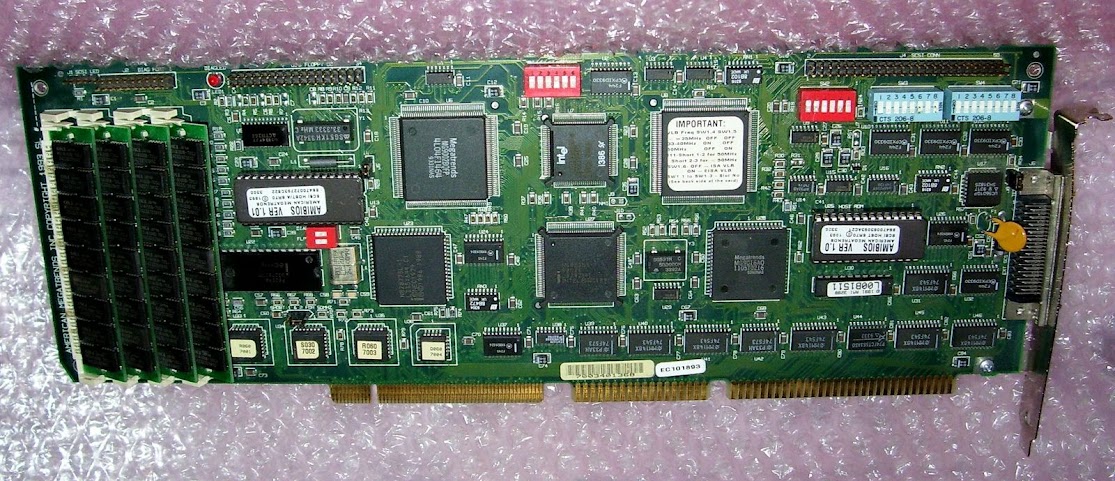
Initially I had planned on posting about the restoration of a Systempro/XL that I had acquired. I finished restoring that system (well as much as any restoration is ever finished – there is always little tweaks that need to be made or parts that need to be acquired that don’t make it in time/can’t be found) earlier this year. It is now up and running 24/7 serving files to all of my “vintage” PCs. The NT 4.0 OS on it is time perfect for interfacing with DOS, OS/2, and windows all the way up to XP/2K3. Unfortunately, that posting will have to wait. Right around the time I finished with the Compaq I came across another system I had been keeping an eye out for: an [URL="https://www.stason.org/TULARC/pc/motherboards/A/AMERICAN-MEGATRENDS-INC-486-SERIES-68-ENTERPRISE-I.html”]AMI Enterprise III[/URL] motherboard.

For those of you not familiar with the Enterprise III here are some specs:

AMI Enterprise III Series 68

  1. 80486 EISA/VLB Mother Board with support for 80484SX, DX, and DX2 based processors. A 80487SX (in case of an 80486SX CPU) and Intel OverDrive Processors via a NON ZIF upgrade socket are supported as well.
  2. Eight Total Slots: Six Bus Mastering EISA only slots and two Fully Buffered VL-Bus Mastering slots
    a. While the VL-Bus slots on the Enterprise III can accept EISA cards (as well as ISA ones) they will only provide Bus Mastering on the VL-Bus and not the EISA bus.
    b. Benefits of buffering of the VL-Bus slots according to the manual:
    Because VL-Bus Adapter Cards sit directly on the CPU bus, the additional loading on the CPU signals can cause unreliable CPU operation. At 33 MHz, most CPU signals have Setup/Hold times in the order of 10-9 seconds. It is easy to see how timing can be thrown off by the additional load from devices on the VL-Bus. The American Megatrends VL-Bus design includes full buffering for all VL-Bus expansion slots. Each VL-Bus expansion slot always appears as a fixed non-capacitive load on the CPU bus. Therefore, the end user can install any type of VL-Bus compatible Adapter Card on the system and still be certain of totally reliable operation.
  3. Total of 256MB of RAM via 16 30pin SIMM Slots (setup in four banks) with support for Parity and FPM.
  4. 256KB of L2 Cache
  5. A non-socketed DS1488 RTC with CMOS support. This also provides the extended CMOS static RAM for the EISA Configuration Utility (ECU).
  6. “Flash” upgradeable BIOS. I put this in quotes because this is the early flash years which still required you to open the computer case. Updating your BIOS involved setting jumpers on the motherboard and arcane booting instructions. However, it still beats needing a new EPROM.
  7. Support for PS/2 Mouse
  8. Support for AT Keyboard (5pin DIN). I am not sure why AMI chose to mix and match standards here. Could just be the time period as the transition was still occurring from AT to the PS/2 standard. Many people would have had AT keyboards on hand.
This particular specimen is a revision 1 motherboard. There is a revision 2 as well, and as far as I can tell, revision 2 only adds an internal header for the PS/2 mouse. As is typical of motherboards of that era there is no on board HDD or FDD controllers nor any serial or parallel ports. While the BIOS does support these devices, you need an add-in card to provide the actual HW for the system.

Due to limitations of the forum I am going to break the thread into sections with each post being focused on one aspect /subsystem of the system restoration effort. I have tried to make the full size images behind the thumbnails manageable in size so even if you are bandwidth limited it should be okay.

Planned sections:
  1. Introduction (this post)
  2. Original System and Delivery
  3. Original Equipment
  4. Initial Testing
  5. Restoration, Clean Up, Prep of Case
  6. Case Painted, Repaired, and Missing Equipment Replaced
  7. Updates – Motherboard
  8. Updates – Video and Audio Subsystems
  9. Updates – Storage and I/O Subsystem
  10. Installation and Testing of Components Part 1
  11. Installation and Testing of Components Part 2
  12. Future Plans

As always all questions, discussions, constructive criticism, and comments are welcome.
 
Original System and Delivery

Original System and Delivery

I don’t have much to say in this section except what a disaster. As is typical the keys were lost to the original locks so the owner/seller forced open the panels to get into the system. In the process the managed to severely warp the case so that none of the panels closed properly. There is also the usual set of scratches, marks, etc. including one huge deep scratch across the plastic (with classic smoked look) drive window. To add insult to injury the packaging for shipping was questionable at best. I will let the pictures do the talking for themselves.


Yes, this is actually how the internals were packed for shipping:


Original Equipment

Original Equipment

One of the things that caught my eye with this system was that fact that the sum of its parts was worth more than the system. The system was well equipped for the time and used brand name/high quality parts and equipment. It also came with a full complement of options as would be expected for a server of that time including an EISA SCSI Storage subsystem w/ cache and RAID functionality.

Of course the most important thing to me and what caught my eye initially was the motherboard:


The motherboard came out of the system with the original BIOS, a 80486DX2-66, and 16MB of 80ns Parity RAM. As expected this is a pretty big motherboard in terms of size. Components are nicely spaced and cleanly laid out. In fact the only thing I note as a negative is the soldered RTC. It would have been far better if AMI had spent an extra 50 cents to allow for coin battery backup or at least have socketed the chip. The board also lacks a header for an external battery. What this means is a future session of a soldering iron to either install a socket and/or a replacement DS1488 using a DS1485 and a coin cell battery. In the meant time the battery levels seem very good and are holding. This was also true for the Compaq RTC chip even though both systems are now almost 30 years old.

Also note the P3 connector (in addition to the usual AT P1 and P2 power connectors) behind the PSU connectors. I have yet to locates an AT class PSU that supplies P3. BTW: This should not be confuses with a very similar looking (but electrically different) aux power cable found on dual CPU AMD boards. That power cable provides both 3.3V and 5V power while the P3 connector on the Enterprise III needs three 5V lines and three ground lines (more on this later).

Next were the drives and storage subsystems. As already mentioned this was an all SCSI deal. While the transition to IDE had started it had not gained full traction yet. The typical home system could have easily been sporting an RLL drive controller.


From the top:
Teac FD-505 Dual Floppy Drive

Archive 2525S


Unfortunately the capstan has already gooified and will need replacement before this drive is put back in use.


MediaVision CDR-H93MV – This is a rebranded Ricoh SCSI drive. My guess? This was a later addition when the system left its server role became and everyday work horse. It was bundled with a MediaVision Pro Audio 16 with SCSI interface sound card (see below).


Maxtor MXT-540S – Unfortunately, I think mishandling and poor packaging killed this drive in transport. It started up the first few times but it was not happy – so it stopped starting up.


Moving on to the add-in boards we have from the top down:


Weitek Power 9000 Based VLB Card – Interestingly the card is made by AMI as well and reports itself as a Weitek 5186.


AMI Series-44 SCSI Controller - This was the second most interesting item in the system to me. This is a SCSI-2 Controller with an Intel 386SX-16 for processing. Originally it provide HDD controller and FDD support. The controller also sports 4MB of Cache which back then would have cost about $400 just for the SIMMs. This is significant in that in 1992 you could still buy a 386SX-16 system form the major clone makers as an entry system. So you basically had the equivalent of nicely equipped entry computer in this one controller.

Unfortunately, I have not found any real info on this card so I cannot determine if it had RAID support, if the memory could be expanded past 4MB, or any drivers for it. If anyone has info please get in touch with me!


Generic serial and lpt card

Mediavision Pro Audio 16

 
Last edited:
Initial Testing

Initial Testing

The initial testing of the system was a very simple affair. I was mainly interested to see if the system would boot, what error messages would show up, and if there were any show stoppers. I was also very curious to see how the BIOS worked on this hybrid system.

If you ever had the opportunity to play with an EISA system you are familiar with the ECU. The ECU is basically how you configure the system, identify the installed cards (ISA and EISA), and configure any options for these cards (including auto configuring resources such as IRQ). It functions in lieu of the more common BIOS interfaces out there (e.g. when you press DEL). As such all the EISA systems I have worked with have a fail safe mode so in case of a complete NVRAM failure (e.g. battery failure) the system will POST and then attempts to boot the ECU floppy disk from the primary drive (i.e. “A:”). However, this particular motherboard also has a traditional BIOS (one that is accessed by hitting DEL on boot).

To setup the AMI Enterprise III you initially boot the system and enter the AMI BIOS program by pressing the DEL key. There you have access to the usual menagerie of BIOS options including what floppy drives are installed, the HDD type, num lock boot up status, etc. Once you have configured your boot drive then you can run the ECU. Through the ECU you can configure options for the motherboard itself, as well as any EISA add on cards that you may have. You can also identify any ISA cards you may have, assuming they have EISA CFG files. This is important so that the ECU can reserve those resources used by the ISA cards and not assign them to EISA cards. Once you have updated the NVRAM with the current EISA configuration you can reboot and start the system with a boot disk of your choice.


Restoration, Clean Up, Prep of Case

Restoration, Clean Up, Prep of Case

Originally when I acquired this system I had planned on just tossing it because of all the damage. However, after it got here I wasn’t so sure about that. The case is quite impressive. While not as unique or with all the thoughtful features of the Everex Step MegaCUBE it is still a full height AT class server case. This means that there is plenty of room to work inside the case once you get the mess of tangled wires out. The case is actually significantly bigger than a Compaq Systempro/XL.
The outside dimensions of the case (HxWxD) are 25.5”x11”x17.5”. It has eleven drive bays composed of six external and five internal ones.

The case came with a Seventeam 400W PSU. Based on my limited research and experience the Seventeam is a pretty solid PSU.


Cooling also seems to be well thought out with two intake fans at the bottom to draw in cold air which then passed over the component to be expelled by the PSU fan on the top of the case. Of course the filter foam looks like it has never been cleaned and by now it is falling apart.


I started by taking everything a part to better assess the damage:


Looks like the metal was not the only thing to suffer, the mess of wires had started disconnecting from their solder connections as well:


Next the dents were hammered out so that the case and panels closed properly again.


The case was then washed with degreaser soap, taped, and made ready for painting:

 
Case Painted, Repaired, and Missing Equipment Replaced

Case Painted, Repaired, and Missing Equipment Replaced

The first order of business was to paint all the equipment so that they could dry properly and cure. While the paint color came out very close to the original I am not happy with the actual quality of the paint I used. Even though I baked the side panels the paint is easily scratched. I foresee a future repainting, this time going all out with special primer and sealant.


Repairing the plastic windows was more challenging but I think it came out very nice afterwards. I first repaired the deep scratch with acrylic filler and then sanded it down smooth. Given the amount of damage to the window polishing it was out of the question so instead I opted for a frosted look by sandblasting it. A bit of elbow grease, a couple of plastic restoration techniques later and from afar it looks better then new.


Next I repaired all the wires that had torn off and since I had everything apart tried to do a better job of getting rid of slack and organizing the wires.


Finding the replacement camlocks proved much harder than I expected. However, I was able to replace both the simple camlock on the side panel and the e-switch on the front panel with parts that fit the OEM openings perfectly. Even the E-Switch function was retained so that it not only locks the drive window but also disconnects the KB.


All the expansion card guides were also missing:


Luckily I had a tower donated to me by “Grumpy Ol’ Fred” at VCF. That machine has proven a treasure trove of parts – donating a 386SX board to my Gateway 2000 386SX-16, switches and LED lights, and now card guides to this tower.


Finally, I replaced the foam filters in the fans as the originals were pretty crappy quality and damaged beyond saving.


Last edited:
Updates – Motherboard

Updates – Motherboard

Of course what is a restoration without a bit of upgrading at the same time? My plans for this system were to create a top tier late 80s to mid 90s power house. As such it should be able to run almost all programs produced during that era, including Windows only programs, effortlessly. It should also be able to deal with any 2D based game from that era (e.g. platforms, shooters, side scrollers, etc.). IMHO after that time period, i.e. by the late 90s/early 2Ks, the typical system had PCI slots and 3D acceleration was well entrenched requiring a different class of machine for playing games.

The first thing to be updated was the motherboard. I started by flashing the BIOS with the only other version I could find. Going by the version numbers the "new" BIOS was released about three months later. There is no info with the file to indicate what bugs were quashed and if there were any new features added. As discussed earlier the term flashing on this motherboard might not be quite what most people are used to. Now a days when you want to flash a new BIOS you run a program, load the new BIOS and you are done. The program flashes the EEPROM and gives you a visual feedback of each step of the process. This can be even done through windows and the BIOS interface.

On the Enterprise III one must place the BIOS file on an empty floppy disk (no system files needed), open up the computer case to set a jumper, and then turn on the computer. The jumper tells the system to initiate a loader program instead of the normal BIOS routine. This program then reads the file off of the floppy drive and flashes the EEPROM. Your only indication that anything is happening is by listening to the beeping of the speaker. After the flash procedure is done you shutoff the computer, reset the jumper, and reboot. There is one huge benefit to this method: in the case of a bad flash you have a very good chance of recovery as you don't need a system that can boot or POST.

After upgrading the BIOS I proceeded to upgrade the memory. The Enterprise III can take a massive, for the time, 256MB of memory on board via 4 bank of SIMMs. So in went 16 of these beauties:


If you look at the boot screen in the information box only lists 64MB of RAM. However, there is a line under it that indicates there is another 192MB of extended memory.

The next upgrade was the CPU. I replaced the original 80486DX2-66 w/ a Pentium OverDrive 83Mhz. Now generally I am not fan of generational CPU upgrades (e.g. Orchid Tiny Turbo 286 or the Intel Inboard 386). While you do get a speed boost you miss out on updated bus (e.g. 16bit to 32bit), new memory architecture, and other tech improvements. However, in this case the OverDrive processor made sense:

  • AMI already provided the upgrade socket
  • The 83MHz OverDrive has an external bus speed of 33MHz so there should be no detrimental effects on the VL-Bus or other components with timing issues
  • 32KB of L1 cache which is four times the 486 L1 cache
  • A much improved FPU compared to the 486
And of course a Pentium VLB/EISA based system!


As you can see with the OverDrive chip installed the BIOS informational message changed. Interestingly it does not identify that a Pentium CPU is installed. Instead it reports an actually misleading informational line: "80486SX/SX-66MHz CPU"


My guess is that the BIOS core on the AMI Enterprise was simply too old to properly address such large memory and Pentium chips. The documentation for the motherboard talks about forthcoming OverDrive processors so the actual processors were not available for testing. If someone has a later BIOS revision I would love to test it out and see if they ironed out any of the cosmetic issues.
 
Updates – Video and Audio Subsystem

Updates – Video and Audio Subsystem

The system came with a pretty decent video card, a Weitek 9000 powered VLB card with 1MB of DRAM, that is, for a server class machine. However, as a system meant to be a powerhouse and aimed at playing dos games there was definitely room for improvement. Over the years I have acquired a number of VBL and EISA video cards including ATI Mach 32, ATI Mach 64, and Elsa EISA based cards. Given that VLB video is much faster than EISA the bus choice was clear. Out of my VLB cards one stood out as having superb performance in DOS and being extremely feature rich: The Number Nine #9GXE. Number Nine was a very innovative graphic company that for a few years looked like it was going to be a real contender in the graphic space. That is until they got decimated in the 3D wars.

My current specimen is a beast of a video card:
  • S3 928 GUI Accelerator
  • 4MB of VRAM
  • 1MB of DRAM Cache
  • Max resolution of 1600x1200x8
Yep, you read that right this card has five megabytes of RAM total. I have not been able to confirm this but I believe the 1MB of DRAM is used with the virtual screen function. This card also has the 200MHz RAMDAC.


Plus it has a very cool “status” led on the back!


With regards to audio two standards are come into play for the time period targeted by this system:
Digital: Adlib/Sound Blaster
MIDI: Roland

With this in mind the plan was to setup the system with two sound cards: A SB AWE32 w/a Roland SCB-55 daughterboard and a Roland LAPC-I. The AWE32 would provide digital music/SB16 compatibility, AWE compatibility (which is distinct from MIDI) and the SCB-55 would provide GM MIDI on the secondary MIDI port. The LAPC-I would provide LA MIDI for the earlier generation of games. Unfortunately, currently I can’t find any of my LAPC-Is so the AWE is the only card slated for installation at this point.


The AWE32 is a DSP 4.12 with a CT1747 bus controller. After much research I am pretty confident that it will be very unlikely to run into the hanging notes bug.


Updates – Storage and I/O Subsystem

Updates – Storage and I/O Subsystem

Although the system came with a very sweet SCSI controller card I opted not use it. This was done for very practical reasons: I had neither documentations nor driver disks, and it is getting harder and harder to get working small capacity SCSI drives. On the other hand I plenty of IDE equipment on hand. I have a couple of different VLB cached disk controllers which all seem to be copies of one design. I chose to use a Tekram DC-680CD in this system. It is a part of a line of caching and mirroring controllers that come in ISA, EISA, PCI, and VL-Bus flavors. This particular model has support for up to 16MB of Cache, Four IDE HDD, two optical drives (so a total of six drives), and two FDDs.


Of course the first order of business was to max out the cache:


I then replaced the FD-505 with more reliable separate drives: a Teac FD-235HF and a Teac FD-55GFR. I wanted to use round FDD cables for better airflow and cable management. While there are plenty of Card Edge to 34pin PCB adapters out there the reverse is not true so I cobbled together my own adapter cable:


For HDDs I used four identical (down to FW level) Compaq branded Conner CP-3541 drives provided by our own chulofiasco:


This system is far along enough in the “Multi Media revolution” that an optical drive was warranted. As such I went with a Plextor Premium. Yes, a bit of overkill but one of the finest IDE drives you could get your hands on. Instead of a second optical drive I installed an Iomega ZIP 250 internal drive to make it easier to exchange data.

For networking the system currently has a 3Com 3C515-TX 10/100mbit ISA NIC. This is a pretty nice piece of HW assuming you meet the minimum requirements of a 386 processor or higher (the card will not work in a 386SX or lower and the drivers will not load on a 286). I actually plan to use a 3C597-TX EISA 10/100mbit NIC. However, like the LAPC-Is I have misplaced my stash of EISA NICs.

At this point I have elected not to install a serial and/or parallel port card in the system. I am unlikely to use an external modem with this system and the included PS/2 mouse port makes a serial port unnecessary for a mouse. The system is also not directly connected to a printer and with a live network connection, CD-RW, and ZIP 250 drive data exchange is really not an issue.

The keyboard on the system is a Northgate OmniKey/Ultra – I know KB fanatics all have their favorite but to me the Northgate KBs have always had the best feel, even better then the venerable IBM Model M. This was a used KB I picked up cheap a few years back. I took it apart and did complete clean up before putting it in service.


For a mouse I chose a Microsoft Cordless Wheel Mouse which works both with PS/2 and serial port connections.


I am also planning on installing a Thrustmaster Game Card (i.e. high end joystick port) to make better use of high quality joysticks for games. The card is probably in the same box with the LAPC-Is and the 3C957-TXs…..

Last but not least I installed a ThermoCall device in the unit. This is basically a siren alarm attached to a temperature probe. You preset the alarm temperature using jumpers.

 
Last edited:
Installation and Testing of Components Part 1

Installation and Testing of Components Part 1


Once the motherboard was upgraded and installed in the system it was time for testing of the new components. The system was powered up and the following screen showed up:


There are three errors on that screen. The CMOS memory error is nonissue. One just needs to go into CMOS, save settings, and the new max memory will be updated. The NMI errors however could be more troublesome. Looking on the web one finds:


So, I did the only sensible thing and rebooted. Luckily on the second boot the NMI errors went away and have not returned.
Once I was able to POST I went ahead and installed the rest of the system/components. As the install progressed I ran into a number of other issues:

The original plan was to install a CSC X-10 Fastcache Floppy Drive along with an FD-55GFR. Unfortunately, the controller on the Fastcache only supports one FDD. The drive also lacks an eject button instead relying on a SW eject making it impractical as a primary FDD. I then switched gears and planned on using an FD-235J, for ED support, as the AMI Enterprise BIOS supports the format but the Tekram DC-680CD HW only supports 720KB and 1.44MB drives leading me to finally settling on the FD-235HF.

The Tekram DC-680CD advertises linking and mirroring of HDDs. At a first glance this sounds like RAID 0 and RAID 1. While mirroring does function as RAID 1 linking is not RAID 0. It is more like JBOD. Basically the controller will link two drives back to back so while you get a “larger” logical drive. However, you don’t get any speed benefits associated with RAID 0.

The DC-680CD cache only caches the HDDs on the IDE port one and two. There is no caching provided for the CD Drive.

The Compaq branded Conner HDDs caused me a ton of grief in installation. The HDDs would all check out okay individually. Also installing three drives worked fine. However, installing a fourth drive caused issues in that the drive would only be seen intermittently. Switching drives, cables, locations on the bus or IDE ports continued to display the same problem. I even attempted a FW update on the controller with no change. Finally I was able to find info on a very similar model that indicated a jumper need to be changed on all four drives. Once I did that the system saw all four drives consistently.

The biggest issue, and one that remains unresolved, is the parity errors when the motherboard is fully loaded with 256MB of RAM or even 192MB (although the errors are seen less often with 192MB).


Initially I thought it may have been due to a bad memory stick. As I had extra RAM on hand I tried installing different sticks and got the same results. To make things more confusing I attempted to test the sticks using MemTest 2.6:


After seven passes and no errors I was ready to declare the system stable. However, on reboot I got a weird boot screen:


I approached the hive mind with the issue and initially it seemed we may have found the issue in bad cache chips.


Unfortunately the victory was short lived:


At this point I began suspecting the motherboard as a possible culprit. One interesting thing was that during the testing the last two banks would maybe get warm or even stay cold while the first two banks would get hot. It seemed as if there might be a power issue to the last two banks. As stated earlier this motherboard has a P3 connector. Per the manual each bank of SIMMs uses 2A of power. I built a jumper cable to supply power to P3 from a FDD power connector:


Continued in part 2….
 
Last edited:
Installation and Testing of Components Part 2

Installation and Testing of Components Part 2

Continued from part 1…

Unfortunately, the extra power did not help resolve the issues with the parity errors. The system however worked superbly with only 128MB. As such a decision was made to limit the memory to 128MB and proceed with the rest of the restoration.


It even displays the correct speed on the case LED display:


Future Plans

Future Plans


For now the system is proving to be a solid performer. It is handling everything I am throwing at it, as it should, given the horsepower under the hood. With the Pentium OverDrive the system should be able to handle almost all DOS based games up to the time when a 3D accelerator became a requirement. The system should also run Win95 and probably Win98 with ease. I do have my doubts as to it performance under those OSes specially if one plans on playing games. As such WfW 3.11 is going to remain my "windows" of choice on this system. The 100mbit NIC, ZIP drive, and CD-RW allow for very easy transfer of data between this system and more current system. In fact the NIC almost completely eliminates a need for "Sneaker Net"

Having said that a few issues remain to be addressed. Some of these are easy and some more difficult:

  1. Easy
    • Replace 3com 3C515 with an EISA 3C597
    • Install Thrustmaster ACM Game Card
    • Install LAPC-I Sound Card
    • Consider a Tape drive for a backup solution (e.g. Colorado T3000)
  2. Doable
    • Repaint the case with better quality paint. This requires mostly will power to dedicate a weekend or two to the job AGAIN. If I do repaint the case I plan on using a high quality primer as a base coat and sealing it with some flat sealant afterwards. I would also "bake" the paint using an ambient heater (or the CA sun depending on the time of the year) for a few days to ensure a proper curing and bonding.
  3. Possibly Impossible
    • Resolve memory issues: I would really love to get the system fully loaded with 256MB of RAM. However, my guess is that there is a component fault of some kind on the motherboard resulting in the parity error. This could be a result of age or it could be why a second revision of the board was issued. In either case this would be well beyond me to repair.

If you made it through all the posts up to this point thank you for bearing with me and I hope you enjoyed the overview of the restoration as much as I enjoyed doing it.

Shadow Lord
 
Is the DS1485 a drop in replacement for a DS1488? I have Nice SuperEISA that uses a DS1488 and don't really feel like drilling into it.

The SCSI controller looks an awful lot like the VLB AMI Fastdisk.

How well supported is the POD83 in this thing? Does it support L1 in WB mode? Is L2 enabled?
 
Is the DS1485 a drop in replacement for a DS1488? I have Nice SuperEISA that uses a DS1488 and don't really feel like drilling into it.

Yes, but the DS1485 is a SOIC part so you have to design a PCB ala the DS1887 replacements out there.

The SCSI controller looks an awful lot like the VLB AMI Fastdisk.

Ha! Any information or linkage to information on this? Drivers or manuals would be fantastic!

How well supported is the POD83 in this thing? Does it support L1 in WB mode? Is L2 enabled?

I am not sure on WB on L1. However, L2 is enabled.
 
Last edited:
Looks like DS1485 is available as both DIP and SOIC, however the DIP version is only 600mil, whereas the DS1488 is 740mil, so you'd still need an adapter for it....plus it also requires a crystal and battery. I'd definitely be interested in an adapter for the SOIC version though.

I don't have any special information pertaining to the EISA card, but I think I might have a copy of the manual for what I think is the VLB version (AMI FastDisk). I'll see if I can dig it up again. Judging by the components on this card, I'm somewhat confident it would work with the software from the VLB.

Caching%2BSCSI%2BController%2B%2528VLB%2529.jpg


http://www.uncreativelabs.de/th99/c/A-B/20031.htm

I seem to recall the PDF manual I had was for both EISA and VLB versions. The main difference between the two is that the EISA version doesn't have the switch banks. Those are probably set using the ECU, so you really need the driver disks. I can't remember if I located those or not. AMI actually still has a lot of this stuff on their server, but for some reason it's almost impossible to access it directly from their site.

http://66.113.161.23/~mR_Slug/EISA/!AMI44C1.CFG

Supposedly these cards are buslogic compatible, so you might not even need the original drivers.

Good to know about the POD83. The Nice SuperEISA is somewhat of a clone of the AMI enterprise III/IV so it's likely POD83 would work okay on my board too.
 
Last edited:
Thanks for that info. The DS1485 is available as a DIP but if you want to fit everything in the same space as the original DS1488 you have to use the SOIC part.

I am not sure if this is the Fast Disk. It matches your picture nicely but the link on uncreativelabs is different.

I had the CFG file for the EISA card but it does not really do anything aside from auto assigning resources and telling you about the two switches (which are pretty self explanatory). If you find your copy of the PDF I would love a copy of it and any software you may have. I will check the Adaptec site and see what I can find as well.

TIA!
 
O.k. Thanks to AC's info I was able to find OS/2 drivers for the SCSI Controller. They can be DLed here.

And the love keeps coming. Apparently there is a later BIOS for the board dated: 070693. Still have not located actual file but I did find a file list for the old AMI BBS which lists it.
 
Last edited:
AMI used to have all this on their FTP site....which appears to have recently gone down. Anyone got a mirror? Regarding RAM, are you using 9 chip parity 30pin SIMMs? I know both the NiCE and the Tyan EISA/VLB boards with the SiS EISA chipset are pretty picky about memory. Manual for this board is still up: https://ami.com/ami_downloads/Enterprise_III_S68_Users_Guide.pdf

Spammy driverfinder has the file.

BIOS Release 68063093
41-0103-004668-00111111-111192-AMIS68


View attachment s68bios.zip


To follow up, I might have other, possibly later BIOS files from AMI's FTP. I have to check my machine when I'm home.
 
Last edited:
AMI used to have all this on their FTP site....which appears to have recently gone down. Anyone got a mirror? Regarding RAM, are you using 9 chip parity 30pin SIMMs? I know both the NiCE and the Tyan EISA/VLB boards with the SiS EISA chipset are pretty picky about memory. Manual for this board is still up: https://ami.com/ami_downloads/Enterprise_III_S68_Users_Guide.pdf

Spammy driverfinder has the file.

BIOS Release 68063093
41-0103-004668-00111111-111192-AMIS68


View attachment 60883


To follow up, I might have other, possibly later BIOS files from AMI's FTP. I have to check my machine when I'm home.

Well some more digital plunking led to this mirror. It is on the archive.org FTP boneyard.

I found the driver disks and "manual" for the series 44 controller. AMI apparently used WP5.1 to make the manuals (another tidbit of info I found during my searches). Hopefully, the files are intact. The PDF guide you linked to is for revision 2 of the board. There is a manual in three parts as well (s68man.exe is the archive). The first file seems to be corrupt. The other two will load in Word as WP5.1 files albeit with errors.

The BIOS file you found is the 06/30/93 version which is also the same one in the mirror on archive.org. However, a file list from the old BBS indicates:

Code:
S68BIOS.ZIP     58774  12-13-93  S-68  Enterprise III     / Flash BIOS
                                 EC070693 update to 063093 BIOS date
                                 Fixes minor boot problems with some floppies

So about 4 days later. I have not found this version and I have not found anything dated later. If you have this or something later that would be great.

In regards to the CFG files for the motherboard apparently the later revision allows windows to see more then 64MB of RAM:

Code:
S68CFG.ZIP       2511  03-18-93  S-68  Enterprise III New CFG & OVL files to
                                       allow Windows to see over 64meg memory
 
Last edited:
Very nice system, had my eye on one of those for years, as well as the systempro. You seam to be able to get anything in California.

I think the files for the 44 series are in this file:

http://66.113.161.23/~mR_Slug/temp/SCSI.zip

Read Dsc_scsi006.txt and Dsc_scsi007.txt, then look at DISK1.ZIP etc. The dir is a mess no idea where disk 5 is.

I have a mirror of ftp.ami.com. I will try to up it to archive.org sometime, but last time with ftp.necam.com i had to split it as it timed out around 3GB. What is going on with ftp servers? They're all going down:-(. does anyone have the Epson ftp?
 
Back
Top