Upcoming Events:
- VCF South West - June 14 - 16, Davidson-Gundy Alumni Center at University of Texas at Dallas
- VCF West - Aug 2 - 3, Computer History Museum, Mountain View, CA
- VCF Midwest - Sept 7 - 8 2024, Schaumburg, IL
- VCF SoCal - Mid February 2025, Location TBD, Southern CA
- VCF East - April 2025, Infoage Museum, Wall NJ
-
Please review our updated Terms and Rules here
- Forums
- Companies
- Apple computers, Clones and Descendants
- Later Apple (68k+ based machines - Mac, Lisa, etc)
You are using an out of date browser. It may not display this or other websites correctly.
You should upgrade or use an alternative browser.
You should upgrade or use an alternative browser.
Mac II relife
- Thread starter Elvi
- Start date
Elvi
Experienced Member
Thanks, i'll see if i can figure it out.
Elvi
Experienced Member
Elvi
Experienced Member
Progress :D
i found this video on youtube http://youtu.be/6Mvn5z6AJK4 Jump Starting the Macintosh II and to my surprice it actually awoke so the psu is ok :D
and my next surprice was when i pressed the button on the back and it shut off but starting it again with the extra battery connected to the bad one, no go... so a trace must be bad around the button.
Elvi
Experienced Member
i'm trying to see where the traces go but i can't, theres just no hint at all where they go and i know about the caps but now it boots atleast of the psu, also just noticed that it doesn't give a chime, nothing from the speaker, plugged in and all that.
RWallmow
Veteran Member
Is it just me or do the traces LOOK bad in that first photo, have you checked the ones that look dark/corroded?okay, i havn't been able to identify the ways the traces go except for the 2 on the bottom of the switch in the above image, maybe someone can help?
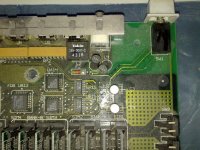
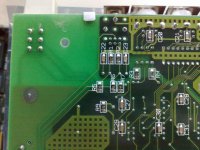
i've taken a image of the front of the board and under for help
View attachment 9199
button, top right corner
View attachment 9200
button pinns top left corner
You would need to clip out the dead battery, or its likely going to short whatever new battery you try to jumper onto it, I would be willing to bet those existing batteries have dead shorted internally. Like many of us have said from the beginning, replace those batteries. It might not even be bad traces, but just shorted batteries (however the traces don't look good, so it could be both).
EDIT: Since you have got this thing to power on, you know its worth doing the work to replace the batteries. :listen: :D
Elvi
Experienced Member
not both batteries are bad, just the 2nd one but i guess i could clip that one out, btw i've never changed surface mounted caps before so i wouldn't know how to or even what specs these caps have.
RWallmow
Veteran Member
not both batteries are bad, just the 2nd one but i guess i could clip that one out, btw i've never changed surface mounted caps before so i wouldn't know how to or even what specs these caps have.
Surface mount work can be a bit scary at first, I would say practice on something unimportant first if you are worried, but if you can handle through-the-hole soldering its not much worse on these macs. These early macs have pretty large solder pads for most the surface mount caps, they are not too bad to work on. You might need a magnifying glass of some kind to read the values of the capacitors its usually small print on the cans, otherwise maybe someone else can chime in, I don't know the values needed by a Mac II, I have only done an SE/30 myself.
You need tools (like a multi meter) to check for continuity of the traces from point to point. If you do not have troubleshooting knowledge send the machine to somebody who does (local repair shop) to have it fixed, no idea what stuff like that costs in your area.
Elvi
Experienced Member
i've allready tested the traces from the button but on 2 of the pinns i can't honestly see where they are going, the 2 bigger traces i can see where they are going and the both connect, it's the 2 smaller traces that i can't see where they go.
@ RWallmow large solder pads? these caps have smaller pads than i've tried in any other machine i've changed stuff in, besides that i can't even see the solder pads.
@ RWallmow large solder pads? these caps have smaller pads than i've tried in any other machine i've changed stuff in, besides that i can't even see the solder pads.
I don't have a Mac II, but I have recapped 3 IIx machines and those used around 15 pieces 47uf 16V capacitors. All of them were in easy to get to areas.
For surface mount capacitors the solder pads are under the part. You don't actually solder the legs, mostly you heatup the pads that stick out and that flows solder to the capacitor legs. There are posts about resoldering methods if you do a search. Even with new capacitors and batteries there is still the chance you need to do board level repairs or replace other components that were damaged from the leak.
For surface mount capacitors the solder pads are under the part. You don't actually solder the legs, mostly you heatup the pads that stick out and that flows solder to the capacitor legs. There are posts about resoldering methods if you do a search. Even with new capacitors and batteries there is still the chance you need to do board level repairs or replace other components that were damaged from the leak.
Elvi
Experienced Member
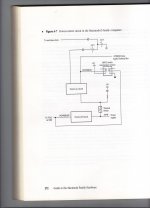
Yes i guess your right about the repairs but with the help of that video i managed to get it going so i can bypass the button if i want to and i think atleast 1 of the small traces to the button that can be seen on the image is probably broken but i could fix that with a new wire on the back if i just could figure out where it goes, the schematic image didn't give much to go after so i don't want to attach a new wire to maybe some wrong place.
On the battery bit, i cut away the battery that only had 1v left in it but let the other one be cause it had over 3.10v in it, maybe that's the clock battery.
thanks anyway this far.
On the battery bit, i cut away the battery that only had 1v left in it but let the other one be cause it had over 3.10v in it, maybe that's the clock battery.
thanks anyway this far.
Elvi
Experienced Member
I'm guessing the top most trace from the button goes to the tokin "black box", if that is the case i don't get any connection, also just today after clipping away the "start" battery i tried my 9v battery on the same pinns and couldn't get the mac to start so i guess the start circuit is offline while the off circuit seems to work.
Elvi
Experienced Member
I'm wondering if it's possible to exchange the orginal surface mounted caps for more normal thru mobo type caps, there seems to be holes to support this beside the orginal caps but i'm unsure.
What i do know however as these holes have direct connections to the current caps as i've tested for connectivity, so both the surface mounted solder pads and the thru holes seem to be linked but i thought i'd ask to confirm this.
If anyone wants i can upload an image of the area in question.
What i do know however as these holes have direct connections to the current caps as i've tested for connectivity, so both the surface mounted solder pads and the thru holes seem to be linked but i thought i'd ask to confirm this.
If anyone wants i can upload an image of the area in question.
scott-k
Member
I checked my board, and those holes are pretty small... if they're holes at all. They may be traces from one side of the mainboard to the other - I'm not sure.
I used this site to re-cap my Macintosh II (and a IIx, and two IIcx's):
http://inbox.apana.org.au/?p=1342
Personally, I wouldn't try shoving anything through those holes.
I used this site to re-cap my Macintosh II (and a IIx, and two IIcx's):
http://inbox.apana.org.au/?p=1342
Personally, I wouldn't try shoving anything through those holes.
scott-k
Member
i tried my 9v battery on the same pinns and couldn't get the mac to start
Just curious... Was this a typo, or did you actually apply 9V to those pins? I'm pretty sure the spec calls for a max of 6V
RWallmow
Veteran Member
I checked my board, and those holes are pretty small... if they're holes at all. They may be traces from one side of the mainboard to the other - I'm not sure.
I used this site to re-cap my Macintosh II (and a IIx, and two IIcx's):
http://inbox.apana.org.au/?p=1342
Personally, I wouldn't try shoving anything through those holes.
That site recommends cleaning the board with brake cleaner (trichloroethylene), which if heated with butane (or some other gases), can become phosgene, which is some deadly stuff. I do most of my soldering with a butane soldering iron (I like it, its portable, has many tips to choose from, and has a fairly wide heat range) and this could be quite dangerous to someone like me if I didn't know better.
This is just an FYI to readers, many people have been hurt or killed welding/soldering things that have been cleaned with brake cleaner, so now you know
scott-k
Member
Phosgene... As in First World War chemical weapons? Okay, I'm glad I skipped that step now 
Thanks for the heads-up
Thanks for the heads-up
RWallmow
Veteran Member
One and the same....Phosgene... As in First World War chemical weapons? Okay, I'm glad I skipped that step now
Thanks for the heads-up
I have heard stories of people who have died welding on parts that were cleaned with brake cleaner, worse yet are some of the stories of the ones who lived....
Not sure how much gas could be produced from soldering vs welding, but I personally would never want to risk that.


