How to move PC floppy images to and from the TRS-80 Model 4
Introduction
When I started my computer collection in 2010 I definitively wanted to include the TRS-80 Model 4p. I purchased one new back in my engineering days and have fond memories of messing around with MM CP/M. For my collection I bought a Model 4p from a guy that refurbished them and guaranteed they were good to go including a manual, TRSDos and MM CP/M boot disk.

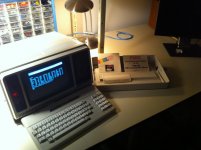
Figure 1 – It arrived...Now what?
The fun soon ended when I realized I had no idea how to get vintage programs onto the Model 4P short of someone providing correctly formatted diskettes. Having saved all my CP/M source files from the late 80s onto MSDOS media I was very interested in figuring out the transfer process on my own. At first I tried all sorts of CP/M commands to send data to and from the serial port in an attempt to get a communication program to the Model 4p with no success. I then remembered what the MM supplied MDM730.COM program was for and I was in business….sort of. Looking back Xmodem seemed fast but by current standards it’s a painfully slow way to transfer files.

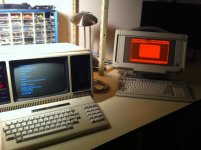
Figure 2 - Tearing it up with Xmodem on the Model 4P
The other issue I immediately encountered was most of the interesting TRS-80 files on the internet were in a mysterious image format. Fortunately there are many dedicated TRS-80 sites on the web to answer basic questions. I discovered a couple of things right away: (1) I was late to the vintage TRS-80 scene and (2) understanding image transfer formats was essential to moving files around. It also appeared using an old floppy drive in a PC was a convenient way of moving files but detailed instructions were limited.
I decided to create an MSDOS solution as I was very familiar with the hardware and software. There are a bunch of ways to accomplish transfers so if the one I suggest doesn’t meet your needs then you will probably find what you are looking by researching the web.
“Your mission Jim if you choose to accept it”
In order to move files between the Model 4P and a PC you will need some old hardware and some very clever software. For the software you will need a TRS-80 Model 4 Emulator that can write to a real 5.25 inch 360K floppy drive. With this setup you will be able to write TRS-80 diskette images found on the web to real floppies that can be booted or read in the Model 4P. The reverse is true as well; real TRS-80 floppies can be read into the emulator and stored on the PC HD. The emulator stores diskette content as a single image file. Emulators can usually handle differing diskette formats including LS-DOS. You will also need another bit of software to copy individual PC files to the disk image format and the reverse of this as well. I will cover this later.
HW/Software Implementation
Let me start out by saying the implementation I present might not be the best or even efficient but it does work. Like I said above there are numerous ways to do this.
Hardware - My transfer PC is a real Frankenstein creation. It started out life as an IBM PC and then had the motherboard yanked for slightly newer technology. The DK Emulator requires at least a 386 and the other HW requirement is the motherboard bios/ floppy controller must be able to handle a 360k floppy drive. Finding a MB that will meet the requirements is not too hard. I selected one (from Ebay) that had both ISA and PCI slots. I figured if the MB had ISA slots its bios probably supported 360K floppy drives. If it’s not already clear you will also need a real 360k floppy drive. I have not had good luck with the 1.2Meg/360k ones for whatever reason.

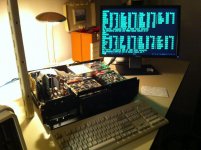
Figure 3 - PC used to transfer images to diskette. DK emulator running MM CP/M in Model 4P mode.
The cards in the slots starting from the left are as follows:
Slot 1 ISA – 8 bit Paradise VGA adapter.
Slot 2 ISA – Catweasel (Not needed but nice to have. more on this later).
Slot 3 ISA – Parallel port adapter (not needed. Used for Xircom network adapter).
Slot 4 ISA – XT-IDE project board with compact flash storage.
Left media opening – 5.25 inch 360k floppy drive connected to MB.
Right media opening - 5.25 inch 360k floppy drive connected to Catweasel (not needed).
MB Bios and onboard interface support 5.25 inch 360K floppy drives.
OS – MSDOS 6.22
More on the Catweasel board: Basically this board can write and read PC images directly to and from a 360k drive without the need for an emulator. I use this occasionally when I am not using the emulator to create files or binaries and I just need to transfer an image to diskette or the other way around. This is kind of an expensive option. In order for the Catweasel to work with Model 4 images you need to toss the software that comes with it and download Tim Mann’s Catweasel tools from the net.
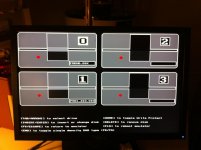
Software - There are several great emulators out there and I selected the one David Keil wrote. It’s a Dos based emulator and is named TRS80.EXE. I have the 6.20 version. You should be able to find it with a quick web search. I am glossing over the “how to use an emulator” discussion as it’s something the reader should really study on his/her own. The cool part of the DK emulator is that you can load an image into a virtual floppy drive and use it in the emulator just like you were sitting at a Model 4. The trick for real floppies is to use the supplied image file that actually bridges the emulator to real floppy drive hardware. In the 6.20 version the image name is like FDD0_360K.dsk. Below is an image of the setup screen for the virtual floppy drives.

You can see in drive[ 0] I have selected a floppy boot image off of the PC hard drive for CP/M. In the second virtual drive I have the bridge image that allows the emulator to read and write the real floppy drive in the PC. Returning to the emulation screen you can then use whatever Model 4 OS you want, in this case CP/M, to copy files from the image to the diskette or the other way around. I usually format diskettes in the Model 4 rather than in the emulation. The DK emulator can also emulate Radio Shack hard drives so you can have your library of programs and files in the emulator and then move them back and forth to real diskettes. As an example, I usually do all my development work in the emulator and then transfer the binaries to diskette to run on the real Model 4 HW.
Ok, this sort of makes sense but what about individual files?
What I have presented up to now is how to transfer files in a PC image file to/from a TRS-80 Model 4 Diskette. What I haven’t covered is how to move PC files that are not in an image file. Well it turns out you have to put them in an image file to move them. There are PC programs for this and the ones I found are called TRSREAD and TRSWRITE from Matthew Reed. You should be able to locate these utilities via a quick search on the internet.
Transfer Scenarios
Scenario 1
I want to create a real floppy for my Model 4 from a floppy image file I downloaded to my PC from the net.
Answer - Use the DK Emulator to write the files in the image to diskette with the appropriate hardware setup. This will involve using whatever copy utility is supported by the OS that has been selected for emulation.
Scenario 2
I want to save my real floppy contents to an image on the PC.
Answer – Use the DK Emulator to read the real floppy and write the files to a floppy image on the PC HD. This will involve using whatever copy utility is supported by the OS that has been selected for emulation.
Scenario 3
I want to copy a text file I have on my PC to a real floppy for my Model 4.
Answer – use the TRSWRITE tool to create a floppy image out of the file(s) you want to transfer. Then use the DK Emulator to write the file(s) from the image to diskette with the appropriate hardware setup. This will involve using whatever copy utility is supported by the OS that has been selected for emulation.
Scenario 4
I want to copy a text file I have on a real Model 4 floppy to my PC for printing.
Answer - Use the DK Emulator to read the real floppy and write a PC floppy image to disk. This will involve using whatever copy utility is supported by the OS that has been selected for emulation. Then use the TRSREAD tool to extract the file from the image for later printing.
Epilog
I hope this article will help collectors save time when starting out with a TRS-80 Model 4. I definitely understand the nightmare of sorting out how to get your favorite programs and files transferred to a vintage computer.
Best of luck with your vintage computer collection,
Matt Wing
Introduction
When I started my computer collection in 2010 I definitively wanted to include the TRS-80 Model 4p. I purchased one new back in my engineering days and have fond memories of messing around with MM CP/M. For my collection I bought a Model 4p from a guy that refurbished them and guaranteed they were good to go including a manual, TRSDos and MM CP/M boot disk.

Figure 1 – It arrived...Now what?
The fun soon ended when I realized I had no idea how to get vintage programs onto the Model 4P short of someone providing correctly formatted diskettes. Having saved all my CP/M source files from the late 80s onto MSDOS media I was very interested in figuring out the transfer process on my own. At first I tried all sorts of CP/M commands to send data to and from the serial port in an attempt to get a communication program to the Model 4p with no success. I then remembered what the MM supplied MDM730.COM program was for and I was in business….sort of. Looking back Xmodem seemed fast but by current standards it’s a painfully slow way to transfer files.

Figure 2 - Tearing it up with Xmodem on the Model 4P
The other issue I immediately encountered was most of the interesting TRS-80 files on the internet were in a mysterious image format. Fortunately there are many dedicated TRS-80 sites on the web to answer basic questions. I discovered a couple of things right away: (1) I was late to the vintage TRS-80 scene and (2) understanding image transfer formats was essential to moving files around. It also appeared using an old floppy drive in a PC was a convenient way of moving files but detailed instructions were limited.
I decided to create an MSDOS solution as I was very familiar with the hardware and software. There are a bunch of ways to accomplish transfers so if the one I suggest doesn’t meet your needs then you will probably find what you are looking by researching the web.
“Your mission Jim if you choose to accept it”
In order to move files between the Model 4P and a PC you will need some old hardware and some very clever software. For the software you will need a TRS-80 Model 4 Emulator that can write to a real 5.25 inch 360K floppy drive. With this setup you will be able to write TRS-80 diskette images found on the web to real floppies that can be booted or read in the Model 4P. The reverse is true as well; real TRS-80 floppies can be read into the emulator and stored on the PC HD. The emulator stores diskette content as a single image file. Emulators can usually handle differing diskette formats including LS-DOS. You will also need another bit of software to copy individual PC files to the disk image format and the reverse of this as well. I will cover this later.
HW/Software Implementation
Let me start out by saying the implementation I present might not be the best or even efficient but it does work. Like I said above there are numerous ways to do this.
Hardware - My transfer PC is a real Frankenstein creation. It started out life as an IBM PC and then had the motherboard yanked for slightly newer technology. The DK Emulator requires at least a 386 and the other HW requirement is the motherboard bios/ floppy controller must be able to handle a 360k floppy drive. Finding a MB that will meet the requirements is not too hard. I selected one (from Ebay) that had both ISA and PCI slots. I figured if the MB had ISA slots its bios probably supported 360K floppy drives. If it’s not already clear you will also need a real 360k floppy drive. I have not had good luck with the 1.2Meg/360k ones for whatever reason.

Figure 3 - PC used to transfer images to diskette. DK emulator running MM CP/M in Model 4P mode.
The cards in the slots starting from the left are as follows:
Slot 1 ISA – 8 bit Paradise VGA adapter.
Slot 2 ISA – Catweasel (Not needed but nice to have. more on this later).
Slot 3 ISA – Parallel port adapter (not needed. Used for Xircom network adapter).
Slot 4 ISA – XT-IDE project board with compact flash storage.
Left media opening – 5.25 inch 360k floppy drive connected to MB.
Right media opening - 5.25 inch 360k floppy drive connected to Catweasel (not needed).
MB Bios and onboard interface support 5.25 inch 360K floppy drives.
OS – MSDOS 6.22
More on the Catweasel board: Basically this board can write and read PC images directly to and from a 360k drive without the need for an emulator. I use this occasionally when I am not using the emulator to create files or binaries and I just need to transfer an image to diskette or the other way around. This is kind of an expensive option. In order for the Catweasel to work with Model 4 images you need to toss the software that comes with it and download Tim Mann’s Catweasel tools from the net.
Software - There are several great emulators out there and I selected the one David Keil wrote. It’s a Dos based emulator and is named TRS80.EXE. I have the 6.20 version. You should be able to find it with a quick web search. I am glossing over the “how to use an emulator” discussion as it’s something the reader should really study on his/her own. The cool part of the DK emulator is that you can load an image into a virtual floppy drive and use it in the emulator just like you were sitting at a Model 4. The trick for real floppies is to use the supplied image file that actually bridges the emulator to real floppy drive hardware. In the 6.20 version the image name is like FDD0_360K.dsk. Below is an image of the setup screen for the virtual floppy drives.

You can see in drive[ 0] I have selected a floppy boot image off of the PC hard drive for CP/M. In the second virtual drive I have the bridge image that allows the emulator to read and write the real floppy drive in the PC. Returning to the emulation screen you can then use whatever Model 4 OS you want, in this case CP/M, to copy files from the image to the diskette or the other way around. I usually format diskettes in the Model 4 rather than in the emulation. The DK emulator can also emulate Radio Shack hard drives so you can have your library of programs and files in the emulator and then move them back and forth to real diskettes. As an example, I usually do all my development work in the emulator and then transfer the binaries to diskette to run on the real Model 4 HW.
Ok, this sort of makes sense but what about individual files?
What I have presented up to now is how to transfer files in a PC image file to/from a TRS-80 Model 4 Diskette. What I haven’t covered is how to move PC files that are not in an image file. Well it turns out you have to put them in an image file to move them. There are PC programs for this and the ones I found are called TRSREAD and TRSWRITE from Matthew Reed. You should be able to locate these utilities via a quick search on the internet.
Transfer Scenarios
Scenario 1
I want to create a real floppy for my Model 4 from a floppy image file I downloaded to my PC from the net.
Answer - Use the DK Emulator to write the files in the image to diskette with the appropriate hardware setup. This will involve using whatever copy utility is supported by the OS that has been selected for emulation.
Scenario 2
I want to save my real floppy contents to an image on the PC.
Answer – Use the DK Emulator to read the real floppy and write the files to a floppy image on the PC HD. This will involve using whatever copy utility is supported by the OS that has been selected for emulation.
Scenario 3
I want to copy a text file I have on my PC to a real floppy for my Model 4.
Answer – use the TRSWRITE tool to create a floppy image out of the file(s) you want to transfer. Then use the DK Emulator to write the file(s) from the image to diskette with the appropriate hardware setup. This will involve using whatever copy utility is supported by the OS that has been selected for emulation.
Scenario 4
I want to copy a text file I have on a real Model 4 floppy to my PC for printing.
Answer - Use the DK Emulator to read the real floppy and write a PC floppy image to disk. This will involve using whatever copy utility is supported by the OS that has been selected for emulation. Then use the TRSREAD tool to extract the file from the image for later printing.
Epilog
I hope this article will help collectors save time when starting out with a TRS-80 Model 4. I definitely understand the nightmare of sorting out how to get your favorite programs and files transferred to a vintage computer.
Best of luck with your vintage computer collection,
Matt Wing
