• Please review our updated Terms and Rules here
  • From now on we will require that a prefix is set for any items in the sales area. We have created regions and locations for this. We also require that you select a delivery option before posting your listing. This will hopefully help us streamline the things that get listed for sales here and help local people better advertise their items, especially for local only sales. New sales rules are also coming, so stay tuned.

Pacific Northwest Paper Tape Punch Service - and request

Covers: Oregon and Washington

mondoshawan

Member
Joined
Sep 27, 2021
Messages
12
Oddball question: are you, perchance, planning on open sourcing the models for that paper cutter? Definitely interested in the design, as I have a few other machines that could use paper tape cut to varying sizes.
 

DougM

Member
Joined
Apr 20, 2023
Messages
24
Oddball question: are you, perchance, planning on open sourcing the models for that paper cutter? Definitely interested in the design, as I have a few other machines that could use paper tape cut to varying sizes.
Sure, that sounds like fun. I've got no formal documentation on it nor a build log but I will start posting details in this thread if that's ok with the forum. It will be critical for you to have a decent 3D printer if you want to get very far with this project.
 

mondoshawan

Member
Joined
Sep 27, 2021
Messages
12
Fortunately, I do. I have two Prusa Minis and a Prusa i3 MK3s MMU2S in tip-top condition. :D
 

Nevets01

Experienced Member
Joined
Aug 29, 2018
Messages
123
Location
United States
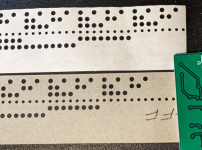
There were 70s punched tapes that had (all-caps) title text at the head of them (I've seen examples of Pittman's Tiny BASIC like that)-- I don't know if that was just one off stuff by whoever was making the tape or whether some of the equipment (33ASR) had a way of doing it automatically?
Both, probably. I have a Numeridex paper tape punch which has a built in 8080 multibus system... one of the functions takes ASCII text in, and produces legibly punched characters (in all caps) on the papertape. (I still don't know how to give it a simple stream of bytes to punch... if anyone has a manual for a Numeridex LC6000ME, please let me know) But such a thing wouldn't be too terribly hard to program; just a lookup table matching every letter to five or so bytes to send out the serial port to an ASR33.

That's a really good question - all the printable characters at the time were in the lower 7 bits (this machine was manufactured in 1975), so while the machine does have an 8th bit I don't think it was used except maybe for parity?. And I didn't code parity. So both text and binary modes only takes advantage of the lower 7 bits (since the binary is just a character in an interpreted language like BASIC). I guess I could change that, but then I'd have to create a whole new font.

but then on the other hand if you were punching actual binary on it like a boot loader it would have to use that 8th bit. Now I need to go see how binary mode actually responds when I send it >127.
This is actually an interesting problem concerning the ASR33 -- the tape reader and punch are 8 bits, but the keyboard and typewheel only use 7 bits (and sometimes parity; it was an optional feature). So when I use a terminal program to pretend to be a teletype with my Nova computers, I have to set the terminal to 8N1 when sending the loader and the binary over, then switch it to 7N2 before I actually start the program so it'll display text correctly.
But yeah, for binaries you absolutely need that 8th bit. And it doesn't hurt to have another row for punching characters either : )

Oddball question: are you, perchance, planning on open sourcing the models for that paper cutter? Definitely interested in the design, as I have a few other machines that could use paper tape cut to varying sizes.
Sure, that sounds like fun. I've got no formal documentation on it nor a build log but I will start posting details in this thread if that's ok with the forum. It will be critical for you to have a decent 3D printer if you want to get very far with this project.
I too would be very interested... I've got papertape For Now, but having a reliable source from readily (and currently) available materials would be awesome!
 

DougM

Member
Joined
Apr 20, 2023
Messages
24
Ok, to get started we should talk about the parts I bought. A lot of the design decisions were based, not surprisingly, on what I had in stock. Bearing choices, linear shafts, the aluminum base, were all stock materials.

Let's get right to it.

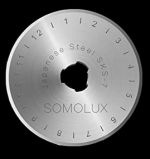
Most important is the blades. I originally tried to do it with standard utility knife blades, but that ended up tearing the paper after a remarkably short time, so spinning blades were the better option. Specifically these (fabric cutter blades):

1685245472807.png
(representation only, not actual blade below)


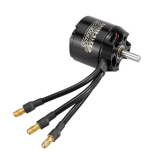
To spin these blades I first tried a small brushed motor, but it just didn't have the torque necessary. So I went to a BLDC outrunner which, at basically the same diameter and half the length, has far more torque.

1685245523157.png

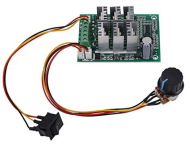
Of course the downside to BLDC is you need a driver, and that is a remarkably deep subject, but for our purposes a little off the shelf driver will do. This one comes with a speed potentiometer

1685245568115.png

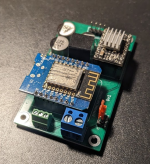
For some weird reason I spun my own stepper driver board with an ESP32 (Wemos D1 Mini) and one of these (or similar) little off the shelf stepper drivers, but you can just get any stepper driver mechanism that will allow you to vary the feed rate.

1685245645977.png


Now, for the bad news. You might need a lathe to complete this project. Almost all of the parts you can make with standard tools, but there is one that will likely require some imagination.

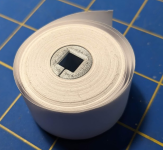
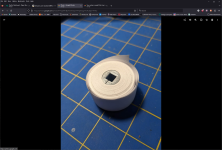
The paper reels, after they are cut, need to be removable from the machine all rolled up on their axles.

1685245953602.png

That means the whole axle assembly needs to be quick-release. So there's a little lever that holds the shaft in place

tLHUdLufOdN0RRDUdUwYfrGpNJW18uidCCsXzwYNI-DpevqBSQJUjjXezCyr9oxzOUYwvTWfUtf4OlDscXjfEVNkr65YD8UVq5VnjApJ_x2AKx7_8bgoruQb6dPnwOi_9qvhUiNubqCfdbjV-CqSYvkcaboHcXPaBPu9Fwy5Dbc5QxwDPaePLh1gGYvS6N5P7BfX3_eVySOWQ9CoGqScunSLgG8Own5XeMnDjzra_N-4TgCI0CCyvQBjfVoT_WMJ3tsoGbPxlmSTEBLswqFM_ywPxnQqiLKZiqhedXUbfRn2k0um-W1RxKMkZQMrpFN8cY9CydRYpC-ACNH0oVVKiSOmOoECrxkl7Sb-HRDhoDbFIObt1cShKaX3m4_KLVaGpFWVIbwKCW-C4r6s5jGyMcP6ejGEfsxf42F-qJ21bfn7OZgFdzIYfrCmd7zqKQiwx_Klpl1a8pq9Ydjn_A32_Eg6stGVeUHZAIU2Ek8OE6Y1t1-6C96dDTp0Oqmzvj4csoAwio4lyKQ9rA-hVkNfmjrN1wBi826U_yY713BrmKbRPN6oRq32Tl06F_SLb-5xDSDdYiD106vOA2kzvPlhh5RjC4cmQpt5-q58wbaeMf8OsyWbVSScaj2xE5ZcIMI9XwQrhXt20Mb1QHOwwYNqrohykkOqE9V_qrEh0Ap65Qna0KWLuqtwFUaDMeuQn65OtTBAFWisRlKuG08BvLl6MW8EvI_LTSxMdral79J7aFGihmOqOitj9noqnDnZDMvNu0K0q5j1zYaaQPYEr24MNwYymbhwgjHIinB3MHdavZKNn9kLUzecnt9HiABVNTuRUzcV01CfVqT2u4nV7bm9_oL0o17vCDuOMaz0O7CnmYQXaoQ8cLTHRETpX0vsisbi5hk5rt7nSo_oUY8IQkYK551bTsGVQl4WoIRfLAKkAB9ErurSlw=w872-h1163-s-no

xbF27MV5lhtKpJpY9ThjEVHfYWOK5i3vwju9bgInogPKHq_8qSHuAhOb_izr-8sUb6z5p4S8h6hQHj3LOQkO_zraIUhgqQmPJa-vLHctW1eX3xY9YDOf9bI2pS8C-u4bKFdseCxKrBRTGz8Y72LBd2-s71HN7WgFmkd_Ga2w6xi7Um7q4cBKQ6aTY1WXCQT_4yIcU8llBYzCDYt_JVaq39CixsZCxl1YhMLSt7gB5ifi5GiHTA54cSTZv1-6JKK1YheMEcPiFkP-ML164TVCtnnHNFblKB4xCRDzYSSSsMtwBexc_xZl8Io68DuVNYoUnupHKXy7xEIWR_GOMT_qHy75NXdJUDLBmE_MUCsVy88XxjSD_Eo1T588j2b3OhcqEIuHqHWwahtrew9IeyhzLVOVIuE29jhNEzFSu9H6l2yp1J_aC5nw1SG-lfGSlPIHon01QgzefqKUisMmpVfFIGVqxTwv60vsubq3RGt_YIJRQHU2MlcjkGK5o6eEPiYDz5XZf5JqbzQ_afXIrylRpl5OE_7hUxU7_v9cMp2h6uvLyjWzQNPD2SA-48XGjVoUHVPFbQgPaPCly-YT5SjMjbXRIfkjWfxwIGT8bm6VXgyf0TDfkFp5pI5N16G6v2F4lKvaXB63lmMD1ix7ecPKaY_TLjA2oN7qviFu5dHc3iwB0bugu6pUan9ZWLk3DCOIAZp4PtxIeT5Nlyg1bzsH9Uw6JfzGARWGrZzIf78_lAXbr0oFcypLRfbQPihuFmd_M24_JWyGx_N36ZM2aCfX9DB4LG64SoZNnvX7Ztk1oJriUEKxqcfKNZIxMgnJrtwSUGBtRd32C_3N112EcBLaW5fIYk66BXoNTkpYW3Qn-cr5TPgkYTpsJu2tzJIkISxK0vhLv4HQZsPLT1IJwgH6AUB1lPmgjEBv3RBERhZ44E5eaMLbYA=w872-h1163-s-no

1XRROxTzYxy841YlcZlsrPSJlrWUZZDOyTQgKSquQcB29ERucergM8gU3c5J-7VFTL56b17YNOuebBx6Nbf0XB_FB37Opo8N3VSBTVkoeKsE_oHl07LvLQPXskIfYrYdOy7Efz1EKEvjJuQFW5dsfBC8xLzTqgVF2U8CGJ11fqWtzqBYnoT_jJiVC7aWPvGMhXCd7o8Fz7MA1n4J2-egO-EWyF0UkRHDUurT1gPdFrPSYxLhlEd6rjYD2vEy-jDGpLILGs1HKoOeB5Jsn-DRmw8IRNFvWqR8283HVJmTH70UOTwjxZdX5CWfAdPpirScjJcmDITzbTqMOxTrq34gjpYr7uE8G8Xl61ycEUEp9DC-rLh6OVw_lzpqcFl7LrWPIod1iJfRw0-IHxhBsAuTFxmckf_412LqAKFmp-kFN0wAAnFA9ivbSJFqWSz4wKzhl66IVN2-gm1_1veDQO0L7EwSmQnxgxTweQP822qFCItHj5EIrg4aui8v6jgessyY6xbS6PGxd_vxHHWqHrtzPsRe32N6Eg9JR0l9Zhp4NqQrCHy8VuUamTHMsb_YfmnRqgRk06IQ-UCQ0HHAKpCTVcNKEAROD1hMZQFgb12LM4FSqVlPRnzqa5rkLNaYiel0gMt4D61GKsxGpsxmezF4e-r41keChUmUqeE6p5qmYwAd0LWIu8-dhPJd4l9_TZIWvSRYvE68g2r4Qlu-avVvkOMptEYjEOM2E87aZoHjIAsIiavAyI4EstaDIKXSoh2LujJwGyFG0OMQcF2OBDS3iyaiXvTKf1Cvu3EtJl5Zzxau63CQxH6Fy2_0TsISiL9g_ew0bxgXOnVGZHgBolZVGYuvBj0rDxNG21LpP0uecsxHhu4aa-qUC9Ljjv5V4fb1rPU1VB8Ys3uI6hVHVRD5o97M_p0-jGNqpwUIgUnSWdP0XFuiNQ=w872-h1163-s-no

That whole assembly is held into the stepper by a little coupler thingie that involves, I think, old bowden tube from a 3D printer :)
-8nJa2TFQbxUDBp0CIOFCLaEClRqtn9OO15jQCDTb5KduyDdNvQ91HZz-l4lETtyBZTJ5OP2bacISrHjTckP2kPkAo5wW9AWPqjyiMLV84kr54_i7JFOg57zMHGmZ2fHeMiDDYv5lnqI2huG88tHtxRXIG_AH0vEoLTPiIRa3b6boUUesXqP5WnkN2y5AXXxTEdKgn6WXuTYc-FiatbIO2Sh5H2GynkPP6TS7FeMd2tspwlfFNX13ej_rzE-UW0wPkzjnecXaX_sd7N3lrIlFdyzsRoy7bWirlZxV6Tc8HroepAYOk94dIZ-G72aGBtpGyCrxefGnhM6qssWlEIl_jAXLCRs9QovfhDhVADbZdqBRjPeefnPRzcavxUoldatpv-HPo6_IhlRHZxQsjERBLFdzs9snmi62d7MJm2l45RQ_181azFANfgCuOUPzSkXN3DLx28w-wMK9bxUdIUTu74LcneEBEYZ6kN15u4j9LNAqA1-3Ve1bljRv6E3lhiyB_IXuvljTFii9K6T_luIadGE_tVAWTdncCKEIORmz_iN5XbfIfuBp7vhawL9IOuuxVxyTVGQbHycmV1nPevbK-Dm_1ZM8ukLSq-_YOYiG2gmKGnC5aPyL91IXpMxCnHS056tuBhwy2b5MdF_3uDtA9SsrrCo2CZVPcnh8sIpUAnUWRbYh7OZQZ9S3oE6oRW3in_2tAUmpTKzgnmWzeOZH6KaQG_Pnvxm65dDY3yKhwA_WJUA4niWpKCeyya_IHVbF2zKWLr0FrqixG4tPsf52woy3j5_WQk2h9ZQbJWX-qaKCQ6A3O1kp7ua5Fz2vJVkaRbiQrmpWoWR-pQogh21m-weN6xZOerzBrUzCDM8MqxRnX-Ph7IPbedHO8jLinm7YniUdotZivdYYZ1xDs4nKUwL2kzwq2kfJhv3pygtRZTETxBc_g=w872-h1163-s-no

ibw6djGH7fsp-QluWkNVwcJILlmZ_KxEG4w0gbRtAZGVruc7OUPtTBTD0XlVW0kU1Ym3LL_c6J29dD41RMHm0X3dnpTKA9gw1uZl-v2VX6Wx9d2GwYaSqQL00mFDMKCoWLatbf7M414iTYim1z42MPuIjVUNH9fx52R1RcFmWCgoknvC8zgys01CwhdQU4dAT23cmRNlGioW7wiKCSjmV2yXk6emWkK9trC96gyMK8UWWaSoMjnNMZyImRPYg-0bOfSQReVrEpd88bywwAKt6R4tDG7SM64pYuXLLVmTg0Ox56cXhtTMHoQG3q0_ovIhyNUUPXe0d-EvaVp0pM3j7sf2A0GCHS3C1uKpPfM0KHdPoaIkTuMwfTc4I84QTsutoqdCPtjoAeOYTtKLwEP3Uhvekt_GnbwhnFxmjZ0z1bWMGPw-gwcn-9tv6t6T_AVKekKia70QIigQLdueaYXxk6Kx6MkNIOdvvsR8cqjJV1PMSt3RqBdzeKEI-151oOUL-4KnwTYRiIecuBWAXSErqGV8uR2zsi-mP4Bgk2xz0b-TwfuwviWW-UFO27jgJ2gZcQPE-QUL-ZJ2YXaioSc9KJLeY8Htd0P-BR4Tj7kECXAPZ_tII2khNibciwPIqopPjuB83DnsV7iAHMCM580IQ4Xsof8d3cP-yuNa8aSDhRoFymtvoF6WH-J6I-UVZpku0fZxdmFEYqabToz1DU33ul9rK7P44_6pBgTJwnPMmpESIGCbwePKBTVJXZAdFO1LRdHNZRYZmV0h_aS1loih15s8kOw3_CQwaOmOBfcK88mmviddIWLwMJIVIu8x8AFMQKWdaUAvpS8O9Ixc2pXU_3BhTJV8AsM1-zA13oTPqaQuGqc2NblVKaNu-WvMbhEjJMbr_HS2YuSxHbpZteyArmi0w4BQmZAAzhbDnF1unjetunoZiQ=w872-h1163-s-no


That's the part that would require a Lathe, though I think you could do it purely native 3D printed with some heat-set inserts.

More to come...
 

Attachments

  • 1685245933343.png
    1685245933343.png
    1.4 MB · Views: 3
Top