• Please review our updated Terms and Rules here

PDP-11/04 and 11/34 front panel

thunter0512

Veteran Member
Joined
Sep 27, 2020
Messages
859
Location
Perth in Western Australia
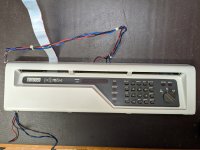
The PDP 11/34 and 11/04 front panels (both operator and programmer) use a somewhat stiff plastic sheet of 1.0 mm thickness with DEC logo, model designation, labels for the keys printed on it, cut-outs for the keypad and knob and red transparent sections for LEDs and 6 digit 7-segment display.

I don't know what the industry calls this type of plastic sheet? Is it a "decal"???

This plastic sheet is (was) fixed to an anodized aluminium plate (1.6 mm thickness) using some type of glue which has deteriorated so that the plastic sheet has separated from the aluminium plate.

The glue looks like it has been sprayed on and has a light yellowish-brown appearance. The glue readily dissolves in ethyl-alcohol and acetone, but is unaffected by water, petrol (gasoline) and dry cleaning fluid (white spirits).

I would like to glue the plastic sheet back onto the aluminium plate, but worry about damaging the plastic sheet by the solvents in typical glues like "contact glues".
Also "contact glues" don't allow any adjustment once you combine the two halves of mostly dried glue covered objects.

What type of plastic is this plastic sheet likely made of (polycarbonate?) and what paint was used? I am asking to determine what solvents may attack either the plastic sheet or the painted surfaces.

The dark grey and transparent red paints are applied to the back side of the plastic sheet, so they are vulnerable to solvent attack when glueing. I tried ethyl-alcohol in one corner which is obscured by the cast metal surround and some of the dark gray colour came off with the alcohol and gentle rubbing.

Has anyone successfully glued back the plastic sheet to the aluminium plate? If yes, what type of glue did you use and how exactly did you do the operation?
 
Would it be possible to have a few photos to clarify the problem?
On the 11/05 the front screen-printed plastic sheet fascia was adhered to the painted bezel with two narrow strips of double-sided tape which nowadays barely holds the thing on. I've seen a photo of an 11/05 bezel with missing fascia and the comment that 'someone had robbed the panel' which I think was unlikely and rather it fell off.
If you can, avoid acetone on plastic panels, instead perhaps citrus or Double D Eucalyptus oil might be worth trying.

As for glues, in recent years I have taken to using a polyurethane glue for a lot of things. It has the consistency of thick honey, sticks to pretty much anything and allows movement for a short time. It does however have one side-effect that must be taken care of and that is it foams and separates the surfaces if left unclamped. Absolutely do not use it without clamping! Apart from that it's all good. I use SikaBond TechGrip, a high quality brand available from Bunnings:
https://www.bunnings.com.au/sika-50...-multi-purpose-polyurethane-adhesive_p1660986
I reckon it would be ideal to glue the plastic sheet to the aluminium.
EAFPFCI321
 
Would it be possible to have a few photos to clarify the problem?

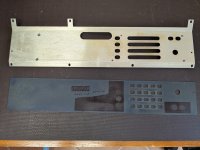
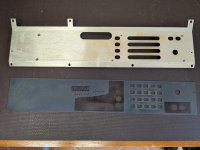
Here is a photo showing both the aluminium plate and the painted initially transparent plastic sheet which was glued to the aluminium plate. Both show the glue side. I have already cleaned most of the solid left hand side of the aluminium plate with alcohol.

PXL_20231107_055115370.MP.jpg

...

As for glues, in recent years I have taken to using a polyurethane glue for a lot of things. It has the consistency of thick honey, sticks to pretty much anything and allows movement for a short time. It does however have one side-effect that must be taken care of and that is it foams and separates the surfaces if left unclamped. Absolutely do not use it without clamping! Apart from that it's all good. I use SikaBond TechGrip, a high quality brand available from Bunnings:
https://www.bunnings.com.au/sika-50...-multi-purpose-polyurethane-adhesive_p1660986
I reckon it would be ideal to glue the plastic sheet to the aluminium.

Polyurethane glue in spray form might work, but I have not found such a product.

My concern is that any solvent trapped between the metal and plastic surfaces has no chance of escaping and will invariably attack the paint covering the otherwise transparent (like glass) plastic sheet. I start to suspect the plastic is polycarbonate.
 
Perhaps selective use of double-sided tape in non-painted areas? Would it be sufficient to simply ensure alignment and "reasonable opposition" between the plastic sheet and the aluminum frame rather than full-coverage adhesion?

When I searched for a supplier of SikaBond TechGrip I learner that it only seems to be available in Australia. Lucky you :->.
 
OK thanks for the pic. So the glue has to bond the painted side to the metal? One glue that could probably do it is PVA. Or aliphatic resin, which looks like yellow PVA but is stronger, waterproof and not rubbery. A long time ago I used it in preference to PVA for building RC planes.

Paul, Bunnings isn't anything more than what you'd call a big-box hardware store. It has had its moment of international fame as 'Hammer Barn' in the australian kids TV show 'Bluey'.
 
Last edited:
It looks like the original glue has been sprayed onto the plastic sheet which was then fitted to the clean aluminium plate.
This means the original glue was likely not a contact glue which requires a thin coat on both surfaces.
Clearly the sheet has not been clamped to the aluminium plate because not all glue has transferred to the metal surface.
 
You need an adhesive that cures, not dries with air exposure since there will be none away from the edges. And as you point out you want an adhesive that does not affect the paint. Epoxy is a good choice because it does not need air to cure and usually does not contain any solvents.

You have a part with obvious alignment pins in those little holes on the far right and left sides. DEC probably had a jig to hold everything in place during assembly. You have two good options I can see. If you want to glue them together and have it be permanent you can use a slow cure epoxy. If you want to be able to take it apart again at some future time then use a thin double sided tape applied in key locations.. My choice would be for the epoxy since DEC never intended it to come apart. With the double stick tape there is no room for alignment error during assembly. With either option you should probably clean off the old adhesive as its presence will diminish the bond strength.

If you choose to use epoxy you want one that gives you lots of working time. You don't care that it takes a long time to cure. You want something like a 1 or more hour cure time. Epoxies intended for wood might be a good choice since the long cure times give the glue a chance to penetrate the wood but you also get plenty of time to apply the adhesive without it starting to cure. You might be able to find a suitable epoxy at a local hardware store. If it was 30 years ago I would suggest checking a local hobby shop and buying a 3 hour epoxy. I would find a bolt as large as will fit through those holes. You will also want to be able to apply some clamping pressure to the plastic sheet. Since everything is fairly flat you can probably use something really simple like Ziploc bags with sand or even water in them to hold the plastic sheet down. I don't know what the bracket looks like on the other side but you will need to support it so it is fairly level. It may be that you can just hang the edge off a table and it will sit flat. I suggest you practice assembly a few times before you mix up the epoxy. You want the least amount of glue you can get away with. You don't want it oozing into the embedded nuts or the holes. I would apply sparingly to the aluminum bracket and then use a plastic squeegee to remove as much as possible. I have used old credit cards, and another good option is playing cards. An old deck that you don't care about as the card will be ruined. A thin film is what you want. Mix on a disposable flat surface. I use the plastic lids from yogurt cups. A paper plate would also work. Don't mix in a small cup because the reaction is exothermic and you can have a thermal runaway. I have seen small plastic cups melt from the heat. If this happens it makes a real mess. A flat surface gives lots of surface area to prevent the problem. You might want to try some practice pieces to get a feel for working time. Let cure overnight and the thin film between the plastic sheet and the bracket will take longer to cure than the unused portion because it is in a thin film and has a lot of surface area to get rid of the reaction heat.

I got a kick out of the handwritten numbers and date on the back side of the plastic. Something that should never have been seen after assembly.

Good luck on the repair!
 
You need an adhesive that cures, not dries with air exposure since there will be none away from the edges.
I will politely disagree, the area to be glued is not large, the glue thickness minimal and the edges are not sealed. Tom is in Perth weather too :) 24 - 72 hours should be fine.
 
You need an adhesive that cures, not dries with air exposure since there will be none away from the edges. And as you point out you want an adhesive that does not affect the paint. Epoxy is a good choice because it does not need air to cure and usually does not contain any solvents.

Thanks Doug for the suggestions. I too was thinking about some glue that cures rather than dries. My concern was that any solvents which are trapped between the plastic and the metal would have nowhere to go and likely attack the paint. The epoxy my be a bit too ... permanent.

I will politely disagree, the area to be glued is not large, the glue thickness minimal and the edges are not sealed. Tom is in Perth weather too :) 24 - 72 hours should be fine.

Thanks Steve for your suggestions. I believe the Polyurethane you suggested also cures rather than dries. If only I could find it in spray form to apply it similar to the original application.

BTW when I cleaned off the left side section of the glue on the aluminium panel using alcohol, the moistened section became tacky very similar to contact glue using some form of rubbery compound.
I now wonder if DEC originally used a type of contact glue which has a "paint-friendly" solvent.
 
After some research and a few phone calls to manufacturer support lines I settled on SikaBond SprayFix as the glue, see the link below:

SikaBond® SprayFix

The glue is advertised as "contains no chlorinated solvents", is "suitable for indoor use", is based on a "synthetic polymer", is "repositionable for 1-2 minutes" and has a "low odour". Sounded just right for this application.

Last night I tried the glue on the bottom left of the plastic sheet which is normally obscured by the cast metal front. Today morning there was no indication of any paint damage in the sprayed area.

Today I cleaned the aluminium plate with aceton and the plastic sheet with ethyl-alcohol. I built a jig out of a timber board with two thin metal rods inserted as alignment pins matching the alignment holes in the aluminium plate and plastic sheet.

I then masked the red transparent areas of the plastic sheet with low-tack masking tape to prevent glue to get onto them. This keeps them nice and clean for good visibility of the LEDs and 6 digit 7-segment display.

With the aluminium plate mounted to the jig I applied a thin layer of the glue and then the same onto the plastic sheet which was laid out on a sheet of paper.
I then moved the plastic sheet onto a fresh sheet of paper to avoid contamination of the front side with glue while I removed the protective masking tape.
Finally I assembled the plastic sheet onto the aluminium plate with the aid of the alignment pins and immediately pressed the two halves firmly together.

After a few minutes I removed the now securely glued assembly from the jig, flipped it over onto another fresh sheet of paper on the edge of a flat table with the plastic down onto the paper.
I placed some weights onto the top (i.e. the aluminium sheet) to let it dry and bond for a few more hours.

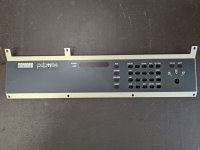
I will take a photo of the glued assembly once I think it has fully dried.
 
Back
Top