• Please review our updated Terms and Rules here

Tektronix 4050 Grayscale BMP Picture Viewer

nikola-wan

Veteran Member
Joined
Mar 7, 2018
Messages
1,303
Location
Texas, USA
Grayscale (or greenscale) BMP image viewer program in BASIC on Tektronix 4050 series vector graphics personal microcomputers - first introduced in 1975! I'm using a Tektronix Graphics Enhancement ROM PACK which not only accelerates vector drawing speed but is also capable of drawing fast DOT patterns. I have created fifteen 4x4 dot patterns at the native 1024x800 resolution of the Tektronix 4050 storage tube vector monitor. Each dot pattern from 1 to 15 contains one vector per dot up to 15 dots to emulate variable 'pixel' brightness - with the "zero" value represented as no dot pattern. I take advantage of the 1024 D/A resolution of the computer to position each 4x4 dot pattern in adjacent horizontal and vertical locations to have a maximum image resolution of 256 horizontal by 200 vertical grayscale 'pixels'.

My current BASIC program is 133 lines and 3904 bytes. It can run on any Tektronix 4050 computer with at least 32KB of RAM.

Program and Data File posted on my Tektronix 4050 program repository on github:
https://github.com/.../tree/master/4050_Grayscale_BMP_Viewer

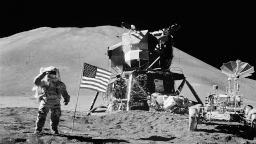
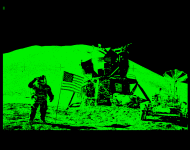
One Giant Leap for Mankind (3).png

Darkened BMP image input to viewer program
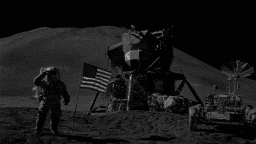
1670853743151.png

'original' grayscale 256x144 BMP
one small step for man grayscale 256x144.png
 
Nifty, but have you considered implementing a proper full-resolution dithering algorithm instead? (Is the conversion actually being done on the Tektronix?) Atkinson dither isn't difficult or computationally expensive and looks very good.
 
Nifty, but have you considered implementing a proper full-resolution dithering algorithm instead? (Is the conversion actually being done on the Tektronix?) Atkinson dither isn't difficult or computationally expensive and looks very good.
I'm currently using GIMP to create the BMP from a color photo:
  • convert the image to grayscale
  • scale the image down to 256 max X or 200 max Y
  • use color curve to severely darken the image like Tektronix did for the 4014 Enhanced Graphics 'grayscale' images
  • convert the grayscale to indexed mode with 15 'colors' plus black with Floyd-Steinberg dithering
  • export the image to BMP format
Then I use HxD on the BMP file:
  • find each of the 16 gray values and poke these values in the third 'line' of the binary to use in my BASIC program
  • export the BMP as Motorola S19 ASCII Hex format
Then I use Notepad++ on the S19 file:
  • Ensure that the X size on S19 file line 2 is at character location 47 (for some reason this X size seems to move to different locations)
  • Replace HxD CR/LF with CR to be compatible with Tektronix string variable parsing
  • Save the file to my Flash Drive filename format
My BASIC program reads each line of the S19 file:
  • Does error checking on "BM" at start of file
  • Does error checking on image X and Y size
  • Ignores rest of header (BMP header is always 1078 bytes) and looks for start of data at 0x436
  • extracts two characters at a time with SEG command and converts to grayscale value with HEXDEC command
  • looks up the grayscale value and converts to 0-15 index
  • uses subroutine to calculate absolute X,Y vectors for grayscale dots in indexed value
  • Draws the dots for that value and increments the absolute X value for the next set of dots and increments the Y value for the next row of 'pixels'
I'm not familiar with Atkinson dithering - and thought I might have to have four sets 16 of rotated dot patterns to keep from having artifacts, but the Floyd-Steinberg dithering is working quite well.

Since the Spock picture took 24 minutes to draw - it is not a practical "viewer" program.

My next step is to output the R12 dots in blocks of 4KB (max Tek BASIC binary write block size) and then the viewer would read the block and draw it until the end of the image - likely get total drawing time down to 2 minutes or less.

The 4050 series computers never had dot graphics images - at least nothing I've seen in the documentation - including the R12 Enhanced Graphics option ROM, nor any of the 100+ Tektronix 4050 tapes with thousands of programs I've examined and recovered.

The Tektronix 4014 terminal had an Enhanced Graphics option which included actual grayscale dots, and there are 4014 grayscale pictures that I want to convert to draw on the 4050 computers - albeit at lower resolution.

Working Tektronix 4014 terminals are more rare than Tektronix 4050 computers!
vintagetek.org has an amazing 4014 demo youtube video link on their site: https://vintagetek.org/4014-demonstration/
 
Working Tektronix 4014 terminals are more rare than Tektronix 4050 computers!
vintagetek.org has an amazing 4014 demo youtube video link on their site: https://vintagetek.org/4014-demonstration/

Got 2 4014's and 2 4052's in the cellar....

The 4014 generates much interest on the yearly VCF's here in Zürich. Most have never seen something similar, but also each year at least one visitor says "I remember using these in those days..."
I really need to repair that second 4014 ( A failure in the analog domain) and try to come up with a 2-player game. Preferably running on a PDP11...

Jos
 
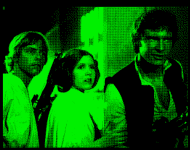
New grayscale image with my Tektronix 4050 BASIC program.
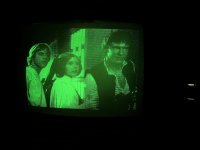
Period correct 1977 (for the 1975 Tektronix 4051 and 1979 4052 and 4054) - Star Wars - Luke, Leia and Han!
256 x 198 Bitmap with 16 shades of gray.
This is a screenshot from our 4051 hardware emulator.

Luke Leia and Han.png
 
I have added code to my Tektronix Bitmap Creator BASIC program to save the grayscale dots to my Arduino based GPIB Flash Drive for the 4050 computers.

And I created a simple Bitmap Viewer BASIC program to read a block of data and immediately display on the screen. This speeds up the display of a bitmap about 10x, so the Spock picture displays in 2 minutes (versus 20 minutes to create) and the Luke Leia Han picture displays in 3 minutes (versus 38 minutes to create).

Here is the Bitmap Viewer BASIC program listing:

Code:
3000 REM Display R12 Bitmap file
3005 DIM R$(4095)
3010 PRINT "Display R12 BMP File"
3020 PRINT "Enter the Flash Drive BINARY R12 BMP file number: ";
3030 INPUT F
3040 FIND @5:F
3050 INPUT @5,19:A$
3060 B$=SEG(A$,8,1)
3070 L=LEN(A$)
3080 S$=SEG(A$,38,L-38+1)
3090 S=VAL(S$)
3100 IF B$="B" OR B$="N" THEN 340
3110 PRINT "Flash Drive file# ";F;" is not a BINARY DATA file"
3120 GO TO 3020
3125 PAGE
3130 FIND@5:F
3140 READ@5:R$
3150 IF R$="|EOG|" THEN 3180
3160 CALL "RDOTS",Z$,1,0,0
3170 GO TO 3140
3180 HOME
3190 END

The Spock bitmap output file was almost 300KB which is approximately 100K dots (3 bytes per dot). The Luke Leia Han bitmap output file was almost 500KB, it is a larger image than Spock. These image sizes are larger than will fit on the original DC300 cartridge tape (max capacity 300KB) - but no problem for my GPIB Flash Drive with gigabytes of capacity on the MicroSD card.

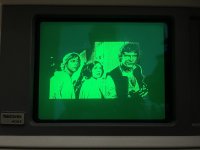
Here is the photo of my Tektronix 4054A computer running the Viewer Program on the Luke Leia Han bitmap file:
Luke Leia and Han on my 4054A.jpeg
 
I think you could produce better images by using error diffusion.
These images are created using Floyd-Steinberg error diffusion in GIMP when I change the grayscale image into indexed mode with only 15 grayscale levels.
My program uses an additional 16th level for no pixels.

This image emulates grayscale with a 4x4 grid of up to 16 dots to emulate 16 levels of brightness. This results in a maximum picture resolution of 256x192 emulated grayscale pixels.

I'm currently experimenting with an 8x8 grid which can provide up to 64 levels of grayscale brightness - although it further reduces the maximum picture resolution on a 4051 or 4052 12 inch display to 128x96 'pixels'. My early results indicate the 4x4 grid gives the clearest image on a 4051 or 4052.

My 4054A has 4096x3072 vector resolution - so I think the 8x8 64-level grayscale images of 512x384 resolution will look much better. However the program will take about 4x longer to convert the bitmap image into dots.
 
Yes, I can see the 4x4 grid, I think that's why I'm seeing posterization in the images. You might try error diffusion with just single black/white pixels, i.e. full 4k resolution. I wrote a program that did that back around 1980 (though with a different type display) and I recall it looking more organic and smooth than what you've got.
 
Yes, I can see the 4x4 grid, I think that's why I'm seeing posterization in the images. You might try error diffusion with just single black/white pixels, i.e. full 4k resolution. I wrote a program that did that back around 1980 (though with a different type display) and I recall it looking more organic and smooth than what you've got.
The 4051 and 4052 are limited to 1024x780 vector or dot resolution.

I have never found a program on over 100 Tektronix 4050 tapes, nor any posts on the web that attempted to display a bitmap image on any 4050 computer, that's why I've been developing my program.

Do you still have your program? What kind of display were you working with?
 
Sorry, no, it was something I threw together just to see if it worked, but the technique was pretty simple. I can't remember what display I used, I was working for Datapoint at the time. Might have been a Hercules monochrome card but it might have been too early for that.
 
Coming from the other thread taking about dithering memory requirements

I’m working with a 64kb system and around 32kb of free memory

The biggest allocation of memory will be the array required for dither processing
This will be 2 rows of bytes the horizontal size of your max resolution

In my case 512x2 1024kb. However I use 3 rows at 1.5kb

You will have to buffer at least 2 rows of pixels in order to run the dither algorithm
It is designed to run from left to right ignoring the first and last position then up to down as a one shot
The 3rd row takes the 2nd row and copies it to the first row as data fills in the new second and third row to continue the dither algo process basically it’s error correcting through all the image data.

Basically it’s a buffer that gets processed with weights on each byte and the output goes to the screen
You could also save to a file and avoid reprocess in the future making redisplay very quick.

Newer algorithms require more memory because you have to buffer 4-8 rows of data to apply more complex weights to each pixel. Bang for the buck wise is the Floyd steinberg dither

Going back to bayer you can also create halftone dot effects like offset printing or you can also create multiple variants for your grey scales and then randomize them going to the screen to reduce patterns from forming.

There are numerous addition white papers talking about options and additions

My printer dithering requires 4kb because I have to store 8 rows of data apply the dither then assemble them into 8dot columns for output

Development took me 3 weeks to go from never having done this before to a working screen and printer output
Great info!

What computer are you using? What language? I think I saw CPM in one of your photos.
Maybe that Altair computer?
 
i noticed commodorejohn above also suggested a dithering solution

I'm using a Altair Arduino Pro 8800 2mhz(z80) 64kb ram. I'm working in MBASIC-80 compiling code with some Z80 op code help to get some speed.

my terminal is split between a VGA32/ESP32 ASCI Terminal and a Cromemco Dazzler.

E6SnwPY.jpg


This might help you more:


The Tektronix would be similar to a black and white printer output.

if your dealing with RGB then you multiply all your requirements by 3. you can easily convert existing RGB BMP or PPM files with: grayscale image = ( (0.3 * R) + (0.59 * G) + (0.11 * B) )

I don't know much about the Tektronix but if you have a dim and bright pixel then you would have 3 levels of color to play with.

you can mess around with the thresholds and produce effects or increase/decrease brightness.

if 0 is 0 and dim is <128 and bright is >=128 then you just setup the tek langauge for output on the screen at X,Y.

a printer is white <128 and black >=128.

if memory requirements are tight, you can break up the conversion.

have a program that takes a BMP or PPM file and convert to dither resaving in a new file.

that will handle all the conversions for your display. next have a simple viewer that will quickly display the image that has been processed if the image is small then you can stack multiple images and have the screen clear and redraw producing some animation.

a 400x300 image being about 1.4 megs of uncompressed RGB took my machine about 12 hours to screen process and output to the printer at the same time.
but small images could be displayed in a second or two in the right format for the display.
 
Last edited:
Got 2 4014's and 2 4052's in the cellar....

The 4014 generates much interest on the yearly VCF's here in Zürich. Most have never seen something similar, but also each year at least one visitor says "I remember using these in those days..."


Jos
Hah - yes indeed, I remember using those in those days :) I was doing data visualization for a physics lab. The physicists didn't like having to wait a day for their jobs to run on the drum plotter connected to the IBM 360 so they got a couple of those Tek terminals. With those, they could get graphs of their experiments instantly. It was fun to be able to do that back when most people were using VT-100's if not punch cards still.
 
With gentle prodding from @commodorejohn, @gottahack, @furball1985 and others on other forums - I finally took the hint to explore individual dot dithering and got amazing results, thank you all for the suggestions.

Best article link sent to me was: https://tannerhelland.com/2012/12/28/dithering-eleven-algorithms-source-code.html
This article included a link to the author's program which provides all eleven dithering algorithms and other editing tools: https://github.com/tannerhelland/PhotoDemon

I used this program on the Luke/Leia/Han, Spock and Astronaut on the Moon original color images and got outstanding results!

I learned how to create completely dithered monochrome images on any Tektronix 4050 computer with the R12 or Fast Graphics ROM Pack or Maxirom for the 4051 or 4052 Multifunction ROM Pack for the 4052/4054.

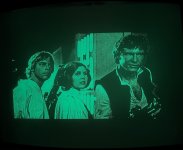
This is a 915x548 picture of Luke, Leia and Han converted from color to monochrome by PhotoDemon 9.0 that allows you to select one of eleven different dithering algorithms. I picked Sierra-3 for this picture and saved the monochrome bitmap (1-bit per monochrome dot). I converted the BMP file to Motorola S-19 format so I could INPUT one line at a time from my laptop over serial into my 4052 with my Dithered Dot Create program, convert the BMP image into R12 Graphics Enhancement format with one binary data block of up to 1024 dots on a line and 780 vertical lines with each block written to my GPIB Flash Drive:
https://forum.vcfed.org/index.php?threads/tektronix-4050-gpib-flash-drive-now-available.1238891/post-1260391.

The ASCII input data file was 148KB and the BINARY R12 file is 396512 bytes or over 130000 DOTS! It displays in about 2.5 minutes on my 4052 or 4054A.
First image is on my 4052 and next image is on my 4054A. The 4054A dot size is smaller than the 4051 or 4052 so you get a little more detail.

And I added the new Tektronix 4050 Bitmap Create and Bitmap Viewer programs to my repository:
https://github.com/mmcgraw74/Tektronix-4051-4052-4054-Program-Files/tree/master/Bitmap_Pictures

This first photo is Luke Leia and Han at a vector dot resolution of 915x548 with an R12 Graphics Enhancement ROM binary file size of 396512 bytes containing almost 130000 individual vector dots! It displayed on my 4052 in 2 minutes and 39 seconds!

Luke Leia Han S3 4052.jpeg


Same binary file and viewer program displayed on my 4054A

You can see more detail on my 4054A. I believe this is due to the 4x higher horizontal and vertical resolution with each 4054/4054A dot about 1/4 of the size of the 4051/4052 dot. The different shade of green for the 4054A is due to the Option 31 Color Enhanced Display which has RED and GREEN phosphors mixed about 50/50%.

Luke Leia Han S3 4054A.jpeg

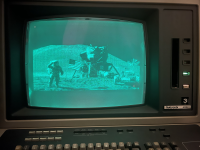
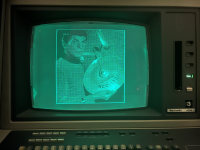
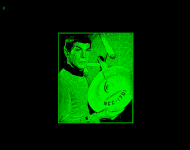
Here are my updated high resolution dot-dithered pictures of Spock and the Astronaut on the Moon - captured from the latest experimental version of the 4051 emulator with huge Flash Drive file support (thanks to @WaveyDipole).

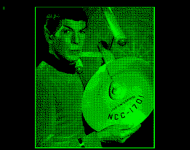
The Spock with Enterprise dot resolution is 413x500 - same as the color photo resolution I found on the web. My bitmap create program centers the image on the screen.


Spock with Enterprise 413x500 S3.png

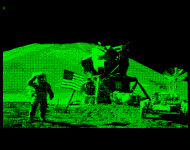
This Astronaut on the Moon pictures is scaled down using PhotoDemon to 1024x576.

These Bitmap Pictures add a new capability to the amazing Tektronix 4050 computers!

One Giant Leap for Mankind 1024x576 S3.png
 
Last edited:
These Tektronix dot-dithered bitmap pictures for the Tektronix 4050 vector graphics computers are fairly easy to create - but it does take 2.5 or more hours on my 4054A or 4052 to create the R12 BINARY file for the viewer with my BASIC Bitmap Create program. The BASIC Bitmap viewer only takes about 3 minutes to display the picture on my 4054A or 4052 - based on the number of dots in the created file.

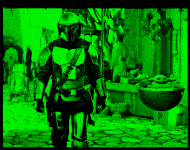
Here is a picture I did this morning from a screenshot of the latest Disney+ trailer video of Mandalorian Season 3 - Mando with Grogu. 1024x770 - almost the full resolution of the 4051 and 4052.

This is a screen copy from the experimental version of the Tektronix 4051 Emulator with Flash Drive huge file support (by @WaveyDipole):

Mandalorian and Grogu.png
 
Back
Top