• Please review our updated Terms and Rules here

Xerox 6060 restoration

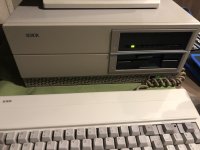
This is great! I'd love to repair 2 of my M24s that have dead power supplies, but not with original parts because they're so non-standard (and dangerous!)
 
That looks nice. Will you place all the ATX PSU and adapter board inside the M24 PSU chassis?

Thank you. The ATX PSU innards are already inside the old M24 PSU chassis. The adapter board would most likely fit inside as well (maybe bolted upside down to the ceiling of the old enclosure) but it would make cable routing quite messy. What I plan to do eventually is to bolt the adapter board to the outside of the original PSU chassis with some metal standoffs, on its side between the PSU and the ISA slots. There is enough space there for the adapter board (maybe a couple of inches?), good access for the cables that need to reach it, good airflow (not that it needs it), plus the (very bright!) status LEDs would be easily visible, instantly telling me if the PC is on or not :) (just joking, but seriously, with the new fan even in a very quiet room you can’t hear the difference between the ON state and the OFF state)
 
Please post some photos of the final mounting of the board. If it looks good, I am interested to get such a board, or maybe two. Maybe you can provide a kit with all necessary components?
 
Please post some photos of the final mounting of the board. If it looks good, I am interested to get such a board, or maybe two. Maybe you can provide a kit with all necessary components?

Sure I will post some photos when I do, but it may be a little while. I first have to re-lay the PCB to get have the correct footprint for the angled ATX connector, since I want the ATX cables to stick away from the adapter board towards the back of the PC case, instead of straight up towards the ISA slots. Then I’ll get it re-fabricated (probably at the same time as the M24-IDE in the other thread), re-assemble it, and only then fix it in position. If you are interested in these boards pls feel free to PM me.
 
Update

Update

Curious if you ever re-laid the PCB and/or got it mounted inside the case -- update?

Yes! Finally, after a long delay, I took advantage of some spare time over the Easter weekend and I re-laid the M24-ATX power adapter PCB and sent it to JLCPCB for fabrication. They say given the current situation there may be some shipping delays, but the production process itself started this morning. Hopefully I will get them over here in the next week or so.

Incidentally I also sent for fabrication a few more PCBs (since you only pay for shipping once...):

  • an improved version of M24-PS2 keyboard adapter with more space for a heatsink for the 7805 (turns out the advice from this board was correct and you do need one)
  • an experimental M24-VGA converter (the simple diode-based version suggested on this forum, with intensity control but without the correct CGA yellow - sorry)
  • a very experimental version of M24-IDE, my attempt at a full 16-bit IDE adapter designed for the Olivetti 16-bit bus - it'll be a miracle if this works

Will let you know once I receive them.
 
2020 version!

2020 version!

The new version of the M24-ATX PCB has arrived! I have soldered it over the weekend and it works just fine, like the previous one. The angled ATX connector allows for better routing of the cables so I think I prefer this version.

As for placement, I have drilled holes on the side of the metal enclosure of the original power supply and attached brass standoffs to it. I then attached the PCB to the standoffs. The air gap allows some air circulation and allows access to one of the two screws that secures the power supply enclosure to the floor of the chassis. I think it’s turned out quite neat, but it was very fiddly at almost every step (it’s always tight for space).

Here are some photos:

7A7B8A41-F72E-4F81-8E5D-BACF3A4E7910.jpeg

6EAF10FB-4B82-4FA8-9E20-FB850EEA5D95.jpeg

37644910-D16C-48C4-A7F9-C182964AF9AD.jpeg

708056F2-37F9-4FCD-B2F8-9E36689DCCCC.jpeg
 
That is so cool! It looks like it fits completely inside then, not visible from the outside?

That’s correct - it fits completely inside, the only visible difference from the outside is that the female (slave) IEC AC socket below the power switch is blocked off (where you would normally connect the AC for the color monitor).
 
Wait, then what do the external power connections look like?

Like the photo below - only the input (male) AC connector remains, the output (female) AC connector had to be removed and blocked off because of space constraints inside the PSU enclosure. The only other difference visible from outside (if one looks very closely) is that the original grey fan has been replaced by a new one which is brown in color.

4BA76719-4743-441C-91C0-42807FB6453A.jpeg

Ok, if you look REALLY really closely you can also notice that the modified PSU is sitting approximately 1 mm higher than the original one, so the power switch and the remaining input AC connector are not exactly centred in their respective openings of the chassis, but it’s barely noticeable.
 
Last edited:
Hold on - I think maybe something is not clear in my description. The M24-ATX PCB is bolted to the outside of the chassis of the Power Supply Unit (PSU), so of course it is visible if you open the case of the computer (see posted photos). However it fits completely on the inside of the case of the computer itself, which means it is not visible from the outside when the computer case is closed.

Would the PCB fit inside the chassis of the PSU? Probably yes but the cable routing would be extremely difficult and cumbersome, so I am not going to try it :)

If the desired objective is to have an all-enclosed PSU that replicates the original one without anything showing from the outside of the PSU, then I think a different PCB design would be better. Most importantly, one would need to source the exact power connectors that are on the original PSU, which I have not been able to do (or scavenge those from a dead PSU PCB, doable but a bit messy).

I hope this clarifies things... ?
 
We see that. As long as the position of the different M24-Power connectors is the same order as on the original PSU that's fine and it should be fitable inside.

One more good thing: It not only is a benefit for M21/M24/M24SP/AT&T/Xerox owners with bad PSU, but it also seems to fit fine for M28 and M280 PSU!!! I have a bad M280, too.
 
During the course of discussion regarding the newly designed PS unit for M24/6300/6060, the circuit board shown in the pictures iis what I want to address here. According to the discussion the board was acquired from China. So my question is why didn't the developer etch his own board rather than going to China for the etched board?
 
Back
Top