• Please review our updated Terms and Rules here

A major breakthrough in removing yellowing from old cases!!!

Status
Not open for further replies.
... and I bet you polished the wheel nuts, and all the brackets in the engine bay of that Triumph, didn't you? :mrgreen:

The short answer to the metal badge issue is that it's lacquered Aluminium; the solution will have got under tiny imperfections in the lacquer coating, reacted with the bare metal underneath and cause the lacquer around the hole to lift.

BTW, I'm trying to keep the lectures to a minimum; it's all the people asking "Why?" that sets me off, I am truly trying to resist... honestly....

You are an expert at this now mate, well done, the guys at EAB are also uber impressed.

@ Carlsson

Just throw the parts in as they are now, the detergents in the Oxy will take care of most marks and as Lorne has said, those that remain after treatment will easily come off.
 
Having done a frame up, nuts & bolts restoration in 1995, on a 1968 Triumph TR250 when I was in Vancouver, I am dying to comment on your paint comment, but we are getting way off topic.
How about you start a new thread, about restoration - I'll bet we get some interest, and some varying comments, on that topic. Let me know when you've started it - I'll be one of the first in.

Another Triumph owner! I have a '79 Dolly Sprint :mrgreen:
 
Polished?
I sandblasted, repainted, rechromed, re-everythinged that whole vehicle.

I was just kidding about the science "lectures". Keep them coming. I want to know why it works, not just that it does.
 
Merlin - question:
Will the H202/Oxy solution do anything bad to silicon sealant?
(I have a little idea that I want to try out).
 
I might try that on my HP Vectra. It's the only yellowed PC I have at the moment. I guess all the others were kept away from direct sunlight. Oh, and I own a '72 Triumph GT-6 Mk III;):)
 
Lorne,

Silicone sealant is unaffected by peroxide. Others have carried out trials in fish tanks that would have fallen apart by now if it were so.

Mind you, I do have a formulation for a product that will dissolve silicone, I developed it about 11 years back....:mrgreen:
 
LESSON LEARNED – better, cheaper (but still not faster)

(I’m hoping by posting this, that anyone else trying this process will benefit from my mistakes)

Tip: plan it all out first !

I started off by doing the keyboard keys using a small clear plastic kitchen food container with a clear lid.
As I got to bigger parts (ie: cases for the actual computers), I started using larger tubs. Solution buckets.jpg They’re cheap, clear plastic tubs with white tops. I cut the white tops out, and replaced the cut out sections with clear plastic, so I could get UV from the top.
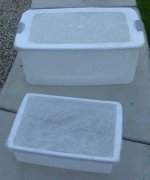
The larger tub has a 29 US gal capacity. The smaller tub has an 8½ US gal capacity.
At a quantity discount cost of $ 20/gal, the larger tub costs $ 290 to fill half full with the H202 solution.
To fill the smaller tub (almost to the brim) costs $ 160.

I needed the larger tub because the Osborne 1 case is one piece (vs the 1a case which is two pieces), and it needed something roughly that size. After processing a bunch of smaller parts, I started with the large case and had to fill the tub up to about 1/2 of capacity, figuring I would turn it over half way through. Afterward, I was left with a huge tub of solution, and I could fit one of the 1a pieces in, but not two. That was an expensive lesson, especially seeing as the solution only lasts for three, maybe four days before it degrades to uselessness.

Then I bought the smaller tub. As you can see, the ½ case piece fits very nicely into the smaller tub. Bucket & part.jpg I figured that was perfect, and would save me some money. After completing the first Osborne 1a, I realized I could do better. It took 5½ gals of solution to cover to a ½” depth over the top of the piece. But there’s a huge space underneath the piece! You can’t put another part in that “void” because it won’t get enough UV, and if you did, it definitely wouldn’t get as much UV as the other part, and wouldn’t de-yellow at the same rate.
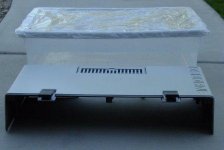
I tried putting rocks in the voids, to displace volume and use less solution, but the solution seemed to concentrate on the rocks (they bubble like mad), instead of the plastic parts. I thought of using bricks or concrete blocks, but figured that would be the same as the rocks.
I thought of using plastic orange juice type bottles to displace the solution, but I’ve only got about a 3” high space and the juice bottles I’ve got, are all too big. I thought of using balloons filled with water, but if one broke in the solution, my concentration of H202 would drop, and I’d still be left with a void which would now be filled with a weaker solution.

I wanted something to take up that space, and I‘ve come up with something that is reusable. It’s clear plexiglass (so the UV can still get through), sealed with silicon sealant, and with a plastic juice bottle cap, silicon sealed to the top. It’s the right fit for the actual parts I’m processing. Plexi box.jpg I’ve made a few of these, in different sizes, that I can place in different configurations, depending on the volume of the tub and the size of piece I’m trying to de-yellow. I can fill these with water (so they won’t float) and put them either in the void space or at the end of the tub (if the part is shorter than the tub), and these things will displace the un-needed volume, while not blocking any UV rays.
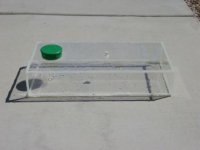
The space under the Osborne 1a half case piece, is 665 cu in, which equates to 2.9 US gals. The plexiglass box holds 2 gals of water, cost me $ 12 and it’s reusable (unlike the solution itself, after four days in the sun). I used to need 5½ gals to cover the piece, now I only need 3½ gals. That’s $ 40 less H202 solution, for a $ 12 investment.

If you’re trying to de-yellow a smaller case or part with a void, and need to displace some wasted volume, you may not need a Plexiglass box - you could use a glass cup filled with marbles, or just throw in some marbles. Anything that’s clear and doesn’t float will work.
 
Nice idea Lorne...I hope that tank has a vent hole though.

By the way, I have started making notes for the Wiki article. I don't want to major too much on the chemistry, yet explain just enough that people understand it, it's a tricky thing to do...
 
LESSON LEARNED – better, cheaper (but still not faster)

(I’m hoping by posting this, that anyone else trying this process will benefit from my mistakes)

Something else that may work would be those plastic collapsible water carriers.

Since you can expel any unused air, one would work for many types of situations.You just fill it until you have the desired displacement, crush it down to fit and, if you have leakage concerns, leave the top above the solution level.
 
Merlin: Vent hole for what? Expansion? What if I started with hot water from the tap?
How about I just fill the box half full with water, and add a bunch of marbles to weigh it down. That should be OK shouldn't it?

Druid6900: Good idea - I can't see those things leaking. I can get those at a sporting goods store, correct? That box WAS a bit of a pain to make, and now Melin might be telling me I screwed up, yet again. :)

I'm going to need some more displacement anyway, as my Televideo 925 is arriving next Friday, and that monitor will have one hell of a void space.

I'm also now thinking that I could have bought some clear plastic, water tight, kitchen type food containers, for less than the $ 12 and wouldn't have had to make anything !

Next time I'll post the idea, and then wait for the comments/suggestions.
 
Lorne,

With all this research and trials, once you optimise and streamline the process with the right gear (and have Merlin as a consultant), you could set yourself up with a little home business de-yellowing cases for vintage computer enthusiasts!

There could be beer money in it! :D

Tez
 
Now that's just the kind of comment/suggestion I've been looking for!
Merlin needs to work on speeding up the process a bit though :)
This long processing time is taking more of my Bass.
Plus, I've got a sneaking suspicion that Merlin fancies a pint or two now and then, and that could really cut into any possible profits.

I just put my plexiglass tub in the recycle bin, ready for tomorrow's recycling pickup - I think I'm going to try 1 quart Ziploc bags, filled 3/4 full with water (to leave room for expansion, I guess). Those things will fit into, and form to almost any shape I could need, and they're cheap too.
 
*Ahem*

I am a diabetic and have been tee-total for seven years. I only drink the alcohol free stuff, which, if I had a choice, I wouldn't wash my feet in....if I drink, it screws my blood sugar levels up and it takes days to get it back under control. That's the reason I stopped.

Lorne, I suggested a vent hole because, as you noticed, the process gives off bubbles of gas, that could pressurise your container without a vent hole present, a 1/16" hole in the lid should cover it. You haven't screwed up, you just forgot something...

Edit: No, I am being a plank for not reading your post properly; you are using the plexiglass tank to just displace volume, so you don't need so much peroxide solution... doh!!

Speed up the process :eek: ? Sheesh, do you guys have Attention Deficit Disorder or something? Speed = heat where reactions are concerned; besides, I don't think you could speed the process up much more without damaging the parts being treated. It took nearly 20 years to get that yellow, I can't fix it in 5 minutes you know.....:cool:
 
Last edited:
Here's another idea I had that may work...

For larger areas, I thought about making the solution into a gel, so that you could brush it onto a surface, then hose it off later.

It might be worth trying to gel the peroxide solution with something like wallpaper paste or corn flour (corn starch). The starch in the wallpaper paste won't react with the peroxide and should gel it up nicely without too much stirring. You might not need so much solution either.

It's certainly worth a try.
 
Last edited:
What happened with the idea to make a H2O2 paste that you smear onto the parts instead of a liquid? Won't it work as well or will it be too aggressive? I mean all the people who bleach their hair don't have their heads stuck into a plexiglass aquarium for 30 minutes or how long the treatment takes. :-D

Edit: Sorry, didn't see Merlin's response right above. I answered Lorne's one about the big cylinders.
 
@ Carlsson

There's a chance that the gel may not work as effectively, however, we won't know until someone tries it. I'm not sure how a gel may cope with the gas bubbles, as a strong gel can suspend air bubbles.

As a chemist, I would have gone for Hydroxy Ethyl Cellulose (Cellosize) for the thickening agent, however, I am trying to use ingredients that anyone can get hold of. Xanthan Gum is another material worth a try if you can get hold of it.

Lorne, would you like to try this idea a try on something?

Edit: Xanthan Gum is readily advertised on Ebay, so it should be fairly easy to get hold of. I would use a treat level of 0.25 to 0.5% to start off with and work up from there. This is probably what they use in the peroxide hair bleaches.

Chemistry is also about figuring out what people make stuff with, this is what I've done all my working life....:D
 
Last edited:
Cool, this should be interesting......you will need to add the xanthan gum just after adding the 'Oxy'.

Have you got a test piece to try this idea on?
 
Oh yeah, I've got way, way too many pieces I can test it on.

I've ordered the stuff.

I'm not following you on the 0.25 to 0.5% though.
(I took all the physics I could get in high school, but only the bare minimum of chemistry and biology, so you've got to lay it out for me).

From your last post, I'm going to mix some H202 solution with the Oxy as usual, and then mix in some Xanthan Gum.
If I use 1 pint of H202 solution, I'll be adding 1/8 tsp of Oxy, and then how much of the gum?
 
I would add no more than 1/4 teaspoonful; that would get you somewhere around the 1.5 grammes per pint mark, which is 0.25%. It's hard to judge on such a small volume of liquid but you will be somewhere close. You want a slightly loose gel that can brush on easily, like emulsion paint.

I thought somehow you would be knee-deep in test pieces.....:mrgreen:
 
Status
Not open for further replies.
Back
Top