• Please review our updated Terms and Rules here

A major breakthrough in removing yellowing from old cases!!!

Status
Not open for further replies.
With temperatures reaching 140F (about 60C if memory serves) you will need to maybe watch for distortion of smaller plastic parts due to the heat.

Yes, this just happened to an apple clone case lid I put through a diswasher using heavy duty wash. I would imagine the temps may have got up to something near that.

Something to watch.

Tez
 
Dishwsher?
You've got guts.

I've found out that it's the UV, that provides the best results.
If I put pieces out at 6:30 am, they're done by 6:00 pm (in 12 hours).
If I put them out at 4:30 pm and check them at 6:30 am (after 14 hours), they're no different. (And considering that in the summer, it only cools down to about 80F at night here, that means heat isn't as big a factor as I thought it was.) All that happens at night, is that the parts get wet. You need the sunshine.

Tezza will have to wait 6 months for summer. That's better than the guys in UK though - they'd have to emmigrate. LOL.

PS: I don't mean to keep posting a million little bits and pieces about the process. I just thought I'd keep my and everyone else's interest up, while I figure this all out through a multitude of small batches. The 10 gals should arrive tomorrow, so I'll get to try some bigger pieces.
Once I've done all of them, Ill post a summary of what works and what doesn't, along with some photos.
 
Now, for all of those nay-saying people who thought that the UV part was a myth....

NER NER NERNER NER....!!! I told you so......all of you flamers, fanboys and trolls who dissed us about this process (not from here I might add), read it and weep.........we wouldn't have said UV was required if it wasn't.......

OK, here's the science bit (for those who are interested):

The UV light bombards the bond formed between the oxygen molecule which has attached to the poly brominated phenyl ether (the flame retardant) with photons, causing the oxygen molecule to become destabilised. The bond formed isn't like a covalent bond; it's weaker, more like a co-ordinate bond.

We've already created an unstable environment around it by using TAED in the "Oxy" to catalyse the breakdown of the hydrogen peroxide. This creates the conditions where the oxygen gets broken off by peracetic acid, which is created as part of a reversible reaction by the TAED.

The oxygen gets replaced with a hydrogen atom from the broken down peroxide, the oxygen gets evolved as the gas, and so it continues until all of the oxygens have been replaced and the part is restored to original condition.

Clever, huh? Loads of people had little pieces of the puzzle, it was over at English Amiga Board that we finally put the puzzle together and figured out how it works.

Science bit over, critiques of this rationale are welcome......

PS. Lorne, if you buy a black light (UV) bulb, then you can clean parts on the night shift as well....that's how we cracked it in the UK ;)

I take my hat off to you, of all the people working on this, you have been among the most scientific in your approach. If you can optimise the process in terms of "oxy" versus peroxide, that would be great. The best UV source is a black light bulb, that way you won't get the heat generated by your climate and the process may go quicker as it's concentrated UV.
 
Last edited:
Well in New Zealand here we get very high UV levels (hole in the ozone consequence) so it should work well here.

I just might give the de-yellowing process a go this summer. I have a VIC 20 case that REALLY needs it, but I also have a junk computer case I could trial it on.

Tez
 
I got my 10 gals in.

The night before I picked it up, I was surfing MSN.com and came across a news article reporting how a couple of terrorists had been convicted of trying to make bombs to blow something up. I can't remember if it was in the UK or the US. They were planning on making bombs using hydrogen peroxide! Oh great I thought, this is good - right before I go try to buy 10 gals of the stuff. I don't know how many people read that article, but when I got to the store, the girl behind the counter asked "so what exactly are you using all this stuff for?" Then the guy who helped load it in the car, asked the same thing. That was 4 days ago, and I'm still expecting the cops to show up any minute.

Progress photos attached (I'm keeping these photos for the cops).

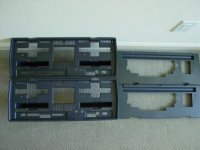
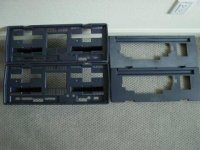
Black & Blue photos: While light colored plastic seems to yellow over time, blue plastic seems to turn black. What was a black face plate and keyboard shroud (and was supposed to be blue) is now back to blue. The keyboard shroud even lightened up too much. These pieces took way less time than the lighter colours, to de-yellow.

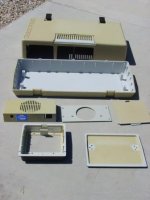
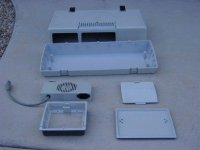
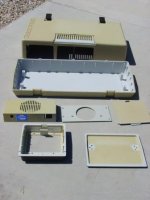
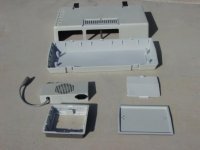
Osborne 1a case & fan parts photos: I should have taken the after photo in the sunshine, like I did withthe before photo, so you can get a better comparison, but you can get the gist - it works. I'll take a better photo tomorrow.

I'm learning as I go on with this de-yellowing process. One more Osborne 1a, an Osborne 1, and an Okidata 93 dot matrix printer to go. By the time I get the hang of it, I'll have all my parts done, and will have to buy some more vintage computer stuff to de-yellow.

Tip - don't tell anyone you know how to de-yellow stuff. (My 25 year old kid has now given me a Nintendo game unit to de-yellow). It's not even worth the cost of the H2O2.

Keep watching. I'll post nmore stuff as I get along.
 

Attachments

  • Black & blue - before.jpg
    Black & blue - before.jpg
    29.3 KB · Views: 1
  • Black & blue - after.jpg
    Black & blue - after.jpg
    27.9 KB · Views: 1
  • Osborne 1a case & fan parts - before.jpg
    Osborne 1a case & fan parts - before.jpg
    25.8 KB · Views: 1
  • Osborne 1a case & fan parts - after.jpg
    Osborne 1a case & fan parts - after.jpg
    15.8 KB · Views: 1
That it totally AWESOME Lorne, I can't wait to see the after pictures in the sunshine.....:-D

Super Nintendo consoles were really bad for going yellow if I recall, I've heard that from a few people. It can't hurt to do it though, if you have the materials to hand.

This has made sticking with this project worth all the grief I have got elsewhere from the trolls, thanks a lot Lorne, I really appreciate your efforts.

:mrgreen:
 
Better photos of before and after, are attached.
 

Attachments

  • Osborne 1a case & fan parts - before.jpg
    Osborne 1a case & fan parts - before.jpg
    25.8 KB · Views: 1
  • Osborne 1a case & fan parts - after.jpg
    Osborne 1a case & fan parts - after.jpg
    21.5 KB · Views: 1
Now THAT's impressive!!!

I hope you are taking notes about the concentration of "Oxy" you are using.

If some items aappear to be 'overcooking' (as you8 described the keyboard case above) then back off the "Oxy" a bit, it will slow things down and should prevent the 'overcook'.

Well done mate....
 
Better photos of before and after, are attached.

Looks decent, any of the texture to the plastics gone? I kind of wonder what the long term results are going to be in that process.

When I strip my old machines I wash them with some dish soap and they seem to come out a little less yellowed. Was looking at the bottle (keep it in the basement) and it has some oxygen releasing compound in it.
 
Replies for the last three:

Merlin: I'm still screwing with the Oxy amounts. When I notice the bubbles are dying off, I add some more. I put in 10 t for the 10 gals, then the next day, for another batch, I put in about 4 t, which got the bubbling going again, and didn't produce too much foam. The problem with the bubbles is, that the bubbles form all over the parts, and when they form on the bottom, they tend to make the parts float. I'm spending a lot of time sitting on the deck, slugging Bass ale (because it's hot out), and then pushing the parts back down. Life's a bitch.
(I'll take it easy on the Oxy - the same thing happened to the blue keyboard plate - some sort of stress fractures showed up).

Druid: I'm a Canadian-American (left CA in 97). You probably still need an RX for hydrocortisone up there - you don't here. Try a store that supplies carpet cleaners with their cleaning materials. That's what I'm using. Urine Rescue is a carpet cleaning product that's just 20% to 40% hydrogen peroxide, and the balance is water. I checked with a hairdresser - they get 20% H2O2 for $ 18 for a 12 oz bottle. I get a gallon for $ 20. I suggested they use what I get, but I guess they didn't like the idea of using something called Urine Rescue on their client's hair.

Unknown_K: I haven't noticed anything different on the texture of the plastic pieces, and I've done cases and keyboard key caps. What was smooth is still smooth, and what was textured is still textured - they're just not yellow or brown anymore. Long term results I have no idea about. If it lasts another 20 years, I'm fine with that. Merlin's the one for that answer. And Merlin: you can't get a clear lacquer that won't yellow through the UV process in a spray can. I tried. If you want that, it has to have a hardener in it, and you can only get that, if you go to someone who has a spray gun (like an autobody shop).

QUESTION: Right before I read Unknown_K's post, I was thinking (because I'm an inpatient SOB, and this 12 hours per piece is driving me nuts - I keep wanting to pull the pieces out early), that if the yellowing is only on the outside of the plastic, would sand blasting (delicately) work as well, but quicker. It would have to be a gentle sand blast, so that it wouldn't go through the plastic, but it could keep the rougher texture. I wouldn't want to do that on keyboard keys, but on the cases, it would be a lot quicker and probably cheaper too. Thoughts?
 
Sand blastin will ruin the texture, remove silk screening, and if the plastic is brittle it might even fall apart or crack.
 
@ Lorne

The tiny bit of yellowing caused by the driers in the acrylic lacquer is going to be far less than leaving the surface of the cleaned case open to oxygen again. It's your call if you choose to clear coat it.

Sheesh! 12 hours is too long to wait, to remove 20 years of yellowing? That's a sign of the times, no bloody patience or span of attention these people, LOL......Remember, reactions = heat, speed it up and it will start to get hot, that means distortion or melted plastic if you want to restore it while the adverts are on.

Plasticene / modeling clay can work well to weight items down and you can either attach it to an area that won't be seen, or attach it with fishing line as a weight. I suppose ordinary fishing weights will work just as well.

We aren't short of ideas here, you know......;):cool:
 
I've been using a rock to weigh the pieces down (that's in the morning, before I start on the Bass), and the rocks bubble like crazy. Haven't seen any colour change in the rocks yet though. Plasticene is a good idea.

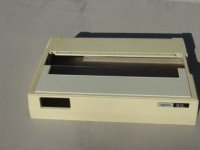
New pic attached. I did one panel on my old Okidata dot matrix printer, and it's back to the original beige or cream color, instead of yellow. When the pieces yellow, it seems scratches also get yellowed and aren't noticeable. After you de-yellow the pieces, the scratches become visible. Not a big deal - they still look a whole lot better than they did.

I've got to go check on my latest batch of parts - they've been in the solution at least 10 minutes now !
 

Attachments

  • Okidata ML93.jpg
    Okidata ML93.jpg
    20.1 KB · Views: 1
Replies for the last three:

Druid: I'm a Canadian-American (left CA in 97). You probably still need an RX for hydrocortisone up there - you don't here. Try a store that supplies carpet cleaners with their cleaning materials. That's what I'm using. Urine Rescue is a carpet cleaning product that's just 20% to 40% hydrogen peroxide, and the balance is water. I checked with a hairdresser - they get 20% H2O2 for $ 18 for a 12 oz bottle. I get a gallon for $ 20. I suggested they use what I get, but I guess they didn't like the idea of using something called Urine Rescue on their client's hair.

Could well be, but, since I don't need it, I can't say for sure. :)

Ok, I have a buddy that runs a cleaning company and I'll see if he can get me a gallon for a test drive. I'm sure Oxy is readily available (I know I can order straight TAED from not too far away)
 
@ Druid6900

You won't need much TAED, it's only soluble up to 1.5 grammes per litre in water, I make that about 1/4 teaspoonful per gallon or so.
 
Merlin:

Have a look at Tetraacetylethylenediamine in Wikipedia, and then look at OxiClean in Wikipedia.

"OxiClean works through hydrogen peroxide molecules bound within a sodium carbonate structure".

Have I got the right stuff (ie: sodium carbonate) in the Oxi, and aren't I just adding more H202, when I add the Oxi powder?
 
Lorne,

In theory, you are adding more H2O2, but you are also adding more TAED, which is the magic ingredient which makes it all happen. You aren't adding much H2O2 in a 1/2 teaspoonful of Oxy, but the extra TAED will accelerate the H2O2 that's left in the solution, eventually, you will get to a point of diminishing return though. The chemical in Oxy is sodium percarbonate, not the ordinary carbonate.

From the TAED Wiki, which is actually the correct one (Science bit again):-

TAED is an important component of detergents and bleaches. Its is an activator for "active oxygen" bleaching agents. Such active oxygen bleaching agents release hydrogen peroxide during the wash cycle. Such agents include sodium perborate, sodium percarbonate, sodium perphosphate, sodium persulfate, and urea peroxide. The released hydrogen peroxide is an inefficient bleach below 40 °C, except in the presence of activators such as TAED.

The activation process entails a reaction of the hydrogen peroxide with TAED to release peracetic acid, which is a fast-acting bleaching agent.

(CH3C(O))2NCH2CH2N(C(O)CH3)2 + H2O2 → (CH3C(O))2NCH2CH2NH(C(O)CH3) + CH3CO3H

This is what I've been talking about all along. The peracetic acid from the TAED is the magic part, the process doesn't work properly without it. The UV light destabilises the co-ordinate bond between the oxygen and the brominated flame retardant, so that the peracetic acid can release it and replace the oxygen with a hydrogen, effectively re-capping the polymer chain.

I actually understand this, it's not stereo instructions..... :mrgreen:

Believe me, you have the right stuff, in more ways than one. ;)

/me starts humming the da daaa, da dadada daaaa daaaa tune, from the film The Right Stuff.....
 
Last edited:
OK - I believe you (because my head hurts when I read that stuff).

You're a smart lad - tell your mum.

I've been sitting in the heat, pushing the pieces down every half hour, all afternoon. Bass is much better than palsticine, especially on a Saturday.

I read in a previous post, that the H2O2 could degrade the metal parts, so I thought I'd try something. I lit a candle (red xmas type) and dripped the melted wax over anything that was metal. The de-yellowing process doesn't seemed to have penetrated the wax, although the red xmas candle wax was no longer red (it was a transluscent white). You have to scrape the wax off afterward, but it comes off easy. I've just put a casing piece in with a sticker that I coated with the candle wax, to see what happens. I suspect it will protect the sticker, just like it did the metal parts. Some stickers seem to work out OK, while others disintegrate.
 
I'm impressed with the way you are thinking this through, Lorne. Using wax to protect the metal parts is genius, tell your Mum you are a smart guy too....
 
Status
Not open for further replies.
Back
Top