• Please review our updated Terms and Rules here

Assistance Creating Disk for Model 4 Gate Array

Tincanalley

Experienced Member
Joined
Aug 26, 2019
Messages
176
Location
Los Angeles, CA
Okay, I have a bunch of .DSK files that I need to make into usable disks. They are programs I downloaded that use the Hires board and I've been wanting to test the board. There seems to be a number of ways to create them, but I was hoping I could list the resources I have and someone(s) could tell me the best one to use. I have never done this before, so I'm starting with basic knowledge of available utilities and apps.

I have a Model 4 GA with dual SS DD drives.

What I have to create disks:

IBM 5150 with dual Tandon DS DD drives and an external IBM DS DD drive (DOS 3.3).
IBM 8550 with external CMS DS DD drive (DOS 5).
Clone 286 with dual DS HD drives (DOS 3.3).
Pentium 233MMX with DS HD drive and DS DD drive (DOS 5).

Given those choices, which machine would be best at creating the SS DD disk? Which program should be used?
 
David Keil's TRS-80 emulator should run fine on this machine and can access real floppy drives for creating the disks.

and if you have a huge library, like I do, here's my vid on how I implemented a Gotek in mine so I wouldn't have to create disks :)


to create the files on USB:

Push DSK file to HFE emulator and export

OR

USE TRStools and make a NEW file
JV3 80TRK DS DD
Push the files you want into it
Push into HFE emulator
Export as HFE
 
Cool, but this requires some modifications to the TRS-80 that not everyone might want to do ... and you have to convert the DSK images to HFE ...
Maybe fiddling around with real floppy disks is more fun ... ;)
 
and if you have a huge library, like I do, here's my vid on how I implemented a Gotek in mine so I wouldn't have to create disks :)


to create the files on USB:

Push DSK file to HFE emulator and export

OR

USE TRStools and make a NEW file
JV3 80TRK DS DD
Push the files you want into it
Push into HFE emulator
Export as HFE
While I like the idea, I do want to keep it original and use it as equipped.
 
David Keil's TRS-80 emulator should run fine on this machine and can access real floppy drives for creating the disks.
I'll check it out. One thing I've been wondering is if it would be better to format SS DD in an older Tandon drive like on my IBM PC. I have IMD and I believe it allows me to choose all parameters when it comes to formatting.
 
Can I use a hole punch to notch the disk so I can use both sides? So hard to find a notcher for a decent price. I figure if I get the location marked, a hole punch can be used to notch it by punching a couple time in that location. Won't be pretty, but I believe it will remove enough for the sensor to clear.
 
Have you used this program? I got it, ran it and hit a wall. I got the first drive to load the LDOS, the second drive to load my .DSK, but got stumped for the third drive which is supposed to be my 5.25. I can't figure out how it gets assigned. The F9 for drives let's me put in B for my real drive, but then it wants to load a .DSK or other image file. How do I just assign drive 2 to my B? I have a formatted disk in it fresh from my model 4. When I try to copy :1 to :2, it isn't seeing a drive.
 
Tincanalley,
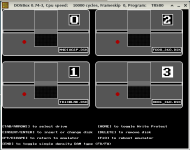
For the David Keil Emulator the Drives are {0..3} on the Display. You can select Images to load into 0 and 1
and there are three special types that are included. That information is shown below.

From this list there are several choices for drive selection.

1. The first letter (F or V) describes REAL FLOPPY or VIRTUAL
2. The second letter (D or H) describes DD or HD
3. The third and fourth letters describe Drive 0 or 1.
NOTE that External Floppy's on the TRS-80 Model 3 & 4 are also hardwired 0 or 1, but selected as 2 or 3 in Software.
4. The three letters after the Underline are Disk Image Size (360 or 720).

So, if your External 1.2M Floppy Drive is hardwired as DS0, it is selected as Drive 2 in Emulator TRS80 and the
proper choice to read a 360K Floppy would be FHD0_360.DSK

Likewise, if your External 360K Floppy Drive is hardwired as DS1, it is selected as Drive 3 in the Emulator TRS80
and the proper choice to read a 360K floppy would be FDD1_360.DSK


FDD0_360.DSK
FDD1_360.DSK

FHD0_360.DSK
FHD1_360.DSK

FHD0_720.DSK
FHD1_720.DSK

F350_720.DSK
F351_720.DSK


VDD0_360.DSK
VDD1_360.DSK

V350_720.DSK
V351_720.DSK

VHD0_360.DSK
VHD1_360.DSK

VHD0_720.DSK
VHD1_720.DSK


Larry
 

Attachments

  • TRSDOS-M4.png
    TRSDOS-M4.png
    17.1 KB · Views: 7
Can I use a hole punch to notch the disk so I can use both sides? So hard to find a notcher for a decent price. I figure if I get the location marked, a hole punch can be used to notch it by punching a couple time in that location. Won't be pretty, but I believe it will remove enough for the sensor to clear.

Not as easily as you might like.

Those disk notchers they sold back in the day were mostly useful on Commodore and Apple computers, because neither of those uses the index hole. So all you needed to do to convert a disk was punch out the area for the write protect notch. To use both sides of a disk on a Radio Shack machine with single-sided disks you'll need to punch out both the write protect notch *and* make new, properly positioned, index holes. The latter isn't quite mission impossible but it is difficult to do without mangling the disk envelope badly, at least with a normal hole punch.

A couple brands did sell flip-able floppy disks back in the day, which you can distinguish from home-notched disks by their factory-punched dual index holes, but I'm sure nobody has stock of those anymore.
 
Tincanalley,
For the David Keil Emulator the Drives are {0..3} on the Display. You can select Images to load into 0 and 1
and there are three special types that are included. That information is shown below.

From this list there are several choices for drive selection.

1. The first letter (F or V) describes REAL FLOPPY or VIRTUAL
2. The second letter (D or H) describes DD or HD
3. The third and fourth letters describe Drive 0 or 1.
NOTE that External Floppy's on the TRS-80 Model 3 & 4 are also hardwired 0 or 1, but selected as 2 or 3 in Software.
4. The three letters after the Underline are Disk Image Size (360 or 720).

So, if your External 1.2M Floppy Drive is hardwired as DS0, it is selected as Drive 2 in Emulator TRS80 and the
proper choice to read a 360K Floppy would be FHD0_360.DSK

Likewise, if your External 360K Floppy Drive is hardwired as DS1, it is selected as Drive 3 in the Emulator TRS80
and the proper choice to read a 360K floppy would be FDD1_360.DSK


FDD0_360.DSK
FDD1_360.DSK

FHD0_360.DSK
FHD1_360.DSK

FHD0_720.DSK
FHD1_720.DSK

F350_720.DSK
F351_720.DSK


VDD0_360.DSK
VDD1_360.DSK

V350_720.DSK
V351_720.DSK

VHD0_360.DSK
VHD1_360.DSK

VHD0_720.DSK
VHD1_720.DSK


Larry
That's exactly what I did. However, when I tried to access a drive higher than 1, it returned an invalid drive error. I made sure to use the correct one for a B: drive that is 1.2MB. So drive 2 showed FHD1_360.DSK being used, but I could not access it as a drive.
 
Not as easily as you might like.

Those disk notchers they sold back in the day were mostly useful on Commodore and Apple computers, because neither of those uses the index hole. So all you needed to do to convert a disk was punch out the area for the write protect notch. To use both sides of a disk on a Radio Shack machine with single-sided disks you'll need to punch out both the write protect notch *and* make new, properly positioned, index holes. The latter isn't quite mission impossible but it is difficult to do without mangling the disk envelope badly, at least with a normal hole punch.

A couple brands did sell flip-able floppy disks back in the day, which you can distinguish from home-notched disks by their factory-punched dual index holes, but I'm sure nobody has stock of those anymore.
Didn't think about the index. Bummer.
 
The Emulator labels the Drives {0..3} and 0 corresponds with DS0, while1 corresponding to DS1.
But, 2 corresponds with DS0 (EXTERNAL DRIVE) and 3 corresponds with DS1 (EXTERNAL DRIVE).
The last External Drive on the cable has a Terminator resistor.

If you have Floppy's in the external drives, you should be able to do:
DIR :0
DIR :1
DIR :2
DIR :3

If running CP/M the drives become A..D

DIR A:
DIR B:
DIR C:
DIR D:


Larry
 
I have a typo in posting #10 which should be as follows:

NOTE that External Floppy's on the TRS-80 Model 4 are also hardwired 0 or 1, but selected as 2 or 3 in
Keil's Emulator Software. (The Model 3's external floppy's are Drive 2 & Drive 3.)


Also I'm not a big fan of using the Floppy Drives that are capable of allowing writing on the back side
of the floppy's. I do still have three AEROCOMP Flippy Drives that have added electronics to allow
flipping each floppy, and writing to the back side. It does work, but long term usage of the floppy's
didn't didn't have good results for all my Model 1 Software.

Larry
 
The Emulator labels the Drives {0..3} and 0 corresponds with DS0, while1 corresponding to DS1.
But, 2 corresponds with DS0 (EXTERNAL DRIVE) and 3 corresponds with DS1 (EXTERNAL DRIVE).
The last External Drive on the cable has a Terminator resistor.

If you have Floppy's in the external drives, you should be able to do:
DIR :0
DIR :1
DIR :2
DIR :3

If running CP/M the drives become A..D

DIR A:
DIR B:
DIR C:
DIR D:


Larry
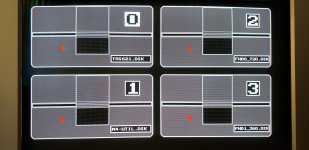
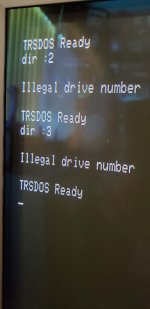
Okay, my floppy drives are DS0 is a 1.44 and DS1 is a 1.2. I have floppies in both and I set them up as shown in the first attached pic. When I try to access them, I get what is shown in the second attached pic.

Either it is not working as intended, or I'm just missing something and need to focus more.
 

Attachments

  • Emulator 1.jpg
    Emulator 1.jpg
    922.7 KB · Views: 3
  • Emulator 2.jpg
    Emulator 2.jpg
    392.3 KB · Views: 3
Also I'm not a big fan of using the Floppy Drives that are capable of allowing writing on the back side
of the floppy's. I do still have three AEROCOMP Flippy Drives that have added electronics to allow
flipping each floppy, and writing to the back side. It does work, but long term usage of the floppy's
didn't didn't have good results for all my Model 1 Software.

I bet you could have a grand ol' time confusing one of those drives with a disk that's been punched with dual index holes.
 
Either it is not working as intended, or I'm just missing something and need to focus more.
Seems that the drive number 3 is not enabled in TRS-DOS ... please execute SYSTEM (DRIVE=3,ENABLE) ...
 
Back
Top