PorkyPiggy
Member
- Joined
- Jan 11, 2024
- Messages
- 46
Hello,
I have spent the past few days cleaning up two generic CP/M 2.2 disks from Digital Research (DRI). CP/M had generic versions released by DRI to OEMs, similar to the OEM Adaptation Kits for MS-DOS. The generic version of CP/M 2.2 consisted of two disks - the Master Control disk and the Serialization Disk.
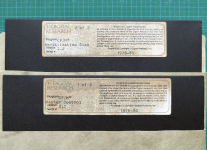
(Not my disks, photo taken from an auction.)
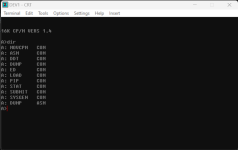
Unlike MS-DOS 1.x and 2.x OAKs, the CP/M Master Control disks are actually bootable on the Intellec MDS-800, Intel's 8080 development system. I spent days searching the internet for an emulator capable of emulating the MDS-800, and eventually, I found the Z80 Emulator (ZEMU). ZEMU claims to be able to boot DRI's CP/M distributions, but I was unable to get the 2.2 disk to boot straight out of the box. Although it emulates the Intellec FDC, it is configured to use ports starting from 30H, whereas DRI's CP/M BIOS expects ports starting from 78H. Fortunately, ZEMU includes an option to remap the I/O ports, and I spent about three hours figuring out how to use the GUI to remap those ports. After this adjustment, CP/M loaded itself into memory and proceeded to crash immediately after transferring control to the BIOS. After another three hours of learning how to use the built-in debugger, I managed to identify the culprit of the problem - DRI's BIOS calls into the MDS Monitor ROM, which does not exist.
I searched the internet and found one ROM dump, but it was not compatible with the DRI BIOS. I spent the next 30 minutes hacking together a 2KB ROM with all the functionalities necessary for the generic CP/M disk to boot, and to my amazement, it actually worked!
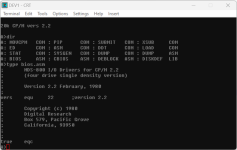
Next, I figured I could try serializing and creating my own copy of CP/M, so I loaded up the serialization disk (from @Chuck(G)) and looked around. Immediately, I saw this inside SERIAL.ASM:
Ouch! I looked around further and discovered that it's half 8080 and half Z80, clearly not something DRI would have done. Fortunately, the copy of SERIAL.COM on that disk is intact and unmodified. With a bit of work in IDA, I have restored SERIAL.ASM to work with CP/M's built-in assembler and produce the exact same SERIAL.COM binary. It appears that Frank modified it to support double-density disks and hard-code the origin (OEM) number for CompuPro, and in the process, he converted half of it to Zilog mnemonics and changed half of the strings. The restored .ASM isn't original, but given that it assembles back to the original binary, it's good enough for me. I know hardcore collectors will now yell at me, but a binary-matching disassembly is about as close as you can get.
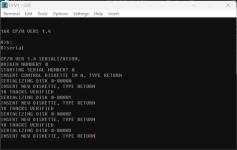
Anyway, here is how you serialize your CP/M disks:
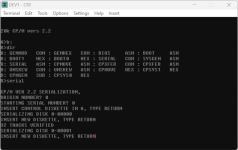
You first enter your origin (OEM) number and then the starting serial number. After that, it will continue prompting you for disks while incrementing the serial number. Each time you serialize a disk, the disk in drive A is copied to drive B with a serial number stamped on it. Therefore, remove the Serialization Disk from drive B after you start SERIAL.COM to prevent it from getting overwritten.
Now you may wonder, what are the rest of the files for? They're mostly for building your own MOVCPM from scratch. Essentially, you provide two copies of your BIOS and run the batch file CPMGEN.SUB, which generates a copy of MOVCPM named MOVCPM1.COM. Two copies of the boot sector, BIOS, and CP/M kernel (BDOS + CCP) are needed, each assembled at a different base address (100H bytes apart). This is necessary to determine the bytes to patch when relocating CP/M, by comparing two binaries assembled at different bases.
First, it clears a region of memory, then loads BOOT0, CPSYS0, and BIOS0 into memory according to the on-disk layout. Afterward, it dumps the memory to CPM0.COM and converts it to CPM0.HEX. It performs the same process for BOOT1, CPSYS1, and BIOS1, outputting CPM1.COM and CPM1.HEX. Then, it concatenates the two .HEX files into CPM10.HEX and calls GENMOD to generate CPM10.COM, which includes the relocation information calculated by diffing the first and second halves of CPM10.HEX. After this, it loads CPMOV.HEX into memory followed by CPM10.COM and writes out the final MOVCPM1.COM binary. All of these steps are done via the SUBMIT script CPMGEN.SUB. A sample output looks like this:
The biggest problem with building MOVCPM is that you need to supply your own BIOS0.HEX and BIOS1.HEX. This is rather obvious - DRI's BIOS was only targeted at the MDS-800, and if you are releasing an OEM version of CP/M, you likely won't be targeting the MDS-800. Therefore, you need to write your own BIOS. However, if you are targeting the MDS-800 for some reason, you can simply release the generic DRI binaries. Nevertheless, if you want to build MOVCPM for the MDS-800 using the DRI-supplied BIOS, you'll need to modify one line and use the macro assembler MAC. Interestingly, DRI's BIOS doesn’t use the BIAS equate, which is defined and needed for producing two Intel HEX objects at different addresses. You must change line 27 from:
to
And then you can set BIAS to 0 for BIOS0.HEX and 100H for BIOS1.HEX. If you don't make the above change, the 2 objects will have the same base address and therefore not work. This is the only way of making it work, and the resulting MOVCPM1.COM matches the original MOVCPM.COM, so DRI left out the "+bias" for the BIOS on purpose.
And then you can set BIAS to 0 for BIOS0.HEX and 100H for BIOS1.HEX. If you don't make the above change, the two objects will have the same base address and will therefore not work. This is the only way to make it work, and the resulting MOVCPM1.COM matches the original MOVCPM.COM, indicating that DRI intentionally omitted the "+bias" for the BIOS.
This pretty much sums up what I have been working on in the last few days. Creating a copy of CP/M from scratch in the intended/DRI way was an interesting adventure.
Downloads
ZEMU - http://www.z80.info/zip/zemu.zip (Windows only)
ZEMU config files - (attached) zemu_mds-800_package.zip
Requests
I'm sure I've overcomplicated things while trying to emulate the MDS-800 because ZEMU claims to emulate "Intellec FDCs (single density, MDS-800; and double density Intellec Series II) to run ISIS and CPM 1.3, 1.4 and 2.2 original DRI ditributions". Even if it doesn't just work out of the box, I shouldn't need to write a ROM myself tailored for the hypothetical "real hardware" emulated by ZEMU, so I might have missed something important. If anyone knows of other emulators capable of emulating the MDS-800, or how to get it working under ZEMU with fewer steps, please let me know.
Also, as you can see, we don't have true original copies of the generic disks. The Master Control disk was stamped with a serial number, and the Serialization Disk has a modified SERIAL.ASM. I would strongly prefer original, unmodified versions. Additionally, we only have the generic disks for version 2.2, so DRI distributions of versions 1.3 through 2.0 are also welcome.
Sincerely,
Pig
I have spent the past few days cleaning up two generic CP/M 2.2 disks from Digital Research (DRI). CP/M had generic versions released by DRI to OEMs, similar to the OEM Adaptation Kits for MS-DOS. The generic version of CP/M 2.2 consisted of two disks - the Master Control disk and the Serialization Disk.

(Not my disks, photo taken from an auction.)
Unlike MS-DOS 1.x and 2.x OAKs, the CP/M Master Control disks are actually bootable on the Intellec MDS-800, Intel's 8080 development system. I spent days searching the internet for an emulator capable of emulating the MDS-800, and eventually, I found the Z80 Emulator (ZEMU). ZEMU claims to be able to boot DRI's CP/M distributions, but I was unable to get the 2.2 disk to boot straight out of the box. Although it emulates the Intellec FDC, it is configured to use ports starting from 30H, whereas DRI's CP/M BIOS expects ports starting from 78H. Fortunately, ZEMU includes an option to remap the I/O ports, and I spent about three hours figuring out how to use the GUI to remap those ports. After this adjustment, CP/M loaded itself into memory and proceeded to crash immediately after transferring control to the BIOS. After another three hours of learning how to use the built-in debugger, I managed to identify the culprit of the problem - DRI's BIOS calls into the MDS Monitor ROM, which does not exist.
I searched the internet and found one ROM dump, but it was not compatible with the DRI BIOS. I spent the next 30 minutes hacking together a 2KB ROM with all the functionalities necessary for the generic CP/M disk to boot, and to my amazement, it actually worked!

Next, I figured I could try serializing and creating my own copy of CP/M, so I loaded up the serialization disk (from @Chuck(G)) and looked around. Immediately, I saw this inside SERIAL.ASM:
Code:
;    Modified for CompuPro by:
;        R.H. Frank
;        Sorcim Corporation
;        April 6, 1981
Ouch! I looked around further and discovered that it's half 8080 and half Z80, clearly not something DRI would have done. Fortunately, the copy of SERIAL.COM on that disk is intact and unmodified. With a bit of work in IDA, I have restored SERIAL.ASM to work with CP/M's built-in assembler and produce the exact same SERIAL.COM binary. It appears that Frank modified it to support double-density disks and hard-code the origin (OEM) number for CompuPro, and in the process, he converted half of it to Zilog mnemonics and changed half of the strings. The restored .ASM isn't original, but given that it assembles back to the original binary, it's good enough for me. I know hardcore collectors will now yell at me, but a binary-matching disassembly is about as close as you can get.
Anyway, here is how you serialize your CP/M disks:

You first enter your origin (OEM) number and then the starting serial number. After that, it will continue prompting you for disks while incrementing the serial number. Each time you serialize a disk, the disk in drive A is copied to drive B with a serial number stamped on it. Therefore, remove the Serialization Disk from drive B after you start SERIAL.COM to prevent it from getting overwritten.
Now you may wonder, what are the rest of the files for? They're mostly for building your own MOVCPM from scratch. Essentially, you provide two copies of your BIOS and run the batch file CPMGEN.SUB, which generates a copy of MOVCPM named MOVCPM1.COM. Two copies of the boot sector, BIOS, and CP/M kernel (BDOS + CCP) are needed, each assembled at a different base address (100H bytes apart). This is necessary to determine the bytes to patch when relocating CP/M, by comparing two binaries assembled at different bases.
First, it clears a region of memory, then loads BOOT0, CPSYS0, and BIOS0 into memory according to the on-disk layout. Afterward, it dumps the memory to CPM0.COM and converts it to CPM0.HEX. It performs the same process for BOOT1, CPSYS1, and BIOS1, outputting CPM1.COM and CPM1.HEX. Then, it concatenates the two .HEX files into CPM10.HEX and calls GENMOD to generate CPM10.COM, which includes the relocation information calculated by diffing the first and second halves of CPM10.HEX. After this, it loads CPMOV.HEX into memory followed by CPM10.COM and writes out the final MOVCPM1.COM binary. All of these steps are done via the SUBMIT script CPMGEN.SUB. A sample output looks like this:
Code:
A>submit cpmgen.sub


A>XSUB

A>DDT
DDT VERS 2.2
-F100,20FF,0

-IBOOT0.HEX

-S5C

005C 00 02

005D 42 .

-RD180

NEXT  PC
01D0 0000
-ICPSYS0.HEX

-S5C

005C 00 02

005D 43 .

-R200

NEXT  PC
17B3 0000
-IBIOS0.HEX

-R200

NEXT  PC
1A6E 0000
-G0


(xsub active)
A>SAVE 26 CPM0.COM
A>DDT
DDT VERS 2.2
-F100,20FF,0

-IBOOT1.HEX

-S5C

005C 00 02

005D 42 .

-RD180

NEXT  PC
01D0 0000
-ICPSYS1.HEX

-S5C

005C 00 02

005D 43 .

-R100

NEXT  PC
17B3 0100
-IBIOS1.HEX

-R100

NEXT  PC
1A6E 0000
-G0


(xsub active)
A>SAVE 26 CPM1.COM
A>GENHEX CPM0.COM

HEX FILE WRITTEN
(xsub active)
A>GENHEX CPM1.COM 100

HEX FILE WRITTEN
(xsub active)
A>PIP CPM10.HEX = CPM0.HEX,CPM1.HEX

(xsub active)
A>GENMOD CPM10.HEX CPM10.COM

REL MOD END  1A00
REL MOD SIZE 1D7F
ABS MOD END  267F
MODULE CONSTRUCTED
(xsub active)
A>SAVE 38 CPM10.COM
A>DDT CPM10.COM
DDT VERS 2.2
NEXT  PC
2700 0100
-F100,7FF,0

-ICPMOVE.HEX

-S5C

005C 00 02

005D 43 .

-R

NEXT  PC
2700 0000
-G0


(xsub active)
A>SAVE 38 MOVCPM1.COM
The biggest problem with building MOVCPM is that you need to supply your own BIOS0.HEX and BIOS1.HEX. This is rather obvious - DRI's BIOS was only targeted at the MDS-800, and if you are releasing an OEM version of CP/M, you likely won't be targeting the MDS-800. Therefore, you need to write your own BIOS. However, if you are targeting the MDS-800 for some reason, you can simply release the generic DRI binaries. Nevertheless, if you want to build MOVCPM for the MDS-800 using the DRI-supplied BIOS, you'll need to modify one line and use the macro assembler MAC. Interestingly, DRI's BIOS doesn’t use the BIAS equate, which is defined and needed for producing two Intel HEX objects at different addresses. You must change line 27 from:
Code:
org patchto
Code:
org patch+biasAnd then you can set BIAS to 0 for BIOS0.HEX and 100H for BIOS1.HEX. If you don't make the above change, the 2 objects will have the same base address and therefore not work. This is the only way of making it work, and the resulting MOVCPM1.COM matches the original MOVCPM.COM, so DRI left out the "+bias" for the BIOS on purpose.
And then you can set BIAS to 0 for BIOS0.HEX and 100H for BIOS1.HEX. If you don't make the above change, the two objects will have the same base address and will therefore not work. This is the only way to make it work, and the resulting MOVCPM1.COM matches the original MOVCPM.COM, indicating that DRI intentionally omitted the "+bias" for the BIOS.
This pretty much sums up what I have been working on in the last few days. Creating a copy of CP/M from scratch in the intended/DRI way was an interesting adventure.
Downloads
ZEMU - http://www.z80.info/zip/zemu.zip (Windows only)
ZEMU config files - (attached) zemu_mds-800_package.zip
- Apply mds-800.reg after you install ZEMU, this configures everything for you (too many things to configure by hand).
- Run ZEMU.
- Go to File -> Load As ROM and select stub_mds-800_rom.bin, then click OK.
- Go to File -> Load I/O Port ReMap and select mds-800.iom.
- Go to Disks -> A: and Disks -> B:, to select disk images for drives A and B.
- Click "Boot" on the main window to start the emulation.
- You will need to do this every single time you start ZEMU.
- The Master Control disk originated from Don Maslin's archive within the Sydex folder, so it's actually from @Chuck(G). It came with a serial number, which I have removed, enabling the MOVCPM built from scratch to run without the classic synchronization (serial mismatch) error. Freshly built MOVCPMs do not contain serial numbers (not even in the version field of the S/N), suggesting that the original Master Control disks likely also lacked serial numbers, as evidenced by the empty serial field on disk labels.
- The Serialization Disk was uploaded by @Chuck(G). I have cleaned it up and restored SERIAL.ASM to the best of my abilities.
- Copy these to the Serialization Disk if you don't want to modify BIOS.ASM and build them yourself.
Requests
I'm sure I've overcomplicated things while trying to emulate the MDS-800 because ZEMU claims to emulate "Intellec FDCs (single density, MDS-800; and double density Intellec Series II) to run ISIS and CPM 1.3, 1.4 and 2.2 original DRI ditributions". Even if it doesn't just work out of the box, I shouldn't need to write a ROM myself tailored for the hypothetical "real hardware" emulated by ZEMU, so I might have missed something important. If anyone knows of other emulators capable of emulating the MDS-800, or how to get it working under ZEMU with fewer steps, please let me know.
Also, as you can see, we don't have true original copies of the generic disks. The Master Control disk was stamped with a serial number, and the Serialization Disk has a modified SERIAL.ASM. I would strongly prefer original, unmodified versions. Additionally, we only have the generic disks for version 2.2, so DRI distributions of versions 1.3 through 2.0 are also welcome.
Sincerely,
Pig

