• Please review our updated Terms and Rules here

How to safely disassemble Macintosh Color Display (M1212)?

STorrence

Member
Joined
Dec 17, 2009
Messages
49
I am attempting to safely disassemble the monitor that I have with an old Macintosh LC II. It's a "Macintosh Color Display" model M-1212. I have found two screws on the bottom that loosen what appears to be the whole upper housing, but I cannot lift this housing off completely. It seems to be held in place by something near where the upper housing meets the front plastic bezel that surrounds the glass. I have probed the seam with a screwdriver but am trying not to break the plastic as I am attempting to restore the monitor with Retr0brite.

Does anyone here happen to have a service manual for this monitor or know specifically how to open it? Thanks in advance!
 
I have probed the seam with a screwdriver but am trying not to break the plastic as I am attempting to restore the monitor with Retr0brite.

Make sure you take some before and after photos !
(of the Retr0Brite treatment, not the damage caused trying to open it!) :)
 
Oh you know it. This is actually part of a larger restoration project too. I'm doing an SE, two LC II's, an ImageWriter II, and hopefully this monitor. Just gotta get the darn thing open!
 
There's no service manual I could find, but I have the exact same monitor you do. Just through gentle jiggery pokery, I found out that there are a couple clips along the top of the monitor near the seam where the front face-panel and the main housing meet. When laying the monitor face down (CRT on the ground, preferably something soft) with the top facing towards you, and both screws removed, press firmly on the housing-side of the seam at the top of the CRT with your thumbs as you lift the housing up.
 
Fantastic advice, olePigeon! It came right off just as you suggested. Now, how do I safely discharge this beast? Here are some photos of the monitor with the upper housing removed.

4287072646_f3c35915af_o.jpg


4287072616_7d2a098718_o.jpg
 
Now, how do I safely discharge this beast?

Discharge smishcharge.
Go to Home Depot and get some thick rubber gloves (the longer length type), and then just be careful.
I've never discharged one yet (because I never figured out how :)), but I've taken apart IBM 5151s, Televideo's, Osborne's, etc.
I'm still alive.
 
If the monitor works, I would just leave it alone aside from cleaning plastic.

First and fore-most, make double, triple, quadrouple sure the monitor is unplugged first.

You can discharge the tube by connecting a flat blade screwdriver to the chassy (ground) and sliding it under the anode cap on the tube. Make sure the screwdriver is well insulated from your hand. If you slip it will give you quite a jolt (from experience), so if you have heart conditions I would just skip it all together. If you do this, put one arm behind your back.

The most dangerous part of the monitor is going to be the low-voltage power supply side (the caps).

Honestly, if the monitor works, it's just best to leave it alone. I know it's fun to take things apart, but it's risky.
 
You have to manhandle the CRT to separate it from the plastic. Better to discharge and be safe.

http://www.wikihow.com/Discharge-a-CRT-Monitor

That's it?

It's the anode you're supposed to discharge?

I've been zapped a couple times messing with the anodes with my bare hands. Now I use the rubber glove.
I always thought it was the area with all the wire wrapped around the end of the CRT that was the dangerous part. I've been steering well clear of that area.

Geezzz.
 
Yeah, I would definitley recommend discharging the Anode (red wire, black rubber boot/cap/whatever) first.

Good thing you didn't break anything doing it that way.
 
Okay, I'll do that next. Getting the plastic pieces off the chassis looks like quite a chore, but I'll take detailed pictures of the whole process. I'm hoping others can duplicate this for their vintage monitors.

Just out of curiosity, how many batches of Merlin's recipe would y'all estimate it will take to treat this entirely?
 
Ah, you're retrobrite'ing.

Honestly, to do the pieces I did, I just used regular ol Wal-Mart 3% Hydrogen Peroxide, water, and Oxy Clean. The mixture I used was mostly water even. I plan on getting a large container and fluorescent tube UV lights to do the bigger pieces (someone in thread 3 or 4 did similar). It took about 12 hours with the little lights I used.

I'm personally a little standoffish about making the paste, although there are success stories with it.
 
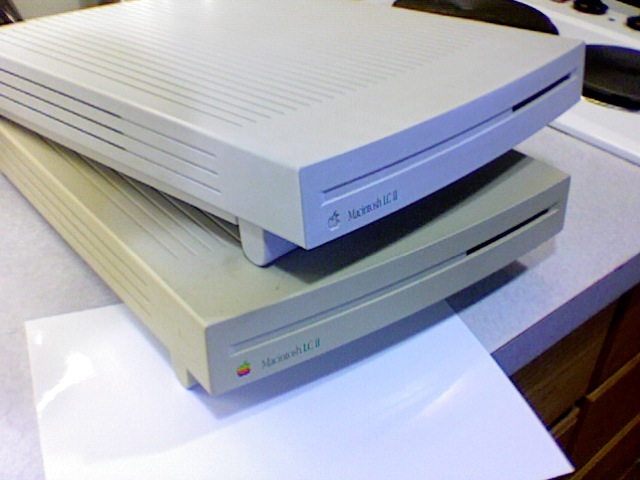
Well I just had my first foray in retr0briting, and the results were fantastic. Here's a preliminary photo of the LC II case compared to the untreated one I have. I'll be starting a new thread for the treatment of this monitor in a week or so.

4303605697_6221b8ce9f_o.jpg
 
Looks good.
Make sure you take before and after photos, and post them in the De-Yellowing thread too.

I did. This is just an iPhone pic I posted during the process. I'm going to upload the before/after set from my camera sometime this week.
 
That looks really good... someday I will get to mine, but I have to get back on target to send all my "stuff" to the people who expressed interest.
 
I have a design idea for a retr0brite box, that will make it easy, but combersome.

Get a 10 gallon clear container (one guy had success with doing his Mac SE case in a tub of just H2O2, oxyclean, and lots of water), and put that in an acrillic 5 sided box (no top), the acrillic box is like a super-structure (to hold the container), and then the outside would be just plywood with UV lights around all 6 sides (hinged lid with a light too). Then you can control each light on/off, so for example if you have the back of a mac SE case facing up, you can turn off the bottom light to save power. Of course the whole box would be on casters.
 
That is awesome. Great job. I'm glad you had success with the paste.

What concentration of H2O2 did you use?

I followed Merlin's recipe exactly, so 40 volume H2O2 (10-12%). No bleaching, no degradation of the markings.
 
Back
Top