• Please review our updated Terms and Rules here

IBM PS/2 P70 8573 POST 161 163 after replacing battery

Holmes

Experienced Member
Joined
Dec 13, 2010
Messages
313
Location
Marietta, GA
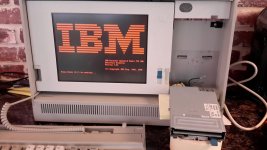
I recently came into a wonderful IBM PS/2 P70, which I have always wanted. I knew it had POST errors 161 and 163 on buying, and hoped this could be fixed quickly.

When I first got it, it does a RAM check up to 8MB, and then shows POST errors 161 (CMOS configuration lost (battery has died)) and 163 (CMOS error; Clock is not updating).

I opened it up, and found it was quite clean, and there was no CMOS battery installed, so I purchased a new Duracell DL223A, and put it in. It still gives a 161 and 163 error.

I checked the battery lines with a DVM, and it says a clean 6.4 VDC all the way to the PCB connections (I even checked it when running).

I created several P70 reference disks on a spare Win98 laptop with a floppy drive, and ran REFSTAMP on those. After getting 161 163, I try the floppy and it sounds good initially, but then just spins forever, and when I eventually eject it, the P70 goes to cassette BASIC. The keyboard works fine, and I can enter in a program, list it, renumber it, and run it without issue.


It came with modem and network cards, and I removed them. I tried replacing the nasty sounding ESDI hard drive with a working spare, and no difference. I eventually unplugged the hard drive completely, and there's no difference, still 161 and 163 POST errors.

I also tried removing all the RAM sticks (it has 4 sticks), and tried putting in only 1 stick (and I tried 2 of the original 4 sticks) as the only stick. No difference, except the RAM check only goes to 2MB in those cases.

So I've done tons of internet searches, and am looking for help.


My first thought was that somehow there's a power draw making it look like there's no CMOS battery, but checking the board connections shows it is still 6+ volts when running. Shouldn't replacing the battery cause the 161 error to go away, and just leave the 163 error?

It's also likely my floppy drive needs capacitor replacement, but that just affects its inability to boot from my created reference disks. I keep coming back to thinking that the continued 161 error is the problem.

Can someone help?
 
I opened it up, and found it was quite clean, and there was no CMOS battery installed, so I purchased a new Duracell DL223A, and put it in. It still gives a 161 and 163 error.
Even the IBM AT exhibits that behaviour. With the IBM AT, after a bad battery is replaced with new, the only way to remove the 161 and 163 errors is to follow up by executing the SETUP procedure. Even with the configuration in the CMOS/RTC chip being in an 'unconfigured' state, the IBM AT can still boot from the AT's diagnostic floppy (in order to perform SETUP).

I am pretty sure that the P70 is 'in the same boat'; need to run the P70's reference diskette.

OK, I see. Looks like I can't procrastinate working on the floppy drive, then! Nuts.

Thanks!
 
It's also likely my floppy drive needs capacitor replacement, but that just affects its inability to boot from my created reference disks.
The "created reference disks" are also suspect until proven good.

I have read things like, "It took me four attempts to create a reference diskette that worked."

Consider trying REFSTAMP against your created reference disks. Detailed at [here].
 
The "created reference disks" are also suspect until proven good.

I have read things like, "It took me four attempts to create a reference diskette that worked."

Consider trying REFSTAMP against your created reference disks. Detailed at [here].

I did run REFSTAMP on my created reference disks. I first ran it in "report" mode, and it said the just-created disks were NOT refstamped. Then I ran it to update the refstamps, and checked with the "report" mode again, and it seemed to work.

I just attempted to boot using the created reference disks on the win98 machine I used to create them, and it showed an official message "window" on a text screen saying "The Reference Diskette in drive A will not run on this system. Your system is now locked." It seems like the disks work.

Maybe I can try building them on a different machine, once I unpack them.

Thanks for the suggestions.
 
So I wanted to post a follow-up.

It seems like the floppy drive was the problem, as Modem7 said, but I'm getting a bit ahead of myself.

I did more testing, but then the screen went out! I cursed and tested and tested, and then it came back all by itself. I was planning to Deoxit the connections and made a last try before going ahead with it.

So the screen came back, and I was back at my starting point. I modified a floppy cable based on plans someone laid of for using a non-PS/2 floppy on a P70. I plugged in a spare 5V-only 3.5" floppy drive, and it worked! I was able to boot to the reference disk I made at the beginning.

So I probably still need to deoxit the display connectors, but I've really got to look at the built-in floppy drive. It's a bear to get out, and I managed to get the cover off and unscrew it, but the cable's holding it in, and it doesn't look like I can get that free unless I take out the power supply.

I'm going to put it on hold for a moment. Too much life stuff getting in the way!

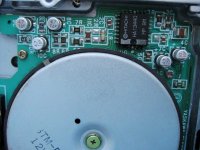
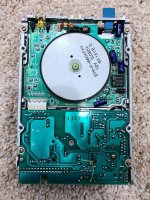
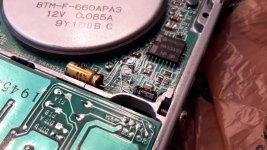
The P70's have notoriously bad reputation for its floppy drives. To make things worse, these drives are not easily substituted by other general floppy drives without making modifications. However, most of the bad OEM floppy drives only needed a recap. I did it for one of my two P70's and it came back to life right after the recapping. Hope yours can be fixed easily as well.

IMG_9136.jpg
IMG_9172.jpg
 
The P70's have notoriously bad reputation for its floppy drives. To make things worse, these drives are not easily substituted by other general floppy drives without making modifications. However, most of the bad OEM floppy drives only needed a recap. I did it for one of my two P70's and it came back to life right after the recapping. Hope yours can be fixed easily as well.

View attachment 59792
View attachment 59793

Thanks for the pics! That helps.

I've been procrastinating removing the drive, as it looks like you have to take half the computer apart just to get the floppy cable out.
 
Thanks for the pics! That helps.

I've been procrastinating removing the drive, as it looks like you have to take half the computer apart just to get the floppy cable out.

No you don't need to take the computer apart before you can remove the drive. I was searching in my phone for a picture with the floppy drive removed while having the computer case intact but I can't find it. I believe there are some on the internet. In a nutshell, it's not as hard as you would imagine and I am sure you can easily do it ;)
 
No you don't need to take the computer apart before you can remove the drive. I was searching in my phone for a picture with the floppy drive removed while having the computer case intact but I can't find it. I believe there are some on the internet. In a nutshell, it's not as hard as you would imagine and I am sure you can easily do it ;)

I found pictures of how to remove the drive cover. I managed to get that off, and I can unscrew the hinged bracket that lowers the drive, and I can reach the screws to loosen the drive. The problem is the ribbon cable is attached to the back of the drive, and snakes its way through a small hole to the back, where it plugs into the motherboard. The problem is it looks like you have to remove the power supply and/or the motherboard or other components to get the ribbon cable through, and unless you do that, you can't disconnect it from the back of the drive, and you can't remove the drive. At least this is what it looks like. I may take another look again.

I can do it, but it's involved, and will take some time to complete the task. I'm busy with this COVID-19 quarantine thing, daughter at home now (schools closed), new job, and a recent long-distance move. I'm trying to balance my interests with my duties, so I can't spend too much time on something like this right now.

If someone has suggestions of an easy way to get the drive disconnected, I would be grateful. Thanks!
 
Last edited:
I found pictures of how to remove the drive cover. I managed to get that off, and I can unscrew the hinged bracket that lowers the drive, and I can reach the screws to loosen the drive. The problem is the ribbon cable is attached to the back of the drive, and snakes its way through a small hole to the back, where it plugs into the motherboard. The problem is it looks like you have to remove the power supply and/or the motherboard or other components to get the ribbon cable through, and unless you do that, you can't disconnect it from the back of the drive, and you can't remove the drive. At least this is what it looks like. I may take another look again.

I can do it, but it's involved, and will take some time to complete the task. I'm busy with this COVID-19 quarantine thing, daughter at home now (schools closed), new job, and a recent long-distance move. I'm trying to balance my interests with my duties, so I can't spend too much time on something like this right now.

If someone has suggestions of an easy way to get the drive disconnected, I would be grateful. Thanks!

I remember that I managed to detach the cable on the drive end without dismantling the machine. But it was really really tough because of the very limited space at the back of the drive cage. Were you able to get the cage loose?
 
I remember that I managed to detach the cable on the drive end without dismantling the machine. But it was really really tough because of the very limited space at the back of the drive cage. Were you able to get the cage loose?

Yes, both the P70 and P75 are a real pain to extract the floppy drive from. It's a case of somehow gripping the cable strongly enough to pull the connector out of the FD socket. Tortuous positioning in order to accomplish it. Beware of the P75's earthed EMC shield and the sometimes exposed circuit board reverse of the floppy drive.
 
I remember that I managed to detach the cable on the drive end without dismantling the machine. But it was really really tough because of the very limited space at the back of the drive cage. Were you able to get the cage loose?

Yes, I did remove the cage (the pivoting structure). It is really tight behind the drive, and I didn't think I could remove the drive from the cable without removing the whole thing (floppy drive, mounting cage, and ribbon cable all together) to do so. Problem is, you can't even get to it without removing the motherboard-side of the floppy ribbon cable.
 
Yes, both the P70 and P75 are a real pain to extract the floppy drive from. It's a case of somehow gripping the cable strongly enough to pull the connector out of the FD socket. Tortuous positioning in order to accomplish it. Beware of the P75's earthed EMC shield and the sometimes exposed circuit board reverse of the floppy drive.

Yes, it seems like it would be really hard to unplug the floppy ribbon cable from the floppy. Maybe I could try sticking a small screwdriver in the side to pry the ribbon cable off. I didn't seem to think I could, the last time I was in there. I may take another look soon.
 
It's usually necessary, when the cable's been in there a long time, to ensure a steady pull without any lateral or vertical offset, sticky little blighters. You might loosen the molecular bonding by judicious levering and pressing the cable end in various directions within the socket. I'm unsure of the conductive properties of lubricants like WD40, so can't advise their use, but something of a similar nature is needed, IMO.
 
It's usually necessary, when the cable's been in there a long time, to ensure a steady pull without any lateral or vertical offset, sticky little blighters. You might loosen the molecular bonding by judicious levering and pressing the cable end in various directions within the socket. I'm unsure of the conductive properties of lubricants like WD40, so can't advise their use, but something of a similar nature is needed, IMO.

Thanks for the suggestion! I actually think getting the plug off the floppy should be okay, if I could just get access to it. I need to go back in and look at what I can do given the physical restrictions of the setup.
 
So here's an update.

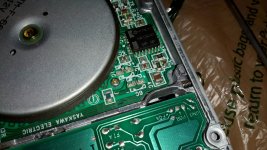
I cut off the bad capacitors as follows. I find this method much better as you don't have to worry about desoldering them. I cut them off using a wire cutter, making sure I didn't stress the leads.
P70 medium repair (2).jpg

Then I desoldered them easily using a regular soldering iron:
P70 medium repair (3).jpg

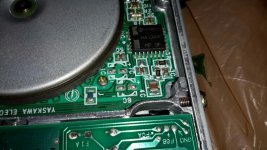
I checked all the exposed solder pads to make sure they were still connected to their components, and it seemed like they were fine.

I resoldered in some spare capacitors that meet the specifications of the removed ones:
P70 medium repair (4).jpg

I plug it back in, and ... it works!
P70 medium repair (5).jpg


I did not replace the other caps on the PCB, because they looked fine. Also, I don't have replacement caps for them, but I guess I should change them as well, since I don't want to go through the madness of removing the floppy again if they go out in the next year or so.
 
Back
Top