• Please review our updated Terms and Rules here

NeXT color monitor N4006 PSU shuts off immediately after power on

powerlot

Experienced Member
Joined
Nov 20, 2021
Messages
483
Location
Europe
Hi community

I couldn't say to no to a NeXT computer (the slab, not the cube) complete with accessories, "working the last time it was used". While the computer's only problem seems to be a seized fan, the monitor turns out to be more problematic than I initially thought.

The monitor in question is a rebranded Sony GDM-1632, at least it matches all the parts descriptions and only lacks the weird video connector board:

When I first powered it up, the green LED turned on, but there was no high voltage and the distinct smell of capacitor juice started to emanate from the monitor. After examining the PSU and posting a picture of it on the TRW discord, it was pointed out to me that the ELNA capacitors like to be leaky and indeed they were.

I swapped all the ELNA branded capacitors except one that I didn't have stocked and was not (yet) leaking, cleaned up the PSU ("G-board") and attempted to power it on again. This time the monitor powered up including high voltage, and displayed a dim, purple picture with horizontal smears.

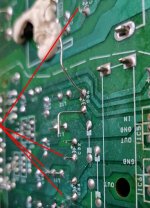
After a about half a minute of being on, it started to sputter and the cap juice smell came back. I further took the monitor apart and saw that the "A-board" (the color board that drives the guns I believe) has more of those ELNAs and they leaked all over the place.

I cleaned it up, replaced the ELNA capacitors on the "A-board", the neck board and one of the bigger 1000uf ELNA capacitors on the large main board ("D-board"), though that one measured still good and I was just paranoid of having to clean more of that juice. In the mean time I also replaced the last ELNA on the PSU.

Now, after putting everything back together, whenever I switch it on the green LED turns on briefly and shuts down immediatly. I can hear a bit of degauss coil noise as well.

From the above linked service manual (which unfortunately doesn't have schematics):

1674206933397.png1674206829605.png

Also:

1674207033916.png

Change "D-board" and PSU.. would be easy if I had a warehouse of those. I have disconnected all boards except the neck board and "D-board" and problem persists. Therefore my assumption is that something is wrong on the PSU or logic board.

I'm putting this out here as most threads in the internet look like people gave up on it. At the same time I'm also having a look at one of the pages (https://web.archive.org/web/20070302074640/http://repairfaq.ece.drexel.edu:80/sam/monfaq.htm) about troubleshooting monitors, but it's still a bit difficult as someone who doesn't have that much experience in SMPS / monitor repair.

Would anyone have experience in troubleshooting these monitors? It's a bit more complicated than the Commodore monitors I have encountered until now :/

I must have either introduced a fault somewhere, some component doesn't play nice with the replacement caps or something broke down randomly.

Thanks for any hints on how to try to get it back to life again! It would be nice to have a complete working setup...
 
It sounds like you have had massive electrolyte leakage from a good number of capacitors.

The leaked electrolyte is much harder to clean off than it looks. Being a highly polar solution, it barely dissolves at all into contact cleaners. Warm de-ionised water is the best way to clean it off.

Check your work, make sure any caps you did replace re correctly orientated and of the right value. Examine all the other electrolytic caps in the whole VDU, check for physical signs of leakage and check them with an ESR meter.

Disconnect the collector of the H output transistor, see if the set powers up (without the H scan and EHT running) , or if the psu still shuts down after turn on.
 
Thanks for the pointers, Hugo. I'll come back in few days as it looks like I have some more cleaning to do (and then figure out where the H output transistor is located).

I have examined the board for obvious leakage, but I'll go over it again. I don't have an in-circuit capacitor checker and I dread desoldering every cap in there. Maybe I can figure out another solution to determine ESR with the test equipment I have.

Now I'll go shopping for some water...
 
Horizontal smearing on trinitron tubes is always bad capacitors in the deflection and convergence. I am not entirely educated on Sony's tubes but I do know that the HV shutdown like you are experiencing is something I've seen several times before in other Sony monitors from Apple. Way back in day yonder it was assumed that immediately meant a bad flyback or a shorted horizontal output transistor, but with capacitors in the mix it could also be it thinks there's a problem where there actually isn't, so a complete clean and recap might fix it or the damage is now done. I can't say.
 
I cleaned the video driver board with the suggested deionised water and washed it down with PCB cleaner... now it's having spa day on the radiator and I think I'll leave it there for another day to get all the moisture out.

Then I continued examining the rest and damage appears to be in my brain, because this is how I found that capacitor I replaced last in the PSU:

g-board-01.jpg

Turns out I'm able to sabotage my own repairs! It didn't blow a fuse so it must have been the protection circuit kicking in (at least that appears to be working).

Without the "A-board" in I tried to power the monitor up, the high voltage came right up and there were no funny smells or sounds. It displays a purplish-blue raster that I can't regulate the brightness for, but without board present I'll stop here.

Horizontal smearing on trinitron tubes is always bad capacitors in the deflection and convergence.
Good to know, I might come back to this if the picture is still smeary after trying it out with a proper video signal.
 
Turns out I'm able to sabotage my own repairs!

I cleaned the video driver board with the suggested deionised water and washed it down with PCB cleaner... now it's having spa day on the radiator and I think I'll leave it there for another day to get all the moisture out.
Don't be too alarmed by that, you forgot to clip off the tails.

In the Australian movie, The Dish, one of the Engineers looking after the Radio Telescope at Parkes, that was monitoring the Apollo 11 moon landing, forgot to prime the fuel pump for the UPS, that backed up the receiving dish. The power went down because the meat pie warmer (yes we eat meat pies in Australia) in the local town took out all the fuses. When the NASA supervisor found out about it he said "these things happen" before every launch everyone at NASA turns blue.

So don't beat yourself up about it.

I can see that you have been cleaning the pcb, because of the lint or fibers left behind by the cloths or cue tips on the ends of some of the component leads.
 

Attachments

  • Lint.jpg
    Lint.jpg
    112.6 KB · Views: 6
I only once had meat pie when I was in the UK for a trip, I didn't know Australia also eats them :)

So don't beat yourself up about it.
Agreed, it has happened and no damage was done... water under the bridge.

I've tried to get the worst corrosion off, while the PSU got away with minor damage, the A-board was hit really bad. There's corrosion and blackened cap goo everywhere, to the point where some components don't take solder anymore and some trances or pads started to dissolve.
It's also really disgusting, everytime I removed the contaminated solder it sizzled and smelled....
a-board-01.jpg
Not sure how far I have to go here, even with flux paste it's difficult to flow fresh solder in.
 
I often have to physically scrape the corroded pads until it's down to bare copper.
 
I often have to physically scrape the corroded pads until it's down to bare copper.
Yes, that's what I did where there I tinned solder on the traces. I think I've got the worst corrosion out.. let's see if it was good enough.

I reassembled the board and,

next-monitor-01.jpg
success! :)

The moiré and stripe in the middle is from the camera... I guess the two other horizontal stripes are from the Trinitron tube? If yes, everything seems to be alright except for some minor shifted colors visible in the corners. I don't think I'll try to adjust anything here unless it looks worse with the operating system running.

Turned out to be less of a hassle than I thought and I hope the monitor holds up!

@NeXT from your name I assume you're familiar with the computers? Does the computer and the speaker box need their caps changed as well? I replaced those surface mount caps already in an Amiga and Macintosh, if they're the same type known to leak I'll have a look.

It has a new fan and battery now and I managed to boot to a login prompt. If you know how to "break into" the system (= reset the root or user passwords) I'd be interested to have a look around.

Thanks everyone!

PS: If there is interest I can open a thread presenting the haul.
 
Yes there are capacitors in the slabs and cubes that need to be replaced, notably the surface mount cans but a complete recap is recommended. Same goes for the sound box and the PSU.
It's no longer the case of a capacitor failing from visual symptoms. They are internally breaking down chemically and the rubber sealing material that holds the electrolyte in is shrinking with age to the point there is nothing to keep the electrolyte from seeping out.
In short: they might not have enough hours to of reached their rated MTBF but they have long since passed their rated assembled lifespan and are on borrowed time.
 
Thanks everyone for your help... I left the monitor and computer on for half a day and except for some faint cap smell in the PSU section of the monitor (I have to check if I forgot to clean up some area or additional caps are leaking) and the printer not working it seems to be looking good.

I'll proceed with recapping and open a new thread in the appropriate forum in case I hit a road block again.
 
Misfortune has struck!

After being used for a while, the smell came back... today I heard arcing noises.

It seems I have missed to notice that electrolyte has seeped all the way under the heatsink of IC1 and has become conductive!

g-board-02.jpg g-board-03.jpg


I hope this can be cleaned and didn't damage the IC, PCB or tracks...
 
At that point I'd use a 50% iso solution (that's still relatively cheap these days in volume) and wash the entire board.
 
At that point I'd use a 50% iso solution (that's still relatively cheap these days in volume) and wash the entire board.
Yeah, as well as desoldering every component in a 10 cm radius around the leaked capacitors. It does look like it flowed downwards into IC1 and to the right into the relay after it pooled on the heatsink, probably because it was transported face down
 
Alright, I examined the board and did another round of cleaning.

The 100nf cap hidden in the silicone was full of electrolyte as well as the heatsink and two rectifier diodes:

g-board-04.jpgg-board-05.jpgg-board-06.jpgg-board-07.jpg

I cleaned and resoldered everything and except for one of the pads that disappeared somewhere while I was scrubbing it looks like a successful repair

g-board-08.jpg

I hope I finally get to enjoy this computer...
 
Nice video of the arcing.

One thing about the phenolic pcb you are dealing with, the side with the tracks and the green coating is more resistant to the ingress of electrolyte than the brown side which is a little more resistant than the holes . When the electrolytye goes into the holes it absorbs into the board edges there very well. It can help to run a slightly over-sized drill trough the holes, not too big though with respect to the pad size and components, to remove the heavily contaminated phenolic material in the hole edges.

De-ionised water is best for cleaning in this case. But for this one, you would need a lot of it, could get costly. I would use water from a kitchen sink hot tap, running just a low flow small even stream of it over the affected area of the board holding the board at an angle so the water runs off the lower edges, for at least 1 hour to help leach out the electrolyte, probably even 2 hours would be better, but for that you would likely want to set up a holder, to hold the board at a tilted angle, or you might get bored doing it and lose concentration. Avoid getting the water near objects like the relays. Once it has been washed like this, then you could wash the area with some de-ionized water at room temperature, to get rid of the residual tap water salts, then a final clean with some IPA or contact cleaner and a warm air dry .

(it is much more difficult to get salts out of phenolic pcb material than it looks. I once repaired a vintage meter switch where the phenolic plates had come into contact with leaked battery electrolyte. They had to go in a bath of water in a tank for a week, even then ions were still slowly leaving the material to the solution, I could still detect residual conductivity in the material. Contact cleaners , on their own won't do the job at all, it requires water and it is a slower process than you might ever imagine).

PS: make sure to scrape of any carbonized board material where it was previously arcing and if that is a deep area, varnish that afterwards with marine spar varnish or transformer varnish to seal the surface.
 
Nice video of the arcing.
Thanks, I wanted to find the location of the arcing as quickly as possible without being near the circuit while it was on. Unfortunately, this monitor draws more power than my isolation transformer can handle so I won't go near any zappy parts while it's on.
It was tempting to get a better shot at the arcs, but I didn't want to push my luck and destroy something that would be even harder to fix.

One thing about the phenolic pcb you are dealing with, the side with the tracks and the green coating is more resistant to the ingress of electrolyte than the brown side which is a little more resistant than the holes . When the electrolytye goes into the holes it absorbs into the board edges there very well. It can help to run a slightly over-sized drill trough the holes, not too big though with respect to the pad size and components, to remove the heavily contaminated phenolic material in the hole edges.

De-ionised water is best for cleaning in this case. But for this one, you would need a lot of it, could get costly. I would use water from a kitchen sink hot tap, running just a low flow small even stream of it over the affected area of the board holding the board at an angle so the water runs off the lower edges, for at least 1 hour to help leach out the electrolyte, probably even 2 hours would be better, but for that you would likely want to set up a holder, to hold the board at a tilted angle, or you might get bored doing it and lose concentration. Avoid getting the water near objects like the relays. Once it has been washed like this, then you could wash the area with some de-ionized water at room temperature, to get rid of the residual tap water salts, then a final clean with some IPA or contact cleaner and a warm air dry .
I love how this implies that someone would not get bored and lose concentration after rinsing a PCB for 1-2h :)

I thought about a more prolonged cleaning, but ultimately just stuck to use de-ioinised water and PCB cleaning solution to remove the electrolyte. The resistance was in the two digit MOhm ranges, so it should hopefully be ok. I will keep an eye on the monitor's behaviour and recheck it in case there are anomalies. However, those are valuable tips which I will keep in mind in case I have to deal with even heavier contamination of this type of PCB.

PS: make sure to scrape of any carbonized board material where it was previously arcing and if that is a deep area, varnish that afterwards with marine spar varnish or transformer varnish to seal the surface.
I have heard of carbon tracking and the carbonized parts becoming conductive, therefore I scraped the area with a fiberglass pen and a knive until there was no more carbon visible. Since the contamination appears to be relatively fresh and not some several year long soaking I hope it is sufficient.
 
Back
Top