• Please review our updated Terms and Rules here

Osborne 1 Screenpac

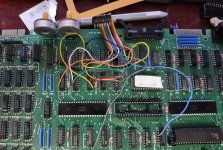
Loom Details

NOTE - Pin 14 on the IDC crimp is the first wire, NOT pin 1.... Seems backwards. Maybe it was designed to go into the back of the screen PAC or something like that.

Pin 14 - Yellow - Pin 1 - E13 - 74LS05 Pin 1 - Orange - Pin 14 - D18 - 74LS161 Pin 13 - Red - No Con - Pin 2 - Brown - Pin 11 - D17 - 74LS161 Pin 12 - Black - Pin 12 - E22 - 74LS74 Pin 3 - White - Pin 12 - D17 - 74LS161 Pin 11 - Grey - Pin 1 - B16 - 74LS157 Pin 4 - Violet - Pin 13 - D17 - 74LS161 Pin 10 - Blue - Pin 12 - B11 - 74LS161 Pin 5 - Green - Pin 14 - D17 - 74LS161 Pin 9 - Yellow - Pin 2 - D16 - 74LS161 Pin 6 - Orange - Pin 5 - D14 - 74LS175 Pin 8 - Red - Pin 4 - D16 - 74LS161 Pin 7 - Brown - Pin 5 - D16 - 74LS161
 
Last edited:
Repairing ScreenPACs is hard - :( Seems the one I got has seen better days. Began with a clear screen with alternating lines,

Then I got garbage on screen - mostly repeated. Found a faulty RAM on the main PCB. Removed the ScreenPAC and tried to run with a z80 and character rom direct, but wouldn't work. Sockets were broken by the pin headers of the ScreenPAC. Replaced the z80 and ROM socket with pin header receivers and put a z80 and 24PIN eprom socket on pin headers and plugged them in.

Now I get boot. ScreenPAC goes back on, then it gives garbled screen, through I can see character changes at the right position now.

Mostly I get $ instead of spaces, so I check the ROM. It's OK. But the signals to the EPROM for the character set seem garbled. 74C244 buffer on the ScreenPAC board doesn't appear to be doing the correct job and I get inconsistent voltages to the address lines from A0 to A7. Trace this back to the 74C244. Desolder and socket last night, but don't have a new one to try in the spot yet. , ,

I am really hopefull to get this thing working, but concerned other faults will occur within the ScreenPAC hardware that correctly generates the higher dot clock rate.

Does anyone know what is necessary to run the ScreenPAC? And where a disk image for it might be? And how to run it once I get to a working boot? I had hoped it would kick in straight away once I booted.

Thanks
David.
 
Looking at the service manual, testing the Screen-Pac post-install is:
  • Insert the Extended Utility Diskette in A
  • Insert WordStar into B
  • Per the Screen-Pac User's guide, Sysgen the screen-pac CP/M from the Utility Diskette onto B
  • Set up WordStar for 80-column (per pages 7-10 of Screenpac User's guide)
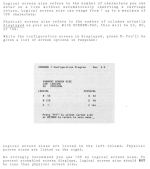
    • This looks to be just using SETUP to configure the "PHYSICAL" screen size:
      • Screenshot from 2023-05-24 07-24-16.png
  • Boot from the disk in B, observe smaller characters
  • Repeat for 104 columns
Looks like you should be able to skip the wordstar specific part of it?

The Extended Utility Diskette appears to be specific to the Screen-Pac:
  • AUTOST.COM
  • COPY.COM 3.2
  • MOVCPM.COM
  • SETUP.COM 2.6
  • SYSGEN.COM 2.1
  • XDIR.COM 3.5

I think you'll just need to find a disk image that has the newer system tracks and a new enough copy of SETUP.COM (2.6?) and I think it'd display the PHYSICAL part of the screen above?
 
It looks like you can just call the BIOS to change screen modes without any of the above, as they include instructions to make it work from BASIC... Though I hope there's nothing resident missing.

Poke E1A5, (0 1 or 3 )
CALL &HE4E5

I have yet to get it set back up so I can test it.

I replaced the faulty buffer chip and the display came up right away. I still don't know if the board is faulty, since I haven't tested it yet, but certainly the video image looked good, so that's a positive start.

It's difficult to know if it is anything more than that yet without trying it, because the character ROM is switched back to the old PCB on startup, and there's a bit to set to change it... Which also suggests that it would be possible to switch in hardware, so I have to track that down, as a permanent setting for 52/80/104 would be nice :)

David
 
Nope, not that simple. Seems the ScreenPAC has to change the boot disk first, and I think it writes some kind of patch to it. I found an image of the setup utility after hotwiring a floppy disk (Seems my O1 with the ScreenPAC has been mangled by some guy who tried to fix it, and took drives out, left screws loose, misreplaced items etc and maybe killed a few chips at the same time wire wrapped jumpers and broke stuff, including either the disk buffer inverters and maybe the parallel chips, so I grounded the drive select and was able to boot fortunately and order some replacement chips which will take a few weeks to arrive... ) -and got the utility running, but it's not real time. It seems to want to patch the boot disk. Maybe do some other stuff too.

I may not have the correct revision of boot either but it looks like the screen PAC gets set up on boot and changes then... So I need to add a DD adapter into the system and fix the current broken stuff ( already replace a RAM, and a bus driver ) - And then I'll see if I can work out how to switch to the higher resolutions.

If anyone has actually done this before and can confirm how I think it works - that would be helpful and appreciated - Without known-good hardware, when things don't work I don't know if it's a fault, or I'm doing something wrong.

Thanks
David
 
Last edited:
Back
Top