• Please review our updated Terms and Rules here

recently picked up an IBM 5154 EGA monitor, picture is dim and washed out

DaveJustDave

Member
Joined
Apr 5, 2017
Messages
33
Location
US
I recently picked this monitor up, it was pretty clean on the outside. However when I hooked it up, it was MUCH dimmer than the princeton EGA monitor i already had. The picture is fuzzy also, it seems out of focus. The power LED is flaky. it usually stays off, but if i lightly whack the side of the monitor with my palm, it turns on until i fiddle with the knobs again.

So far I've tried adjusting both the brightness and contrast knobs (yes I know the middle knob pulls out). There are two adjustment holes in the rear, i've adjusted them with a small phillips screwdriver and haven't noticed much of a difference.

Is there anything I can do? Or is the CRT just worn out?

Note, in the photo below its actually dimmer in person than the photo makes it out to be.

IrxrbbFl.jpg
 
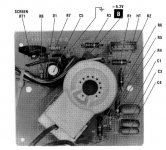
Looking at the Sams Photofact 2567, You'll have to take the back off. There's an adjustment labeled SCREEN on the CRT board which will bring brightness up but then you might have to adjust FOCUS
again which is on the high voltage tripler on the left from the back. It might be epoxied but should break loose.

Larry G
 
Honestly I'd start by considering a cap replacement for the thing way before messing with the adjustments. The power LED being flaky feels like a cap issue to me.

EDIT: I meant the caps in the monitor's power supply!
 
Last edited:
Honestly I'd start by considering a cap replacement for the thing way before messing with the adjustments. The power LED being flaky feels like a cap issue to me.

Are you experienced working on PC monitors ? There are lethal high voltages present inside the monitor so you may want to consider having someone else with experience
do the cap replacements.

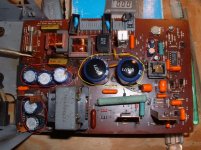
Start with the power supply caps. The 5154 power supply runs very hot, and those 85C temp rated caps are usually dried out and cause problems like this.
The power supply can be removed as its a separate board inside a metal shield , a couple of rivets drilled out, and 10 or so caps replaced (use 105C temp rating),
then replace the rivets with sheet metal screws. It might be okay to leave those two large caps in the center of the board....they usually run about $5 apiece.

There are also a lot of caps on the main circuit board, but I've never needed to replace any of those on the three 5154's I repaired.

PSmarkup.jpg
 
Last edited:
Start with the power supply caps.

Sorry, I meant the power supply ones you are talking about, not the ones that are involved with powering the tube.

Don't jump the gun... try the adjustments before you resort to surgery! :)

Personally I find messing with adjustments like this can be like opening Pandora's box, especially if you do not know what you are doing and do not have some sort of manual explaining what they all do. The caps in the power supply are relatively easy to replace, and IMO the place I would start. Besides, replacing them won't hurt (assuming you do it right).
 
You're assuming they know how to solder, in which case if they don't, an adjustment is easier.. I've worked on CRT's for a long time (9 years), and I find that changing out caps is not "easier" than trying to adjust controls.

However, if the picture is dim and going blurry, you have one of two problems, high voltage issue, or a tired CRT. The flyback controls should be a start, but if you max out the controls you'll want to check voltages SAFELY. If they are within spec, it's the tube.
 
Personally I find messing with adjustments like this can be like opening Pandora's box, especially if you do not know what you are doing and do not have some sort of manual explaining what they all do.
It's a trimmer pot -- you can either turn it CW or CCW. If you need a manual for that...
 
It's a trimmer pot -- you can either turn it CW or CCW. If you need a manual for that...

Yea, if a pandora's box is a concern, just mark with a marker the original position of the pot, if it doesn't work out, return to initial position.
 
Yes I am also considering a weak CRT. The SCREEN control should only have to be turned CW an eighth turn or so to brighten but it might also defocus. If focus cannot be achieved by rocking FOCUS control then probably weak tube but the main B+ DC should also be measured before condemning the tube. I doubt new caps are going to brighten the tube unless the main DC is low
 
I agree if you just want to improve the picture, adjusting the controls for G2 and Focus will most likely help.

But if you want the monitor to be reliable and plan on using it much in the future , power supply cap replacement
would be a good idea. The exception would be a 5154 that had minimal use over the years.....unfortunately all the
ones I have run across had been heavily used, usually indicated by a strong odor from the monitor as it warms up.

The intermittent power led may be caused by one of the three smaller caps on the board as documented in the repair faq here:
https://www.repairfaq.org/REPAIR/F_IBMmon.html#IBMMON_007
 
thanks for the input guys. Took the shell off, not sure what i'm looking at. don't see any adjustment knobs marked SCREEN or FOCUS.

Are you talking about the rings around the center piece?

z87yIxxl.jpg


4RwaBT0l.jpg
 
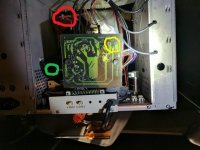
Ok the screen control is labeled RT1 highlighted in yellow. That might be a tough adjustment since the photo I've put in from the Sam's looks like it might have a metal center which means there would be voltage on it.
The focus control is on the HV transformer (probably black) approximately circled in green. Follow the red anode wire (circled in red) down to the transformer. Be careful, that's where the high voltage may still reside when powered off.
5154-2.jpg5154-3.JPG
 
you could try moving RT1 while powered off slightly CW from the top then power on and check. Maybe photo it or mark position with a sharpie first. I hope it isn't old and brittle.
Worst case, it could fall apart. Staring more at the Sams photo, it looks like plastic center but you will need a narrow screwdriver.
 
Last edited:
Please, just use a plastic tool. Capacitors can hold the charge, so turning it off won't help you. I don't know what kind of bleeder resistors are on this set, or even if they are functional.

Best to just use a plastic screwdriver, or one of those wooden chopsticks, shaved down to a flat head (which is what I used to do).
 
I picked up a plastic screwdriver. was going to use it with a pair of insulated gloves.

but may its easier to discharge it before working on it

Please, just use a plastic tool. Capacitors can hold the charge, so turning it off won't help you. I don't know what kind of bleeder resistors are on this set, or even if they are functional.

Best to just use a plastic screwdriver, or one of those wooden chopsticks, shaved down to a flat head (which is what I used to do).
 
Back
Top