• Please review our updated Terms and Rules here

Removing Yellowing from Plastics - Part 3

Merlin

Experienced Member
Joined
Apr 23, 2008
Messages
290
Location
Manchester, UK
Hi all,

Yes, we are now at Part 3, the previous threads were over 20 pages and 200+ posts in each thread; the two threads amassed a combined figure of 20,000 reads!! I never thought that this subject would capture so many people's interest in the way it has....

The condensed history so far can be found at the Wiki which is located here:-

http://www.retr0bright.wikispaces.com

This should bring you up to speed as to what we are doing and what has been achieved so far. This thread here is for ongoing discussions and experiments around this core project. If you clean any of your own parts using the methods described in the Wiki or can suggest any improvements, please do so here; We will always be looking for "before and after" photos of your work and we will eventually set up a gallery of these as part of the Wiki.

Part One of this saga is here:
http://www.vintage-computer.com/vcforum/showthread.php?t=11877

Part Two is here:
http://www.vintage-computer.com/vcforum/showthread.php?t=12566

I'm starting to feel like George Lucas now, lol

OK, the saga continues............
 
Last edited:
I've made some more changes and updates to the Wiki and we've now added a Problems and Pitfalls section, so that we can document possible SNAFUs as they crop up. Some further reference links have also been added to the Scratch Pad section.
 
@ 84TAVeRT

If you do, we want before and after pictures please; I plan to add them to a Gallery we will be putting together on the Wiki.

There's nothing wrong with a bit of hardware pr0n....:mrgreen:
 
Over the past two weeks I made 12 batches of the paste/gel, and used them on a bunch of different computer parts.

I varied the quantities of Xanthan Gum used, and the mixing order/durations.

After nine variations, I found a recipe I liked the best, and used it for the last three batches. The last batches were successfully duplicated using the exact same ingredients and mixing durations. It’s not so gooey that you can’t brush it on, but it’s sticky enough that it will hold on vertical surfaces. Some of the other mixtures I tried were so gooey that I had to use a putty knife to spread the stuff. Mixing durations have a marked effect on the consistency of the paste/gel.

I used this small Hamilton Beach hand drink mixer – model # 51101B ($ 15 at Wal-Mart).
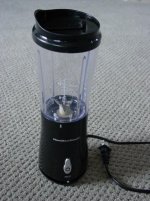
Blender.jpg

It’s the perfect size for mixing a 200 ml (almost a cup) batch, which is about as much as I’ve ever had to make at one time. I tried mixing a 100 ml batch, but it doesn’t mix as well at that quantity. I’m using the metric ml measurements as they can’t be confused, like pints or gals (eg: Imp vs US gal).


Things I’ve learned:

I’ve found that using both arrowroot and the powdered hair bleaching product that I’d tried before, makes a whiter paste gel, rather than the clearer paste/gel that I get using the Xanthan Gum. (Maybe I mixed the arrowroot version too long or not long enough). In any case, I found that both the arrowroot and powdered bleach versions dried out too quickly and formed an outer “crust”, requiring more applications. The Xanthan Gum version forms a very thin outer film, but it’s almost transparent, and I believe it’s still allowing the UV to penetrate. It also seems to take longer to dry out, which is probably the result of using glycerin in the mix.


Source of UV:
While using the sun as a source of UV doesn’t cost anything, there are some benefits to using artificial UV such as black light bulbs.
I used black lights in my garage, and this provided a much more controlled environmental condition than the outdoors. Outside, you have to contend with the weather – one minute the sun can be full strength, and the next minute it can be behind the clouds (not to mention rain – although not a problem where I am). In addition, there can be wind or a slight breeze outside which causes the mixture to evaporate and dry out too quickly, requiring additional applications of the paste/gel. That doesn’t happen in the garage (unless it’s summer and I turn on the garage A/C unit).
The black lights provide the same amount of UV to the areas being processed, at all times – the sun moves, so sometimes you’ve got parts of a piece in the shade, and other times you’ve got parts in the sun.
The black lights don’t generate anywhere near as much heat as the sun can. In full AZ summer sun, the parts & paste/gel get very hot.

As an added benefit, any small flies that happen to be in your garage, are attracted to the bubbling mixture being illuminated by the black light, and get stuck to the mixture thereby ridding your garage of the flies. (the five black spots are the flies)
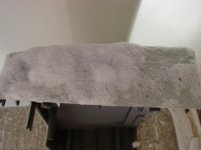
Fly catcher.jpg


Other things:

IBM plastics don’t seem to have yellowed as bad as some other (like Osborne) plastics do. The plastic even feels different (thicker & heavier). Must have been a better quality plastic or had less flame retardant in it. (Merlin ?)
In any case, they still de-yellow fine – there’s just less difference to notice.

Parts being de-yellowed can’t be made to be any more white, grey or beige than they were originally, no matter how many times they are processed.
EDIT: Except black or dark blue plastics - do not try to de-yellow these - more experimentation needs to be performed.

If you want to know what the original color was, so that you de-yellow long enough to get back to that original color, pull of a label. It’ll give a great indication of the color you are trying to get to.
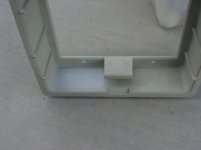
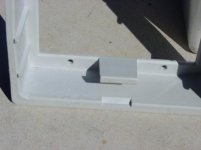
Osborne Exec case piece - before.jpg

Osborne Exec case piece - after.jpg

I’ve processed some parts for not long enough, and later found that the color was not as de-yellowed as much as it should have been. Or, you can just leave the parts de-yellowing for two or three times as long because they won’t get too de-yellowed. I prefer to monitor the color for time reasons (I’m impatient), and to reduce the number of applications required.

Some problems and pitfalls:

Do not use a sticky tape such as brown packing tape on painted metal badges/stickers – it will pull the painted logo or name off the metal.

Do not brush the paste/gel over a painted metal badge/sticker – it will remove the paint. You should remove the metal and any other badges/stickers before processing the piece. Most of them are just stuck on using two sided tape or a contact type cement – you can get under the edge of them with a single edged razor blade or an X-Acto knife and gently pry it off. They can be re-attached later with a good quality glue such as 3M Super 77 Multipurpose Adhesive.

As an experiment, I tried mixing different ingredients at different times. Do not mix the glycerin with the H2O2 first – the order that the ingredients are mixed in, is as important as the mixing durations. If you mix the glycerin and H2O2 before adding the Xanthan Gum, the mixture is so slippery, that after 5 minutes of trying to get it to stick to a part of the plastic, any part of the plastic, you’ll want to go get the sledge hammer. It just moves around on the plastic, like an ice cube on a sheet of glass in the sunshine.

I have had one piece of plastic that I couldn’t process the way I would like. It was an Osborne case. The Osborne case has two halves. One of the halves processed back to its original color, matching all the other pieces from the same computer. The other half however, will not, even after processing it four times, get back to the same color as the other pieces. It’s a different shade of grey. I don’t know if this is because it came from a different batch of plastic, which seems unlikely because it would have probably looked different before it yellowed, or if someone switched the case half with a less yellowed half at some earlier point in its life. I suspect the latter.

THE Recipe:

Ingredients:
200 ml H2O2 (30% solution used)
2 level tsp Xanthan Gum
1 level tsp Glycerin
1/4 level tsp Oxy laundry detergent powder
1 tsp hot (not boiling) water

Process:
In a very small ceramic or plastic bowl/dish, dissolve the Oxy in the hot water (I found that the Oxy doesn’t want to dissolve in the paste/gel very well – this fixed that problem).
While that is dissolving, mix the H2O2 and Xanthan gum in the blender for five seconds (and not five or ten, just five – got it Merlin?).
Add the glycerin to that mixture and blend for another five seconds.
Let this mixture sit for five minutes.
Blend for another five seconds.
Thoroughly stir in by hand, the dissolved Oxy/water mix.

This will provide a sticky but brushable mixture with a good consistency that will stick to vertical surfaces but won’t be too gooey. Using a different blender than the one I used will probably provide a different consistency, and you may need to experiment with mixing times/durations.

Keyboard key caps will need to be processed in a liquid mixture of H2O2 & Oxy. It is not practical to process these items with the paste/gel. (Merlin: need to add that to the Wiki?)


Some photos will follow in a couple of weeks, once everything has been put back together.
 
Last edited:
Lorne,

This is stirling work and pushes forward the refinement of this process.

Well done!

Tez
 
repost with a result update from the previous thread:

Super NES aka "Super Nintendo"

Yellow:

picture2xxx001.jpg


In the whitening process:

picture2xxx002.jpg


Guess what, only 3% hydrogen peroxide. I'm going to sell this one on ebay when its done and it doesn't help the investment to spend $15 to $20 getting a higher solution off the internet.

It's taken like 10 days due to bad weather and low solution but luckily I live in Arizona and with the sun now strong the process is going into turbo mode.

Thanks and credit to Merlin, and others for inspiration! :)

UPDATE:

picture2xxx005.jpg


Good to see you again, old friend! :);)
 
Lorne mate,

You should have been a research chemist; that is a brillant synopsis of some very hard work. Take a bow!!

There are some interesting comments about the transparency of the gel; I noted that when I was using Kelzan D Xanthan Gum, I always got a near crystal clear gel. I agree that the UV light would penetrate this better. I also agree that dispersing the Oxy was a SOB and your workaround is so simple it's genius.

One thing; Xanthan Gum has a weird thixotropy (viscosity effect) in that it thins down as you shear it through mixing, but as soon as you remove the shear forces, the gel reverts to its original viscosity. This also means that it would be brushable and mobile, but once brushed on, it reverts to the gel again. I must have subconsciously remembered this fact when we discussed making a gel and maybe using XG a few months back; it's all coming back to me now, triggered by your comments. An inspired (and also lucky) guess on my part, based on 25 years of experience....we are also a dying breed, as I don't think they teach enough science in schools these days.

I was discussing this sort of intuitive flair for formulating with another old skool chemist at work last week. We concluded that there were classical, theoretical chemists that could bore you to sleep with chemical formulae but can't develop stuff, while others were more of an 'alchemist' because they have a sort of gut instinct for what might work and what won't. I am definitely in the latter category, although I do have to understand the basics first. The key to Retr0brite was figuring out that Bromine was the culprit.

On the subject of quality of plastics; given that a C64 would have sold for a whole lot less than an IBM PC office machine at that time, it sort of stands to reason that Commodore cut back on the quality of the plastics to save costs and maintain margins. On the colour difference, to a degree you may be a victim of a different masterbatch of plastic, however, as I discuss in the Wiki, ABS is a bit like DNA in that no two batches will ever be the same, despite loading the same ingredients in the same ratios.

Black lights are definitely the way forward, especially if you live in a hot climate, as they will give more reproduceable results, which is what we want.

Same mixture + same UV light + same exposure = same result. :)

I am totally stoked that we have managed to get several retro forums discussing some serious science here, this has to be good....:cool:
 
Here's something else, not directly related to de-yellowing though.

Have you guys seen either of these products on the supermarket shelves?
I just recently found out about it, and I've used it on a few things already.

View attachment 1436

Someone had used a permanent marker on the back side of of an IBM keyboard (the painted metal part).

View attachment 1439

This stuff takes off permanent marker (and other things like where a black plastic has bumped into a grey plastic and left a black mark), and it takes less than 10 seconds of light scrubbing.

View attachment 1440

I don't have a microscope, but even if I use a magnifying glass I can't see any difference in the surface texture after it's been scrubbed. It's magic !

@Tezza / Merlin: if you can't get it in NZ / UK, let me know - it can't cost much to mail a sponge.
 
Last edited:
These 'magic erasers' are available over here in the UK and chemically they are nothing more than foam-expanded Melamine, which is being used a a mild abrasive.
 
The "Magic" did remove some of the texture on the ones I did. The magic marker had been there a very long time. I didn't really care that I had a few spots that were glossy compared to the rest. I didn't have to look at UNIT 103 or whatever it said before that (don't remember what was actually written on there anymore).
 
Saw this on shopgoodwill.com and thought of this thread:

ZDS Z-star laptop

Instead of arrowroot or xantham gum, has anyone tried plain old cornstarch? (mix a teaspoon of cornstarch powder with cold water then add to a cup of boiling water). Produces a nice clear thick goo. If left to dry, can simply be peeled off.
 
@ Chuck(G)

Most of the starchy food thickeners including Guar gum, corn starch or even wallpaper paste should work, it's just that no-one has tried them yet. We are still in the early development of this technique if we are honest about it.

@ Lorne

I've added your variant recipe to the Wiki, I hope that this is OK.

:)
 
Last edited:
@ChuckG & Merlin:

Actually, Krye used cornstartch as the thickener in his mixtures.


@Merlin:

No problem - the info is for all who want to read about it.
 
@ Lorne

I am aware of Krye's work with corn starch, however, he also had problems with heat and it wasn't established as to if this was due to the lighting or not, although the likelihood was that the lighting heated up the mixture.

Until we see some more reproduceable results done with corn starch as the thickener, I am loathe to recommend it. I will get some corn starch later this week and do some tests myself under controlled conditions to find out what was going on.
 
Made another batch today, and as I picked up my safety goggles (read: RayBan Wayfarer's), I started thinking about the black plastic problem.
I knew I had some old busted pairs of RayBans around somewhere, so I went to look in the junk drawer. The sunglasses were gone but I found a couple of black plastic cell phone chargers, and a really useless little "computer keyboard vacuum" (man, was that a waste of money !).
Pulled some parts off the little vacuum, and then grabbed some black ABS pipe fittings from the garage.

I put them into their own liquid (H2O2 & Oxy) bath.
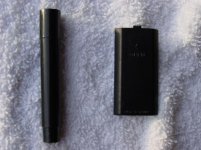
(The rectangular part and the tube are from the vacuum).

Here's the before:

Black parts - before.jpg

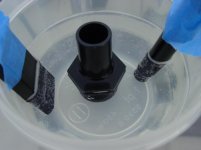
Here's them in the bath:

Black parts in solution.jpg

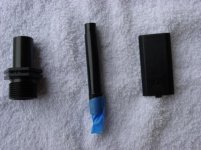
And here's them afterward:

Black parts - after.jpg

What gives?
There's no difference !

Maybe they're PVC and not ABS ?

Is it because the plastics are newer, and not old plastics? (did something change in plastics technology somewhere along the line?)

Is it that only computer parts had a flame retardant that yellowed? Plastics have flame spread ratings, so there must be some sort of flame retardant in them, or maybe that's what the flame spread rating is for - to tell us there isn't any retardant in it?

I want to figure this one out - I've got some white plastic with black plastic attached to it, and the white needs de-yellowing.

The only other thing I can think of, is that maybe, when I had the problem with the dark blue and the black plastic before, that I was using the powdered hair bleach product and not the XG mix. That may have been the case in one instance, but I don't think so in the second.

Merlin: any ideas/comments?

I've got a "parts" Osborne with a dark blue face/bezel that I'm thinking I should sacrifice to the de-yellowing gods. (half with the XG mix, and half with liquid solution, and see what happens?)

.
 
Hmmm.........

My guess is that because they haven't been out in daylight for as long as computer stuff, you aren't seeing any of the photo-oxidation of the ABS polymer. ABS can degrade to the hydroperoxide, mainly due to oxidation of the spare butadiene molecules dispersed within the polymer matrix.

The blue Osborne panels will have some oxidation, however, this would be masked by the discolouration caused by the bromine (brown + blue = 'black') and it's only when you remove the brown colour with our brew that the oxidation becomes apparent. Does this make any sense from your perspective?

If you can stand to sacrifice the panel for the cause, it's worth trying to see if there is a difference between the two mixtures.

Would you like me to start playing 'The Last Post' :(?
 
The Wiki has been updated with a more rounded explanation of the bromine free radicals and co-ordinate bonding. I've added this to the UV Energy section and included some pictures to explain what I am talking about. It should be fairly easy reading.
 
this has probably asked but im a slow reader lol. will this mixture remove lettering off the plastic such as the //c on apple 2cs or the labeling on the front of my samsung?

also i have some black dell laptop pieces i can sacrifice. :)
 
I've got a "parts" Osborne with a dark blue face/bezel that I'm thinking I should sacrifice to the de-yellowing gods. (half with the XG mix, and half with liquid solution, and see what happens?)

Surely there must be a way to do this experiment without sacrificing a collectable. No ancient toys for sale at your neighborhood's yard sales?
 
Back
Top