• Please review our updated Terms and Rules here

reproduction PDP 8e toggle switches?

The switch paddles look good.
I have a Creality Ender 5 which prints quite well if you want to try another printer.
Thanks! I am pretty pleased with the way this iteration came out.

I have another printer. It is a scratch built Core XY kinematics machine. The original plans I used are from a design called the V-King. It can do about a 350 mm cube. But I am going to upload the .STL files to thingiverse so anyone who wants to can print them.
 
Looks good. Have you considered eventually having some printed up in resin?

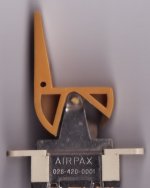
The ones that are not spring loaded have part number 028-420-0001. The ones with "detents" are also 028-420-0001 and look the same as the other 028-420-0001 parts.
I have no plans to print them in Resin. You don't have the color choices so they would need to be painted. And while this might be fine for a museum piece, I suspect the paint would be a problem on a machine you actually use occasionally. From what I have read it does look like resin printed parts would probably have adequate strength on the pins.

I am planning on uploading the .STL files to Thingiverse so anyone can have them printed. There will be at least three files in that upload.

  1. A paddle with the hole for the pivot pin. This is the file I used.
  2. A version with the pivot pins that could be used like the originals. Have Shapeways print this in Nylon or you could print them on a resin printer. I guess if you really wanted to you could have them printed in Titanium or Aluminum and have them anodized to the colors of your choice.
  3. A drill jig for repairing original handles.
The drill jig will securely hold an original paddle so that you can clamp the jig to the bed of a drill press or vertical milling machine. The top and bottom plates will have a 0.0625 hole placed where the drill bit needs to go. This way you can put in a new pivot pin in your original broken handle and there are no concerns about color matches. This is probably the best way to fix a machine assuming you have all the broken paddles.

I have also considered doing a left and right half with the pins and the whole point is that you can join them and you will have what looks like a mold mark like the originals all seem to have. A left and right half would not need any support material and if printed in PETG would probably be strong enough. This idea is somewhat silly but no support and a working pin make it interesting. Too bad I can't afford to go print these in microgravity on the ISS. (Would I really want to spend my time on the ISS printing 3D parts if I could afford to go there? Probably not.)

I need to put the front panel back together and mount it on the machine to verify that the one piece of wire as a pivot will work. I also thought of another thing I need to verify. That is the angle of the opening. I will need to remount a few original handles and verify that they line up in both the up and down orientations with the originals. I have verified the up position does line up. Those angles are really tough to measure. I just eyeballed it by holding the original paddle up against the screen against the Fusion 360 drawing. On the up direction I was off by several degrees. The other end could be off by a similar amount. Fortunately it is easy to change one number in a table and then regenerate the STL should there turn out to be an issue.

Thanks for the other switch part number. I assume you got these off your front panel?

More to come!
 
You don't have the color choices so they would need to be painted.

Different colour resins of the right type can be mixed to get different colours; or dyed.

I am still working on colours, when I have time, (WIP described elsewhere). In a non-scientific iterative mix-and-check with some generic resins I got something close to the amber handle's colour. It would still need to be checked for "UV stability" in case the colour changes due to exposure to sunlight.
I will test out how tough paint might be (just in case it is an option; paint matching might (or not) be easier).

I am planning on uploading the .STL files to Thingiverse so anyone can have them printed.
Thanks 8-)

Thanks for the other switch part number. I assume you got these off your front panel?

I have some switches; but sadly no front panel. WIP: look-a-like panel for the SBC6120-RBC.

airpax-028-420-0001.jpg
 
Where did you get your switch and are engineering drawings available?

Is the paddle in your photo a real one or a replica you made?
I regularly hunt for items. These I have are real. Unsoldered it seems from a front panel at some point and then sold off. They're reasonable clean and not corroded, used and old. I printed some of the earlier thingiverse one a while ago (I posted about that somewhere here); I will do this again when the update is ready and see how close I can get the colours without using paint!

I have looked for engineering drawings/detailed references for the paddles, but never found any. A while back I did a drawing, on paper, based on what clues are available at bitsavers and various online photographic resources. The dimensions on that drawing are superseded by having actual switches that I can measure, and now what you have posted.
 
Lets do an update on the project.

I compared the down position of my replicas to the originals and found I needed 2 more degrees of travel to be middle of the road. Changed the entry in the parametric table and reprinted a switch and this one looks good at both ends. I think I need to make another adjustment though because opening up the angle does change the gap in the part that actuates the switch mechanism.

I did put my front panel back into the machine to verify that everything does work. My approach of using a single pivot wire (copper tube actually) will work on my chassis but while looking at photos on the internet I have seen that there are at least 3 different ways the front panel was assembled. So to be certain I will use a wire (tube) for each grouping of switches and this should work on any arrangement. The concern is that the pivot wire does touch the back of the panel between the switch groupings and on some arrangement it might not allow the front panel graphics plate to be back far enough.

Did you know that on the 8/e the switch colors are

Y OOOYYYOOOYYY OY OYOYO Y

but they are the opposite of this on the 8/f? Where Y means yellow and O means orange. At least sort of yellow and kind of orange.

The 8/m is the same as the 8/f.

The Lab-8 follows the 8/e convention of light on the right where the colors are a light green and a dark green. The decset8000 also follows this convention with midnight blue and sky blue for the colors.

Next is to fix up the spacing between the fingers that press the switch slider. It is always something!

The issue of choosing colors almost makes me wish I was color blind. Almost.....
 
They look very good, well done. One thing that you might try (on a test piece) that works for me is to lightly burnish the printed surfaces. I use the surface of a piece of clean smooth plywood for this. The part is rubbed against the plywood in a figure-8 pattern for a short time and it smooths out the filament 'snaking' and puts a sheen on the part. It's not as aggressive as sanding with sandpaper, and doesn't reduce the material rather it just "smushes" it somewhat. I've tried other surfaces such as the mottled top laminate of an Ikea table and it also gives the same finish.
 
They look very good, well done. One thing that you might try (on a test piece) that works for me is to lightly burnish the printed surfaces. I use the surface of a piece of clean smooth plywood for this. The part is rubbed against the plywood in a figure-8 pattern for a short time and it smooths out the filament 'snaking' and puts a sheen on the part. It's not as aggressive as sanding with sandpaper, and doesn't reduce the material rather it just "smushes" it somewhat. I've tried other surfaces such as the mottled top laminate of an Ikea table and it also gives the same finish.
I see what you are doing here. Sandpaper is intended to actually remove material. What you are doing is more like heating the high spots which causes them to soften and then they are no longer the high spots. I will give this a try.

Another thing I will try is to print one with the pins at an elevated temperature and no part cooling fan. This will help with layer to layer fusion and that combined with the 0.3 mm diameter nozzle (0.4 mm is typical) I like to use on my good printer might make the pins strong enough to use directly. I don't expect it to work but in this case a surprise would be a good thing.
 
At least sort of yellow and kind of orange.

Yellow is "Amber" and orange is "Terra Cotta" (official colours and issues around reproducing them to be found earlier in this thread; I might be able to provide an "update" on my colour activities soon).

This is my current notes on the switches (this might have issues, as I am not in a position to test this out on an actual machine):

Code:
Switch positions from left

  Schematic     Name  Type/pos      Colour
  S2              SW  LATCHING (DT) Amber
  S11              0  LATCHING      Terra Cotta
  S12              1  LATCHING      Terra Cotta
  S13              2  LATCHING      Terra Cotta
  S14              3  LATCHING      Amber
  S15              4  LATCHING      Amber
  S16              5  LATCHING      Amber
  S17              6  LATCHING      Terra Cotta
  S18              7  LATCHING      Terra Cotta
  S19              8  LATCHING      Terra Cotta
  S20              9  LATCHING      Amber
  S21             10  LATCHING      Amber
  S22             11  LATCHING      Amber
  S5       ADDR LOAD  SPRUNG        Terra Cotta
  S8  EXTD ADDR LOAD  SPRUNG        Amber
  S3     START-CLEAR  SPRUNG        Terra Cotta
  S4      START-CONT  SPRUNG        Amber
  S6            EXAM  SPRUNG        Terra Cotta
  S10           HALT  LATCHING (DT) Amber
  S9     SINGLE STEP  LATCHING (DT?) Terra Cotta
  S7             DEP  SPRUNG (DN)   Amber

Notes: (DT) means "has detents"
       (DN) means "normally in the down position"
            LATCHING: AIRPAX 028-420-0001
            SPRUNG: AIRPAX 028-420-0002

In the "did you know" vein: it seems that on the 8/e the rotary switch was updated at some point, as was the screen printing on the facia?
 
Update time again.

Fixed the last geometry issue I know about. This was the spacing between what I am calling the fingers. The part that actually touches the slide switch actuator. I am not 100% happy with the way I modeled this section but I can't think of a better way to do it. I guess I can correct it later. I need to print one of these.

I started work on a drilling jig. The idea is that the best fix is to repair your original handles. The jig will be clamped to the base of the drill press with the drill bit positioned in an alignment hole. Tighten the clamps and then retract the bit. Press the broken handle into the jig. Press on the top alignment plate. The hole in the top alignment plate should already be aligned with the bit if the jig was printed correctly and the base of the drill press is correctly trammed. At this point you turn on the drill press and drill the hole. Insert the pin made from the material of your choice and glue it in place. Fixed handle!

I have printed the first test jig base and it is a very tight fit. The mold lines on the handles are the issue. I am going to increase the clearances and change the jig so that the handle is inserted just shy of the mold lines.

I will show a photo of it in the next update.
 
Yellow is "Amber" and orange is "Terra Cotta" (official colours and issues around reproducing them to be found earlier in this thread; I might be able to provide an "update" on my colour activities soon).

This is my current notes on the switches (this might have issues, as I am not in a position to test this out on an actual machine):

Code:
Switch positions from left

  Schematic     Name  Type/pos      Colour
  S2              SW  LATCHING (DT) Amber
  S11              0  LATCHING      Terra Cotta
  S12              1  LATCHING      Terra Cotta
  S13              2  LATCHING      Terra Cotta
  S14              3  LATCHING      Amber
  S15              4  LATCHING      Amber
  S16              5  LATCHING      Amber
  S17              6  LATCHING      Terra Cotta
  S18              7  LATCHING      Terra Cotta
  S19              8  LATCHING      Terra Cotta
  S20              9  LATCHING      Amber
  S21             10  LATCHING      Amber
  S22             11  LATCHING      Amber
  S5       ADDR LOAD  SPRUNG        Terra Cotta
  S8  EXTD ADDR LOAD  SPRUNG        Amber
  S3     START-CLEAR  SPRUNG        Terra Cotta
  S4      START-CONT  SPRUNG        Amber
  S6            EXAM  SPRUNG        Terra Cotta
  S10           HALT  LATCHING (DT) Amber
  S9     SINGLE STEP  LATCHING (DT?) Terra Cotta
  S7             DEP  SPRUNG (DN)   Amber

Notes: (DT) means "has detents"
       (DN) means "normally in the down position"
            LATCHING: AIRPAX 028-420-0001
            SPRUNG: AIRPAX 028-420-0002

In the "did you know" vein: it seems that on the 8/e the rotary switch was updated at some point, as was the screen printing on the facia?

I thought I had replied to this but I don't see it.

On the colors you have come up with, Do you have the RAL code that most closely matches? I look forward to your update.

On my front panel the switch labeled S10 (HALT) in your table does not have a detent type switch. It seems like it should have one though.

I know about the rotary switch change. The angles are slightly different between the two variants. I think there were more than two different 8/e front panel graphics. I've noticed several while staring at front panel photos.
 
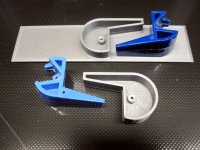
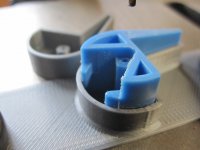
The drill jig or guide is functional. This photo shows the top and bottom parts and the two DECset paddles I drilled out.

IMG_2204.JPG

Here is a photo after the first trial. I ended up drilling out two of my handles with it.

IMG_2202.JPG

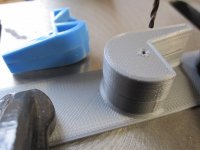
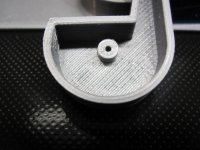
This one is a closeup of the top of the guide.

IMG_2206.JPG

This one showsThe handle in the guide on the drill press with the top guide removed.

IMG_2203.JPG

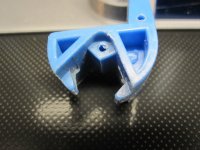
This is a closeup of one of the drilled handles. At this magnification the original looks pretty crusty. Lots of flashing still present after 40 years.

IMG_2205.JPG

They are still a little tight even after increasing the clearance to 0.003 inches (0.076 mm) but better than the 0.002 inch on the first trial. I had to use pliers to remove the part after pressing it in only halfway. The handles go in all the way now and can generally be removed without tools. I should probably loosen it up a bit more in the area at the tip of the handle. 3D printed corners cannot be perfectly square and I think this might be one area where it is too tight.

I used a slow speed to limit the heat. This works better than I had hoped. Aligning the guide on the drill press is a bit fiddly. The guide moves a little when you tighten the C clamps. It would be easier on a vertical milling machine. What I ended up doing is increasing the depth on the drill press so that I can insert the drill in the base plate until the chuck just touches the raised cylinder you can see in the photos. With the drill in this position I tighten up the C clamps. Raise the chuck all the way up. Insert handle in base. Press on the top to fully seat it. Verify the bit is centered over the top cover hole. Drill the hole at slow speed and light pressure. Plastic is so soft compared to everything else I have drilled you can barely tell you are drilling it.

I will upload this stuff later this week and announce it when I do. The guide is printed with Solutech PLA and the color is Silver Metal. This is currently my favorite filament for general printing and I am running low so I looked on Amazon and found it for $15.99 a kilo which is a bargain.
 
That looks like it works pretty well. 3D printing can be so indirectly useful for making jigs so other materials such that other materials can be worked on. I made a PLA angle jig for guiding a hacksaw on the steel stock for my H960 stabiliser feet.
I would dispense with rigid clamping and thus the need to centre it, instead print that accuracy in with a tall and sturdy cylinder drillbit guide on the top of the jig, tall enough that its top is level with the drillbit flute/shank transition.
The shank would be extended from the jacobs chuck for at least enough travel through the paddle.
When the quill is lowered the shank enters the cylinder and does not do any reaming of the jig, that the drill flutes themselves can do.
The only thing then would be to hold it down so it does not catch and ride up the drillbit.
 
On the colors you have come up with, Do you have the RAL code that most closely matches? I look forward to your update.

An update. The second half of the following is mostly about "RAL Design" colours and the use of paint. See also: "freebies".

RAL Classic: there aren't sufficiently good (in my opinion) matches; there aren't that many RAL Classic colours. I will retest RAL Classic again and tabulate the "best" of the RAL Classic matches under different lighting conditions (the worse the match is, the greater the variation in the visual separation in different lighting conditions) later (in a day or two; in another post). See also: "Which colours?".

RAL Effect: the matches with RAL Design are probably better (the Terra Cotta definitely needs to be retested with RAL Effect now that we have something better to measure it against).

Other "colour charts": possibly there are better matches available; but fewer choices of supplier. Now that I have another verifiable "datum" (as below) I will scan through some of the other available colour charts in paint (including RAL Effect) to see if I can identify potentially better matches.

Bespoke paints: expensive looking (but could be investigated). Or: Paint mixing, by spraying two at a time, is a possibility for a better result (needs practice and the right choice of colours)? See experimental results described below.

Coloured 3D printed resin: I didn't find any purchase options for "parametrically specified colours". So, as far as I know, this will still require to be mixed by hand to learn the mix recipe; which is likely dependent on what resin is used.

Coloured 3D printed filament: I haven't seen any practical mixing/colourization options, nor RAL Design options; the RAL Classic colours are available.

Finding definitive colours

A lot of time spent with maths and the web, and various other things trying to narrow things down! Result: too many possibilities with variations, depending on which resource one looks at, that are not really verifiable without spending money to test each one.
Many of my investigations started with searching for colour chart matches with sRGB values from the table Vince has prepared:
http://svn.so-much-stuff.com/svn/trunk/so-much-stuff.com/pdp8/repair/dec-std.html

But different resources match (near matches), for example, different sets of RAL colours for the given sRGB values. Different resources even quote different sRGB values for a given RAL colour. Even coding up searches myself results in too many [electronically] unverifiable choices. And so on.

Which colours?: this whole search has raised a couple of additional "questions"...

The first being that the switches I have have been obtained "loose" (i.e. they were removed from a machine(s) at some point in the past and later acquired by me; so have no provenance). I have started to wonder if they are from an /F, /M or even /L (even if there seems to be some evidence these machines might have all used the same sets of colours). The switches I have have the right part numbers for an /E, and I think they look "okay" colour wise.

Secondly, I am also starting to suspect, maybe, that there may have been at least two versions of "Amber", even for the /E. For example:

Code:
Relevant colours from EL-00092-00-0_F_Finish_and_Color_Standard_Dec82.pdf
141  PDP8/E   Amber        MUN (10YR6/12), CHM 3
142  PDP8/E   Terra Cotta  CHM 5 PE
Also note it gives:
136  PDP14    Amber        MUN (10YR6/10), CHM 3

That's at least two different colours mentioned for either the PDP-8/E or the PDP-14; and I believe/suspect it is three because I haven't been able to discover or prove that either of those Munsell codes are the same colour as CHM 3!​

A different approach to finding a "modern" colour specification

So, rather than waste money on a wide range of different coloured paint to test with, a different course...

I have recently obtained official RAL Design plus (D2) swatches and used them to identify the two visually closest RAL Design codes for "Amber", and the two closest for "Terra Cotta", when compared to the the switches I have in my possession.

I have then purchased acrylic paint of these four RAL Design colours and painted the resin prints from thingiverse.
Observations include:
  • The paint might not 100% match the RAL swatches (but is very close; it could be a texture and/or glossiness thing).
  • Likely to be true: the closer the match in the colours of the genuine handle and the replica, the better the match in all lighting conditions.
  • I think that, potentially, the images below (from my phone's camera) sort of accentuate the differences more than they appears in real-life (tested under artificial light).
  • Texture and gloss can have an effect on colour perception.
  • Lighting can have an effect on colour perception (normally your brain "auto-corrects"; until you compare things side by side).
  • There are other paint systems that might have a better match.

Freebies (for a limited time at least): I have painted some card stock with the paints described below and could send them out in "late" Christmas/New Year cards to interested parties to compare with their machines. And maybe also send some colour patches for reference photos (colour patches might/might not be a useful idea - I only thought of it a few hours ago and have not tested the idea).
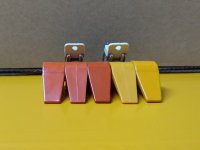
RAL_70_60_75.jpg

The paints used are acrylic enamel spray paints with UV protection and 60% gloss. No hardener (so that it is not single use can of paint) - still it actually seems quite tough; I will do a "wear test" on it soon. There were two layers of primer and about eight thin layers of paint.

In the picture above (all images taken under bright fluorescent light):

Amber:
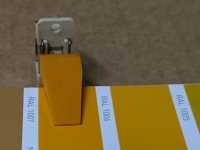
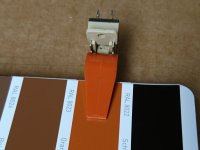
The switches/handles are sat on card stock painted with "RAL 070 60 75"; visually I think this is a better match to the amber switch handle than the "RAL 070 60 70" that has been used to paint the thingverse handle to the right.

Terra Cotta:
The thingiverse handle in the middle has been painted with "RAL 050 40 50"; this is definitely too dark; but is not unpleasant, and possibly the best of the two for the Terra Cotta handles if one was to stop searching at this point.
The leftmost thingiverse handle was painted with both "RAL 050 40 50" and "RAL 050 50 60" by spraying it with both paints at the same time. This was an experiment: because those two colours are the best visual matches with the swatch, but neither seemed as good as the amber matches are with the amber handle, and one looks lighter, the other darker. I think the result is a better visual match than either of the colours on their own.

In isolation (and trying to forget there is a mismatch) "RAL 070 60 75" and "RAL 050 40 50" might be the best choice.

The image below shows the switches sat on card stock painted with "RAL 050 50 60" - however the photo makes it look more orange than it actually is.
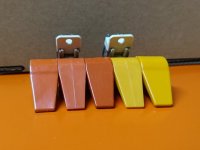
RAL_50_50_60.jpg

Note: colours seen in the images will vary depending on display device.
 
RAL Classic colour selections

I have compared the switches in my possession (see previous post) to RAL Classic swatches and my opinion for the best visual matches would be (see caveat below):

Amber: RAL 1007 (RAL 1006 and RAL 1037 would be the next best matches; or maybe even "just as good").

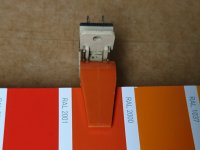
Terra Cotta: RAL 2001. The brown is more dependent on lighting conditions than the Amber (bright versus dark, full daylight spectrum versus reduced spectrum; I think this might be a hue offset effect). Under a very bright full spectrum (it claims) LED lamp RAL 8023 is possibly the "better" match; but such super bright conditions would not be normal use conditions.

For a Terra Cotta substitute I might prefer RAL 8023 as a "nicer" colour if not thinking/worrying about best match with the original. RAL 8004 might also be a candidate for this, but is quite a bit darker.​

The discrepancies in the colours is readily noticeable for RAL Classic in a side-by-side comparison; especially for the Terra Cotta, less pronounced for the Amber. There may be differences again when obtaining coloured paint/filament/resin from suppliers.

Caveat: as these colour matches are not that close, there might be additional differences with paint/filament/resin purchased with these colours depending on the pigment mix used to give the product its colour. I have also noted that filament and resin colour can change slightly from its raw state, after it has been printed with.

Some resources:
http://svn.so-much-stuff.com/svn/trunk/so-much-stuff.com/pdp8/repair/dec-std.html
https://www.e-paint.co.uk/
For example: https://www.e-paint.co.uk/RAL-classic-colour-chart.asp
and: https://www.e-paint.co.uk/Munsell-colour-chart.asp
http://www.easyrgb.com/en/math.php
Note that sRGB comparisons appear to be somewhat misleading unless the match is extremely close; hue and saturation are also important and appear to become more dominant as the sRGB values separate, and more!​

A few images. The images from my phone’s camera show some variation in comparisons from what is seen in real-life (even using the “automatic” setting). But in a bright/good daylight setting it seems reasonably representative of the extent of differences. No bright daylight today, so here are some "next best thing" images taken under “daylight” overhead 40W fluorescent tube lighting. Colours shown here are unlikely to match real life colours!

amber_fluorescent_40Wdaylightoverhead_RAL1007.jpg

terracotta_fluorescent_40Wdaylightoverhead_RAL_2001.jpg

terracotta_fluorescent_40Wdaylightoverhead_RAL_8023.jpg
 
Just finished uploading my stuff to Thingiverse. Here is the link: https://www.thingiverse.com/thing:4739096
Thanks Doug. It looks good. I will have a go at printing it at the weekend.

Thinking about the colour issues in my posts above: your switches in the image you have provided look bright yellow and orange. Is that representative of how bright they look in real life? If it is, I think it would confirm that the ones I have here are "different".

I look forward to hearing how they print for you.

The yellow and orange colored handles in my photos are ones I 3D printed using the colors of PLA I happened to have. And yes they are that bright. Your handles are probably from an 8/e, f, or m. The only 8/e machine variant I have uses the dark blue and sky blue colored handles so I don't have any of the amber/terra cotta colored handles to photograph or compare against. The dark blue/sky blue color scheme is probably the rarest of all the colors. The Lab-8 colors of green and light green are more common and the colors you have appear to be the most common.

Thanks for doing all the color work! I am certain it will help someone out.
 
Back
Top