• Please review our updated Terms and Rules here

SBC6120 "Mini" Front Panel

hideehoo

Experienced Member
Joined
Aug 4, 2015
Messages
129
Location
Prior Lake, MN
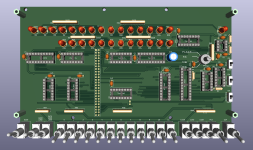
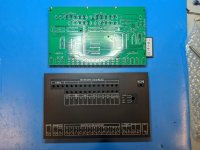
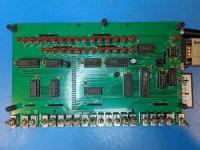
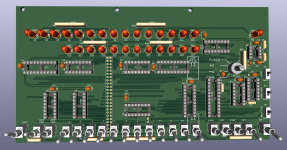
After designing the mounting plate this weekend I couldn't leave well enough alone. I need my blinken now! Behold a mini version of the FP6120 front panel scaled down to fit on the SBC plate with the cheap Chinese CF adapter, sorry, no IOB6120 option here. Using sub-miniature toggle switches since even regular miniature switches makes it way to wide for what I was trying to do. Yes, it's not the "original" style, but switch costs will be ~$40 from Mouser versus 100's of dollars. If I can find sub-mini ON-(ON) momentary toggles from the usual China based sellers, could probably get that down to less than $15 for switches. Was a pain to route with that 50 pin connector sitting right in the middle of the board, but everything eventually fit. Still need to design the dress panel and do a few more quality checks, but sharing now for any feedback before they go off to JLCPCB.

Will also post design files once I validate all if good, biggest concern is with power from the SBC6120 RBC edition via the header pins since it feels like the board was already a bit challenged moving from 4 layers to 2 layers, even with a 2oz copper pour. If push comes to shove, I do have room to build power into this board and feed the SBC, similar to the real FP6120.
1698123113109.png
 
great stuff! gives me a reason to finally put my sbc6120 together..
 
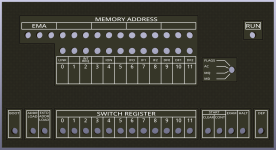
Initial stab at the dress panel. Planning on using JLCPCB's aluminum board option for these. Did some Retro Elf panels earlier this year and they turned out really nice for the price. Since it's going to be monochromatic, I'm also thinking on duplicating the micro crosshatching scheme I did on the Retro Elf boards, adds some texture and helps to keep the finger prints down.

1698207792140.png

Since I also don't want to drill any additional holes in this, I thinking just having it set on some standoffs screwed to the panel PCB below it, secure the bottom portion by the switch nuts (which was my first spacing constraint when designing this), and then make it about 2.5mm larger in all directions so it can accommodate a thin snap fit bezel on the top of the case to hold it all down.

1698208093427.png
Gotta do a little more thinking, and likely some test prints, on that idea before I commit there.
 
Looks great!
Since I also don't want to drill any additional holes in this, I thinking just having it set on some standoffs screwed to the panel PCB below it, secure the bottom portion by the switch nuts (which was my first spacing constraint when designing this), and then make it about 2.5mm larger in all directions so it can accommodate a thin snap fit bezel on the top of the case to hold it all down.

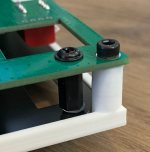
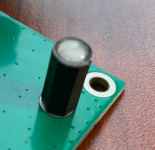
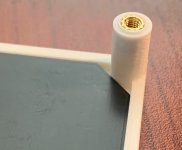
I think what you described will work. I did something similar on the RK05 emulator front panel, except the front panel electronics PCB is secured to the bezel by standoffs that are part of the bezel, and used threaded inserts to be able to fasten the PCB. Like this:
1699551146909.png
(click to enlarge the images)
1699551228084.png 1699551357395.png 1699551456577.png
 
@hideehoo is there any news on your SBC6120 front panel, case and mounting plate?

Waiting for some additional switch samples to come in before I commit the PCB to JLCPCB. After playing with some submini's, I wasn't really impressed with the action compared to the standard miniature style toggles. Plus the allure of cheap Chinese variants that would allow for ~$10 vs ~$45 total switch costs was just to great to ignore (since I'm cheap and love "value engineering" these projects). Had the make the PCB slightly taller, but the additional fab costs per board are trivial vs. the potential switch savings. Kept the width the same by deciding to move to an Altair style panel without the switch nuts securing the dress panel on the bottom. Since I needed standoffs and someway to secure (thanks @gwiley for the example above) on the top, will just go that route all the way around. Will probably throw a standoff or two (or at least a hole for one ) in the middle just for good measure.

1699583427881.png
 
Thanks for sharing this looks great! I am interested in building one of these after you have a design you are happy with releasing. Thanks for giving thought to the switch cost and feel, even if we only toggle in a couple of programs it was the primary input to the machine so having it feel right seems important.
 
@hideehoo your SBC6120 front panel PCB, dress panel, case and mounting plate are a really exciting new development.
Many of us have been wishing for a front panel for the SBC6120-RBC we built, but we missed out on the original FP6120 from Spare Time Gizmos.
Thank you for doing this!!!
 
Almost ready to send the boards off to be fabbed. Mocked everything up with 3D printed PCB's and case lid to check for any unforeseen mechanical fitment issues and looks good.

PXL_20231119_231844754.PORTRAIT.jpg

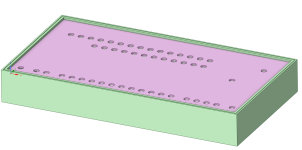
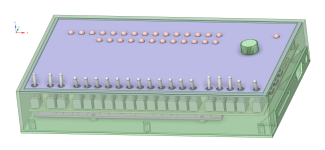
The SBC6120 and front panel will bolt to a bottom plate. Then the dress panel is angled into the lid and rests against a 3mm lip. Finally the panel/lid rests on the swtich nuts/standoffs and everything is screwed together from the bottom.

1700436500778.png
 
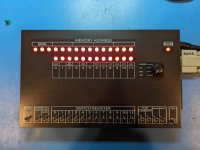
Slapped the board together, unfortunately no dice at this point. All LED's remain lit and the SCB6120 is not starting up (no POST LED's or serial console output) with the front panel attached. Time to do some troubleshooting over the weekend.

PXL_20231215_040945898.PORTRAIT.ORIGINAL.jpg
PXL_20231215_041045771.PORTRAIT.ORIGINAL.jpg
 
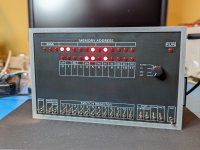
Alright, I think I'm ready to declare this one working fully working. Played around with Deep Thought last night and all the switches and LED's worked as expected. Originally couldn't get anything to work on the data row except for in MD mode, but that was because I had failed to enable the 30 Hz jumper/switch which drives the refresh of those LED's when not displaying the data bus. Another doh! moment here.

Still want to tweak the cases files a bit and print another copy, but otherwise went together first try.

I've started to publish everything at https://github.com/djtersteegc/sbc6120-mini-front-panel

If anyone in the US and interested in a pair of boards (main PCB and dress panel PCB) for $25 shipped, message me. I can also provide some programmed ATF22V10 and 16V8 chips if you don't have the ability to program your own. If you're outside the US, gerber files are in the repo.

And remember, this version was designed to be built cheap. PCB's excluded, I've got maybe another ~$30 into this build.

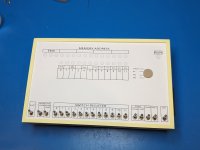
PXL_20231217_194747856.PORTRAIT.jpg
 
Last edited:
This is a really nice addition to any SBC6120 or SBC6120-RBC.
Would you consider creating a full kit of all parts needed to turn an existing SBC6120-RBC into a complete system as shown?
I guess a kit would be much more economic than to individually getting the PCBs made, sourcing the components and getting bits 3D printed.
would be interested in this as well as i'm on the way to building an rbc6120
 
This is a really nice addition to any SBC6120 or SBC6120-RBC.
Would you consider creating a full kit of all parts needed to turn an existing SBC6120-RBC into a complete system as shown?
I guess a kit would be much more economic than to individually getting the PCBs made, sourcing the components and getting bits 3D printed.
Speaking from the experience of packing some SBC6120-RBC kits I've sold locally at VCFMW over the years, this would probably end up being more of a convenience versus actual cost savings given the cost for the time and overhead in putting the kits together that would need to be factored into the price.

I updated the repo with a shared Mouser cart link that comes out to $27 for all the electrical bits except for the toggle and slide switches.


Same'ish bits from China from Ali and UT (and Newark for the C&K rotary switch) in Qty 10+ only brings that down to ~$10 looking at my past orders.

Then there is another ~$25 in switches and other hardware bits if you order yourself (think of all the extra screws you now have :)) from Ali, but realistically that's still close to another $10 in "optimized" costs since it's mostly the 20 toggle switches.

3D printing is where it kinda all goes off the rails if you don't have your own printer or access to one cheaply. I priced out JLCPCB's 3D printing service (which I'm heard is one of the cheapest) and ya, it's ~$50 for all the parts and then another ~$25 in shipping given the size. Versus the less than a dollar in PLA filament and 12+ hours of clock time (no Bambu Labs X1 here yet) it took me to print my own.

And then I still can't ship internationally (sorry @thunter0512) cost effectively unless I use something like eBay, but that would require a higher purchase price to offset all their fees.

Bottom line, what do folks think would be a fair price here for a complete kit?
 
Back
Top