• Please review our updated Terms and Rules here

Tandon TM-100-2 Track Seeking

the3dfxdude

Experienced Member
Joined
Jan 11, 2019
Messages
263
Location
US
Hi all,

I have two Tandon TM-100-2 in a 5150. The second drive has an issue that I can't seem to figure out what to do. I used IMD from Dave Dunfield and determined that the drive seems to be aligned, and track zero switch is working. I can move in one track increments from 0 to 39 and read no problem. But if I attempt to jump in 10 track increments, then the drive seems to stop somewhere between +/- 2 or 3 the intended track, so to soon or too late. Then it will pretty much not track anywhere correctly. A few times I can seek to track zero and eventually it will reach track zero and line everything up again, but that isn't quite easy since it might not move all the way there, stopping around track 2. (sometimes I've waited and it starts reading track 0 after about a minute)

Why could it be able to move single track at a time with good precision, but unable to move larger? Yes, the rails have been cleaned and the stepper motor seems to move freely enough. Also, the first floppy drive is not having this problem. It is the same basic drive, but the logic board is a different layout, and the stepper motor is not the same make.
 
For yucks, have you tried slowing the seek rate to, say, 10-12 msec? As far as the nature of the failure, understand that the drive controller knows where it is verifiably when at track 0 (activating the mechanical sensor). If you lose that reference, everything will be off.

As to where to look for problems, check to see that the capstan on the positioner stepper is firmly attached and not slipping. Also, things should be clean throughout the entire mechanical positioning train.
 
This is exactly the problem I have with one of my five TM100-2A. I tested all of them with my CompatiCard IV, because you can set the steprate so easily here. Four tandons work fine with 6ms. With one I must preset 10ms, then it works perfectly.
 
According to the technical reference manual, the step rate is set using a floppy drive controller command. For what they refer to industry compatible disk drives, the "seek time" is 6ms. The floppy constants table says they use value of 'C' for the step rate is 6ms, and the BIOS listing suggests C is used in startup. However the NEC datasheet I found seems to suggest that from 'F' = 1ms decrementing by 1 is an increase of the step rate by 1ms, which would mean 4ms? Other controllers are programmable in different increments.

Is there a utility for setting the drive controller 'specify' parameters?

I think I will reperform testing the drive in my 486 to doubly confirm the behavior.
 
There is a note in the SPECIFY command of the NEC datasheet, that if a 4 MHz CLK is used, then all time intervals are 2X.
 
You can change the step rate in the specify command if you issue said command, but it will be reset to the ROM BIOS value the next time a controller reset is issued. It works in things like ImageDisk, because IMD never relinquishes control of the floppy hardware during operation. Same for Teledisk, Anadisk, CopyQM, 22Disk ad nauseum, which allow for configuration of the step rate.
 
I hooked it up to my 486, and the drive functioned the same. Then I used debug to send the specify command and loaded up imd. About what I could see is that it would seek slower, but not only that, it would come up far shorter than the track it was seeking quite frequently now.

Also, I cannot figure how this could be. It seems that seeking to the zero track in imd seems to sometimes sense the zero track sensor on tracks 1 and 2, but then at times, it seeks to zero just fine.

The heat sink on the back side gets quite hot, that it could really cook something.
 
The head is stepped with a flexible metal band that wraps around the motor axle. The band is held to the axle with a screw. Sometimes the screw becomes loose and allows the head to move slightly. If "exercised" in this manor for an extended time, the screw hole can become enlarged allowing further "play" in the head position. Loctite is your friend.
 
The band did not seem loose when I inspected it, and the screw feels solid. How much play could be present in the head? It doesn't seem like it's wiggling.
 
My suspicion would be partially failed electronics that control the stepper motor. Ideally try swapping a different logic board, but if it is an odd revision you might need the same revision.

I think the board on the back is mainly for the spindle motor, but consult schematics to be sure. That big regulator can run hot from normal use.
 
The capstan looks fine to me.

Since I have two of these drives, and the other is fine, I did a board swap. They are different layouts, but they seem identical in logic in every way. After the swap the functionality of the seeking did not improve.

If I am understanding how the stepper motor is supposed to work, the drive receives the command to seek based on some N relative amount of tracks to move, and the drive initiates the stepper motor to move N number of steps. Each step should equate to one track. If this is all true, and the logic board is fine, then the problem is isolated to from the connector down to the motor itself.

When I powered up with the other logic board, the stepping initially seemed fine, but after enough moves, the behavior started again. I suppose it may be a sticking/heat issue or the beginnings of failure. But why I can't seem to feel extra resistance when pushing the head or the capstan, I don't know. But maybe it's hard to detect in my lack of experience, and it has to be even smoother.
 
Yes, Chuck, that would make sense.

I think I'll need to take the drive apart to diagnose the problem with the motor. But since I am unfamiliar with this, I might get a parts drive first, and work with it until I know what I am doing. I would like to have two working disk drives in my 5150. Having a parts drive may give me some practice and perhaps some extra parts for insurance.

So before I go hunting elsewhere, does anyone have something like this or a better option that spending time on this?
 
Last edited:
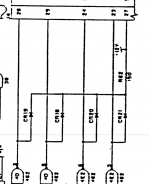
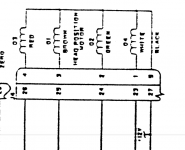
It shouldn't take long to check the Motor's windings with an OHM Meter, as there is a Plug
that disconnects the Motor as shown on the Schematic. Just be sure to also check the
"FLYBACK" Diodes C15, C16, C20, and C21 making sure none is OPEN or SHORTED.

Attached are the Photo's.


Larry


TM-100-1.png TM-100-2.png
 
Thanks for the info Larry.

The resistance in each winding is 73-76 ohms. I tried to measure the diodes in circuit with my digital meter in diode mode swapping my meter both ways giving me 0.099V. I switched to beeper mode, and it doesn't measure a dead short, but 225 ohms, which is the resistance from the motor and the 150 ohm resistor. The good drive's board is the same way. I guess a shorted diode would be lower resistance than going through the motor, but anyhow, it's unlikely that is the issue since we know the good drives board is ok in the other drive, and the suspect drive's board is looking to be good too.

Perhaps what's left is the bearings. I think I need to get the motor out of the drive to really get a look at them. I think it's randomly sticking even if I work it a bit to smooth it out, it's sticking with use.
 
Yes. There is pretty good indication that this is a problem in drives of this make in his video. Unfortunately he zooms through the whole disassembly and reassembly. So I don't know the steps as it's hard to tell what all he did. Which is why I will get a parts/unknown working drive and work on it as needed for practice with reading a service manual step by step.
 
I got a parts drive, learned how to disassemble it and figured out what to do on that. The parts drive is in poor condition, very dirty, and the head was originally very frozen place. But my luck, in one more time I pushed on it, and it loosened up very quickly almost to a normal condition (still very dirty). Taking it apart was a learning experience for sure, but it is much easier than the Tech Tangents video made it look. Nothing wrong with what he did -- he just completely disassembled the drive, and it is not necessary from my perspective and you might as well not risk anything that doesn't need touched.

On the parts drive, when I got the motor apart, the bearings had some small brown seepage, but mostly clean inside where the stepper gears are. The bearings spun slowly but did not resist or made noise that I could tell at the moment. I saw no need to remove the bearings from the shaft. Since I was there, I decided to remove the old oil on the surface of the bearings and motor case openings. Then I added a drop, let it work in, spun, and repeated two times on the first bearing, and then it was definitely smoother. Repeated on the other one. Reassembled the shaft to the motor casing, and tried turning the shaft. It did feel a bit better than originally.

I repeated the process on my problematic drive. What I found different when I got the drive out of the chassis, was that there was gunk around the shaft. It appears my attempts early at cleaning and adding lubrication actually attracted some dirt/old oil on the shaft I could not see. This goes a while back. On my original other good drive on my system, the opening on the shaft seemed bigger where I could drop some lubricant. Come back to this drive, that now appears to been a mistake since I tried dropping in oil blindly. The reason for the bad seeking was that there was gunk being pushed around on the outer shaft causing it to stick in random places. This explains my earlier comment that I could work it manually loosen the head, fire it up, step the tracks, and eventually it would slow up failing to reach the position, because it was sticky. And I'd recheck it manually, and it clearly felt sticky, but loosened up in a few tries, thinking it was ok, but again it was not.

So I went ahead and took the motor apart and cleaned up the gunk, checked the bearings. They initially felt better than the parts drive, but there was clearly brown seepage still. Added a few drops, and they smoothed out a bit more with little noise. Reassembled the drive, and now it steps through tracks 100% perfectly and no more read errors from failing to reach a track.

Lessons learned:
1. On old drives sitting in storage for a long time (the oil gets old and settles) making them very tough to move. But it is possible to free them up by gently working the head, and the bearings are probably ok then. Probably not the best in heavy use with old oil, if it seeps out and attracts dirt, but it's at least a thing to know.
2. Your first step on an old drive or for maintenance should be to clean the guide rails and add some oils to the rails, but avoid the drive shaft, because you can't really reach the bearings anyway, and risk gunking it up.
3. If you still end up having seeking issues (and not an alignment/loose part issue), then disassembly of the motor is the only way to tell and clean and lubricate these stepper bearings and shaft on the Tandon drives

I see no need to remove from the shaft and soak the bearings in oil. Maybe it could remove more of the old contaminated oil but I think it's hard for me to tell. Who knows how good they were supposed to be sealed or just had a little oil on them in the first place.

Also, one last thing. The three drives I have seem to all have different makes of stepper motors. Of the two I had apart, one is labeled by Tandon from India, and the other is some other make from Japan, and they seem to be good quality. Even Tech Tangent's motor is different than the ones I have. I didn't think they'd use so many different parts in these drives in a short period of time in 83!
 
Last edited:
Juggy wasn't shy about sourcing parts, so it would have been unusual for him to stick with a certain brand of commodity part. I've got TM-100s here with steppers that are huge and round as well as the smaller rectangular types.

The "dried up oil/grease" can even happen on NOS drives that haven't seen so much as the inside of a PC. White lithium is perhaps the worst, as it separates as it ages.
 
Back
Top