• Please review our updated Terms and Rules here

Tandy CM-2

falter

Veteran Member
Joined
Jan 22, 2011
Messages
6,573
Location
Vancouver, BC
I picked this up on ebay:

https://www.ebay.com/itm/RARE-TANDY...e=STRK:MEBIDX:IT&_trksid=p2057872.m2749.l2649

Got it for $39.99, so if there ever was any doubt, yes, ebay does deliberately obscure the settled prices for Make Offer purchases.

I bought it because it was originally listed at that price. IIRC these aren't that common. I can't remember if these were intended for the Tandy 1200 or the 2000. However, I'm curious if it will work with the special Tandy 16 color mode on a SX/TX/etc?

I think what you get is Hi-Res 600 x 200 CGA, and it may only work with the Tandy. It a big guy for sure. You may what to check it out over at 'Oldskool.org'. Can't go wrong on the price though.
 
That is a 15 kHz CGA RGBI monitor. It'll work with standard CGA, Tandy 1000 CGA, EGA in low- and medium-res mode, or the Commodore 128's RGBI output.
 
Since nobody has said it, this monitor definately won't work with the Model 2000.

Correct as the 2000 video mode was 640x400. You need a VM1 or CM1 for the 2000.

I have a fairly nice CM-2. But the only reason I bought it was to have a period correct monitor for a 1200 / 1000. Though Tandy did push the CM-1 for the 1200 with the STB-400 hi-rez CGA card. My 1200 came with that combo for about $800 added on to the invoice.

tandy_!200.jpg
 
I think it was TVDogs site that I saw mention of a card for a standard PC to drive the CM-1 but I've never seen one of them. I've always liked the CM-1 myself, and they seem to pop up a bit more often now. I've never used the CM-2, having gone to the CM-5 and CM-11 with the 1000's and then a CM-8 with the CoCo later on
 
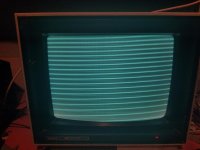
I got the CM-2 today along with other items. Unfortunately, it is not working. When I power it up, I get a bright raster like this:

20181109_201449.jpg

Brightness and Constrast appear to have no effect, and there's a very pronounced hum after a while.
 
Bad filter capacitors?

I'm concerned it took damage in transit. When I look at the last photo of it operating on the auction.. it looks like what I'd expect with an unconnected RGB monitor... totally white out. With it now, you see retrace lines. I don't see the retrace in the auction pic.
 
Damn. I was right.

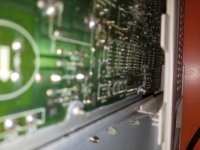
20181110_112351.jpg

Hard to see in the pic, but it's bad. If you're looking at the pic it's close to the back. Broken right apart on the left but a long hairline crack runs off from it. Probably not repairable.

If I wasn't so afraid of the CRT and flyback, I'd remove the board and see if I could repair it. But I think it's probably beyond that. Might just have to recycle the monitor, which is unfortunate, given CM-2s aren't that common.

Most likely somewhere in transit it got jostled hard, and the aged PCB inside flexed and broke. What a disappointment. You just can't have nice things with post/courier people.
 
Yeah I see what happened now. There is a channel on both sides of the case that the monitor PCB fits into. It appears some force popped it up and over the channel on the left side.. twisting and breaking it. Apart from where the board actually broke a hairline crack extends across many traces about halfway across the PCB. I think this is unrecoverable. Going to recycle it.
 
I've had a more detailed look at the board. I'm still afraid to try pulling it out all the way, but I did manage to pull it a bit back to inspect the damage. I'm not going for complete removal as that involves disconnecting the CRT anode and I am not confident in my skills at discharging that, and as they say, literally, once bitten, twice shy.

It appears I have some fortune in that the monitor PCB appears to be single sided. So I think it might be just a matter of epoxying the big 'bite' together, drilling a small hole at the end of the crack to stop it from progressing, and then soldering jumpers wherever traces are broken. I think. I'm just a bit shy about disconnecting that anode, and of course the damage is out of reach because to get at it you gotta slide the board back out of the front of the case.
 
Re. the anode it's nothing to be scared of. With a CRT this old any charge in it will dissipate out over a few hours. I made a video about how I replace the Model III/4 CRT and I just let it sit overnight and every time I take the anode off there is no hint of a spark. It would be different with a brand new tube and flyback but with old ones its pretty safe to just wait overnight or if you are especially cautious a couple of days and disconnect it.

As for the board, I have done what you describe a few times now and as long as you can connect the broken tracks (use wire, or leads cut from a resistor not just blobs of solder) you should be back in business. Then mark if you wish to sell its in the future it's not to be shipped - pickup only, because while the repair works it won't stand up to much abuse in shipping.

Hope this helps,

Ian.

Thanks Ian. I've heard that I should be safe.. monitor has been unplugged for a couple days now. It's the fact that you cannot see a charge that makes someone like me have trouble believing it isn't there.

I'm surprised that whatever happened to it was sufficient to bounce and twist the pcb out of its track but did not damage the case.
 
Many CRTs, especially the older ones, didn't have much thought into properly supporting the circuit boards.

When I was a kid, my dad taught me to take apart and re-tune the focus and colour balance on CRTs. What he didn't teach me was to properly discharge them, since re-tuning needs to be done while it's live. He also taught me how to replace AC wall receptacles while the breaker was still switched on, so... Parent of the year material right there - don't do that.

I've also zapped myself on the flyback circuit (it hurts like hell!), so I understand the fear. It's a pretty high voltage, about 1kv per diagonal inch of tube, but very brief (the flyback circuit only stores a few pF at best), so an electric stun-gun at 50kv and tens of pulses per second is far more "lethal" than most CRTs. http://lowendmac.com/2007/the-truth-about-crts-and-shock-danger/

I'd still exercise caution if you have a heart disease, or a pacemaker. But otherwise, the danger in this circumstance is really overplayed. It just hurts like hell, and you're more likely to drop and break what you're working on, or hurt yourself from jumping back.

Repairing something as simple as a cracked 1-sided circuit board (many of these are) shouldn't be too much of a problem to fix. More labour intensive taking apart and getting around or desoldering components to get at traces (if a two-sided board) than anything. So long as you properly drain the capacitors, including the tube, you should be fine. People usually do this with a screwdriver and alligator-clip jumper to a ground plane (The shield around the flyback transformer works good, just make sure it doesn't slip). I built myself a probe with a 25w resistor I had lying around specifically for this purpose. The wire AND the component being discharged both dissipate the stored energy as heat (because you're basically shorting it) so I added the resistor to soak some of that up. If you stick one end of your Jerry-rigged discharge probe under the rubber anode cup so that it contacts the metal clip, and the other end to a ground plane, you'll discharge it easily and safely. Of course, make sure it's unplugged before you begin.

From there it's just scratching to remove the solder mask around the crack, and adding jumper wire to the traces to bridge the crack. Probably also a good idea to see where the crack terminates on the board, and drill a small hole to add relief and prevent the crack from spreading.

I got a real belly laugh out of this sentence from that article you linked, "The warnings are so numerous and frightening, in fact, that it’s easy to believe that a CRT can vaporize humans and entire herds of cattle with a single discharge." Good stuff.
 
I got a real belly laugh out of this sentence from that article you linked, "The warnings are so numerous and frightening, in fact, that it’s easy to believe that a CRT can vaporize humans and entire herds of cattle with a single discharge." Good stuff.

I've known plenty of people who knew just enough to be dangerous with whatever they thought they could fix/upgrade, and they end up breaking it worse (or potentially hurting themselves). But sometimes ignorance runs the other way to the point where the fear becomes comical to the outside observer. Like being afraid of a spider in a locale that doesn't normally get toxic spiders, and the spider is probably more scared of you. :p
 
Many thanks. I've been 'bitten' a few times. I don't know how much voltage was involved. Recently I bumped my hand against the PCB of an iMac power supply board (it is oriented in a way that it's really easy to do that as you're working around there). And then again when I was working on a small TV, foolishly trying to adjust the inside-the-case focus knob with metal pliers on a hot chassis. My experience of both was not what I expected - not searing pain. It was more like when I had IMS treatment. The muscles twitch involuntarily and *very* uncomfortably and then there's this deep aching, sort of like after you've been vaccinated. In any event, my response was 'ouch' and pull away. But it left me very uneager to mess with that kind of thing again. I realize it's easy to make a discharge tool, but when you lack confidence and are working with something dangerous that cannot be seen, and you've been bitten before, you're kind of reluctant to trust your newly acquired skills. Thus, the CM-2 has sat for several months untouched.

The good news is, it *is* a single PCB, so it should be fairly easy to fix. It's just getting up the courage to properly discharge it and trust that it's safe to work on. I think it'd be easier if I knew someone experienced in these matters who could sort of be a guide/paramedic.
 
Well, I'd have used a screwdriver instead of pliers for that focus knob. All the flyback transformers I've seen have either a slot or star on those trimmers, so you can use a screwdriver to adjust them. Less chance of slipping. I've also just turned the trimmers with my fingers before, but that's generally not a good idea, as any weakness in the insulation can result in arcing if you put a "conductor" too close. If you want to be extra cautious, try putting some heat-shrink or electrical tape over the shaft of the screwdriver.

I don't have much time for travelling around, even within the Fraser Valley, but if you're ever around Chilliwack some time around the evenings or weekends, let me know if you haven't already gotten it going. We can try to hook up and get the thing fixed.
 
Back
Top