• Please review our updated Terms and Rules here

Tektronix 405x GPIB Flash Drive

I had to adjust the directory rights. They should download now.
I have several manuals I would like to upload to Bitsavers. What are the requirements of the PDF's and other files, & how do I submit them? I have a pretty good scanner, I just want to get the best format possible.
 
I was successfull at capturing all the files from a Tektronix 4051 Graphics T1 tape last weekend.

Here is the link to a couple of photos of the process:

Capturing Tektronix 4051 Graphics T1 tape files to laptop


First I replaced the disintegrated drive belt with one from a NOS 3M DC6250 cartridge.

I used my 4051 to PC serial transfer program on my recently repaired and upgraded 4054A.

I set the comm speed of the 4054 serial interface to the maximum 9600 baud, but as it is 7-bit, my program changes all 32 Tektronix control characters to "~X~" where X is the ASCII character corresponding to that control character.

This way I don't lose any of the Tektronix 405x text formatting in the transfer.

I was using ExtraPutty on the laptop to capture the program text strings, then copied the statements into Notepad++ and saved each file.

I am still working on a Tektronix 4051/52/54 compatible GPIB MicroSD flash drive that will emulate the Tektronix 4924 tape drive - for all of us with these computers to use - since both the tapes and drives are very problematic after all these years.

This flash drive contains an Arduino with my code - based on the GPIB flowcharts and info in a 4051 and 4052 GPIB manual.

You will be able to use the existing 405x program statements with @Y for the drive GPIB address - since I don't know how to write a ROMPACK for any of the series :)

I plan to organize the different captured tapes in directories on the flash - and that may mean using a non-4924 GPIB secondary address for that command. It also likely means I need to change any tape commands in each program to use the flash drive GPIB address.

That's why I wanted to capture one of the Tektronix tapes with a menu - is to ensure I could get those files to work on my flash drive design.

Monty McGraw
 
I had to adjust the directory rights. They should download now.
I have several manuals I would like to upload to Bitsavers. What are the requirements of the PDF's and other files, & how do I submit them? I have a pretty good scanner, I just want to get the best format possible.

I scan my Tektronix documents in B&W @ 150dpi on a Canon MFP and use their MP Navigator software to create a PDF - which automatically also includes searchable text.

Al Kossow monitors this forum and has posted several of my scanned docs to bitsavers.

For the Files themselves I just created a github repository:

Tektronix-4051-4052-4054-Program-Files

and need to upload my latest serial transfer program and instructions for wiring the Tektronix 25 pin connector to the PC serial connector.

Monty
 
What are the requirements of the PDF's and other files, & how do I submit them?

I prefer 400dpi minimum 600dpi prefered for B&W text, TIFF G4 encoded.
Color is problematic, I've recently been using 300dpi with .png encoding, then letting Adobe Acrobat downconvert it during OCR.

If they are small enough, you can email them to me, otherwise, I can give you an ftp address to download them to or can download
them from your choice of locations.
 
Last edited:
Emulating a Tektronix 4924 GPIB Tape Drive

Emulating a Tektronix 4924 GPIB Tape Drive

There are 18 different tape drive commands in Tektronix 4050 BASIC.

This is not surprising since the internal tape drive was the only standard storage device in the Tektronix 4051/4052/4054 computers.

Fortunately - the 4924 Operators Manual posted on bitsavers has quite a few details about each command.

However, I expect to learn the rest of the unwritten details as I implement each of the commands for my Arduino project.

I'll be starting with the simplest command - HEADER, which did not have a direct command on the 4051, so the programs implementing tape header comments used the powerful Tektronix 4050 INPUT and PRINT commands to read and write the first ASCII string in the internal tape file after a FIND command.

The 4052/4054 added a CALL "HEADER" command to read the tape header.

The header is read and then listed as part of the internal functionality of the BASIC TLIST command that was available on all the 4050 series computers.

I'll start my coding effort there and just embed a couple of fake header responses in the Arduino code.

After that command is working, I'll try to hook up the MicroSD flash and respond to the HEADER command with FAT filenames.

My long term plan is to use the header as the FAT filename. Tektronix 4050 stored the header as the first record in every tape file.

Monty
 
Last edited:
I made some progress since my last post on the GPIB Flash Drive.

I realized that I needed to rewire my Arduino Nano to allow pins 10-13 to be used with the SPI flash interface to the MicroSD adapter.

I decided to cut down a small prototyping board - and solder the MicroSD adapter from Sparkfun to that board and the prototyping board to the ICSP header. This header has all but one of the signals needed for the MicroSD adapter and adds mechanical stability for plugging and unplugging the MicroSD card.

Here is a photo of my Nano with MicroSD flash card:

Monty's breadboard Arduino NANO with MicroSD card

I decided to test the MicroSD card and wiring using the Arduino SD library. The library tests worked, however this library is limited to FAT16 formatted SD cards and 8.3 filename syntax.

Checking around - there is a newer SdFat library by the same author. It supports long filenames and FAT32.
I downloaded and installed that library and ran a couple of example programs - this library is great. I did use his SDFormatter to reformat the 32GB MicroSD card. He indicates that the OS format is not per the SD spec and recommends you use the SDforum SDFormatter program to initialize the card.

Long filename support should allow me to make the filename equal to the entire tape header string instead of having to store the header string as the first record in every file like the tape drive does.

Hope SdFat leaves enough program space and RAM space on the Nano (328p) for my GPIB emulation of the 4924 tape drive :D

Now off to modify the GPIB code for the control pins I had to move to make room for the SD card and begin GPIB testing.

Monty
 
Last edited:
Al Kossow posted his scan of the Tektronix 4924 Tape Drive Service Manual on bitsavers last fall:

http://bitsavers.org/pdf/tektronix/405x/4924/070-2131-00_Tektronix_4924_Digital_Cartridge_Tape_Drive_Service_Manual_Feb1982.pdf

Appendix A, B and C contain great information on the 4924 GPIB commands including byte-by-byte sequences for each command.

Here is the first page describing GPIB sequences to the 4924:

attachment.php


This will be incredibly helpful in emulating the 4924 with an Arduino board and SD Flash!

I powered on my 4054A and 4924 with a National Instruments GPIB-USB converter attached to my PC - and I can see the data transfers but not the command sequences.
Apparently there is a newer NI GPIB-USB-HS+ that can provide bus analysis - but it is quite expensive.

I attached my Arduino Nano board to the back of the tape drive - and I must have a wiring or programming issue as it locks up the 4054A until I remove my board :(

I'll recheck all my GPIB connections for shorts - the other possibility is the program I loaded into my Arduino may have been in controller mode - which would explain the lock up - since the Tektronix 4050 is the only controller allowed on the bus.

Monty
 
Last edited:
Learned another thing about the Tektronix 4050 tape drives including the 4924 tape drive:

The 4924 Tape Drive GPIB sequences above includes an "ERROR" command - that is undocumented. The description of the ERROR command is also in Appendix B and indicates the 4924 (and likely the internal tape firmware) include a checksum on each 256 byte record.

The 256 byte tape records have an additional checksum byte: per the 4924 Service Manual Appendix B- screenshot of that page:

attachment.php


This checksum is computed and added to the record when a record is written to the tape and checked when a record is read from the tape.

A checksum error will automatically cause a retry of reading that record. After ten retries with the checksum error - BASIC will report an error message.

Performing an INPUT @2,24:E (for a 4924 with ID of 2) will return the accumulated number of read errors and clear the error counter.

Using a 33 for the ID may return accumulated read errors for the internal tape drive.


PS: *******************************

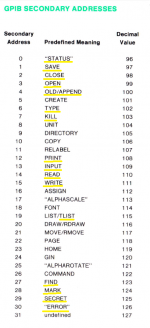
I was puzzled about the undocumented ERROR command for the 4924 - and a conflicting secondary address in the Tektronix 4050 BASIC Reference Card and main BASIC Reference manual indicating "30" was "ERROR"

So I just tried some experiments with my 4054A internal tape drive and 4924 tape drive.

Of course the tape I used is a NOS 3M DC6250 tape that I have no issues with...

Plugged the tape in the 4924 and did a "FIND 2" command and watched it forward the tape to file 2 and stop

Then I typed: INPUT @5,24:E and it returned an "E" value of 0
Then I typed: INPUT @5,30:E and it returned an "E" value of 0

Then I moved that tape to the internal tape drive and typed: FIND 1 and the internal drive rewound the tape to file 1

Then I typed INPUT @33,24:E and got an illegal command message.
same thing for INPUT @33,30:E

I then ejected the tape and both commands above indicated a Mag tape was required.

A search of the big BASIC Reference Volume showed the secondary address of 30 for "Error" and "Brightness", but no further info on tape error messages - other than the Error 67 - Tape Read error after ten retries.

So I guess you may not be able to get the internal tape error count, but you can get the 4924 external tape drive error count.

I found a Tekniques programming tip in Vol 3 No 5 "Early Detection of Tape Wear with 4924 Tape Drive". I indicated using 24 as the secondary address to read the error counter - referencing the 4924 Service Manual Appendix B.
 
Last edited:
I just created a github repository on my site for this Tektronix GPIB Flash Drive project:

https://github.com/mmcgraw74/Tektronix-4050-GPIB-Flash-Drive

I got stalled on the project trying to add GPIB Device Mode to the Arduino GPIB Controller program I found.

I found two more GPIB Arduino projects in the last month:
https://github.com/Tek-User/Tektronix-GPIB-Download

and the most promising:
https://github.com/Twilight-Logic/AR488

The AR488 project has had lots of activity and contributors, and the Arduino program supports several board types plus has Device mode in addition to Controller mode.

One thing that none of these projects has done is support both primary and secondary GPIB addressing - used extensively in the Tektronix 4050 computers BASIC language, instead of sending commands to the devices as data (to be parsed by the device).

I posted this example of GPIB primary + secondary addressing in the README on my new repository:

One example of Tektronix primary/secondary GPIB addressing would be loading a program from internal tape versus external tape:

To load the tenth file on an internal tape:
FIND 10 OLD

To load the tenth file on an external 4924 tape drive with GPIB address 5:
FIND @5: 10 OLD @5:

The FIND @5: 10 BASIC statement resulted in a GPIB write to address 5,27 with a data value of 10, where the 27 was interpreted as the FIND command by the tape drive.

I hope to make more progress on my tape emulator using the AR488 program as a starting point.

I also posted a file that I had created - documenting details on each of the commands I think need to be supported by the emulator, including these commands underlined in yellow:

attachment.php
 

Attachments

  • Tek GPIB commands needed for tape emulator.png
    Tek GPIB commands needed for tape emulator.png
    214.9 KB · Views: 1
I made contact with the author of the AR488 GPIB project, and he is interested in helping me create the Tektronix 405x computer Tape drive emulator.

One of the implementations of the AR488 is to mount an Arduino Pro Micro on the back side of a board with the GPIB connector soldered to the other side.

That design uses all of the IO pins of the Pro Micro - and my concept requires four additional pins to interface to a microSD card adapter.

I found a Pololu A-Star 328PB Micro board that has 24 IO pins that appears to be perfect for this application.

Here is my diagram showing how this board could use the same PCB as the Pro Micro, rewiring only two of the ground pins to different location on the A-Star Micro. Pololu also has a MicroSD adapter with level-shifters to support a 5V micro interfacing to 3.3V MicroSD cards.

attachment.php


Here is an example photo from the eevblog forum of the ProMicro mounted to a PCB with the GPIB connector on the other side.
The header pins in the photo are used to connect to a USB-TTL Serial adapter to program the Pro Micro in the photo.

I would have similar pins to the A-Star 328PB Micro for programming, and for use with the 4050 computer, I would cable the pins to pick up +5V and Ground from an option ROM slot (like Jos Dressen's fabulous 4052/4054 Multi-function ROM Pack).

I would mount the Micro SD card to a board on the other end of the A-Star 328PB Micro.

attachment.php
 
Last edited:
Making progress on my 405x Tape Emulator with the help of the AR488 software author.

Here is a photo of my Pololu 328PB Micro board mounted to a GPIB to Pro Micro PCB designed by artag in the eevblog forum posts on AR488:

attachment.php


One advantage of using an Atmel 328PB Micro over the Pro Micro is the 328PB includes more I/O pins than the 328P. In this Pololu 328PB micro, these additional pins are available on the 'top' and 'bottom' edges of the PCB.

My photo has the 'top' and 'bottom' reversed - the pins along the bottom of the photo are to an external USB to TTL adapter. The pins along the top side of the photo are for a Micro SD adapter (SCLK, MOSI, MISO, CS).

This next photo shows plugging my 328PB Micro with AR488 GPIB adapter into my HP 39470A Data Acquisition Switch:

attachment.php


I am reading the voltage of a 9V alkaline battery. The 328PB Micro is connected to an external USB to TTL serial adapter with a USB extender cable back to my PC.

Here is a photo of the front of my HP 34970A Data Acquisition Switch during this test of the 9V alkaline battery:

attachment.php


This particular program does not use the logging to a file feature - it just initializes the HP 34870A to read voltage on channel 101, and three READ? commands to sample the voltage and print them to the EZGPIB console like this:

attachment.php


For this test, I am taking advantage of the AR488 'Prologix GPIB-USB' commands, and EZGPIB software to read the HP 39470A voltage three times with the following 'PASCAL' program on EZGPIB (very EASY) :)

Code:
Program HP34970A;

const filename=      'D:\EZGPIBData\Test.Plt';
      HP34970A        = 9;
      timeout=       10.0;

var str:string;

procedure writefiledata;
begin;
  if EZGPIB_FileExists(Filename) then EZGPIB_FileDelete(Filename);
  EZGPIB_FileAddToBuffer(str);                               
  EZGPIB_FileWrite(Filename);
end;

begin;
  EZGPIB_BusWriteData(HP34970A,'*IDN?');
  EZGPIB_BusWaitForData(HP34970A,str,timeout);
  EZGPIB_ScreenWriteLn(str);  
  EZGPIB_BusWriteData(HP34970A,'CONF:VOLT:DC (@101)');
  EZGPIB_BusWriteData(HP34970A,'READ?');
  EZGPIB_BusWaitForData(HP34970A,str,timeout);
  EZGPIB_ScreenWriteLn(str);  
  EZGPIB_BusWriteData(HP34970A,'READ?');
  EZGPIB_BusWaitForData(HP34970A,str,timeout);
  EZGPIB_ScreenWriteLn(str);  
  EZGPIB_BusWriteData(HP34970A,'READ?');
  EZGPIB_BusWaitForData(HP34970A,str,timeout);
  EZGPIB_ScreenWriteLn(str);  
  
end.

Next step is to add the Pololu Micro SD adapter with voltage converters to adapt the 5V output of the 328PB Micro to 3.3V for the Micro SD card.

I plan to mount my Pololu Micro SD adapter upside down (right angle might be better) to the 328PB Micro like this:

attachment.php


Then work with the AR488 author on changing his code from Prologix GPIB-USB commands to Tektronix 4924 tape commands that would read and write ALL my uploaded Tektronix BASIC program files on the Micro SD card with the Plot50 BASIC tape commands.
 
MattisLind,

Sounds like you should get your 4051 repaired - I suggest you start a thread on this forum like I did to troubleshoot both my 4052 and 4054.
You will get some helpful suggestions.

Monty

Eventually I got my 4051 repaired. It is a long story.

6L6yP8nl.jpg


Back in 2016 when everything hit the fan the root cause was most likely the capacitors in the power supply. Stupidly I never checked the voltages well enough when first powering it up. At least the cap on the +20 V was zero microfarad. Some components of the 300 and 175V circuitry blew up. While trying to fix that I might have made some yet more stupid thing. I don't really know what I did, but the ceramic laser trimmed resistor with four 1.5 ohm resistor pairs went into smoke. Perhaps I mis-connected one of the nine cables from the board to the transistors on the chassis? Why this annoying mechanical construction in the first place? It is very easy to hook up them wrong when putting the analogue board back into place.

While trying to search for a proper replacement I made my own out of 40 pieces of SMD 7.5 ohm precision resistors. Not exactly cheap.

However since then I got help from the collector community. daver2 here helped my procuring the resistor array (thanks Dave!) and from Canada I was able to get a spare analogue board.

Just a few weeks back I got back to this dormant project (one need to have the right energy level when dealing with things were everything has gone terribly wrong). I hooked up the analogue board on the lab bench to the PSU (which had all the twist-lock capacitors replaced) and powered it up slowly while monitoring voltages.

sV5gerTl.jpg


Everything looked fine and I was able to tune the voltages according to the sticker on the CRT so when I when I today connected everything back together (being very careful on how the 9 transistors were connected this time) it just worked! Perhaps I need to tune the focus slightly but at least the cursor is needle-sharp so it might be when the characters are stored they get a bit more fuzzy.

Then there is a problem with the keyboard. Some keys doesn't register well. What kind of keyboard is this? Is it a capacitive foam type keyboard? Advice please!

Here is my replacement resistor array. For now I will let it stay in the machine. I think it works well enough. Perhaps it is the same in my monster Tek 4016 display that still waits for attention?

Hh5FMExl.jpg


So now I am happy again! I need to put the serial port back pack in place so that I could try out the ROM modules. BTW. What is the best method of getting software into this little fellow?
 
MattisLind,

Congratulations on your 4051 repair!!

My suggestion is to use your serial port to download 4051 programs from your PC.

I've used RealTerm and Tera Term Pro terminal emulator programs successfully - I suggest you try Tera Term Pro first:

https://ttssh2.osdn.jp/index.html.en

Tera Term allows you to add delays after each line - which I think will help give the 4051 BASIC ROMs time to tokenize each line.

I had to do that with my Tektronix 4041 GPIB Controller, when I was using the keyboard port to input programs - since the 4041 doesn't support XON/XOFF handshake on the keyboard interface.

And you can check out my latest Tektronix 4050 program archive on github at:

https://github.com/mmcgraw74/Tektronix-4051-4052-4054-Program-Files
 
More progress on my Tektronix GPIB Flash Drive project.

There was concern that the 2KB of RAM on the ATmega 328PB would not be enough for both the AR488 GPIB code and my Flash Drive code.

I looked for another Arduino board with 5V output and more RAM. Certainly the Mega2560 board has lots more flash and RAM but it is too large.

Most of the newer Arduino boards are using 3.3V CPUs like ARM or ESP32 and would require logic conversion of the 16 GPIB signals :(

I found a new board from Pandauino that uses either a ATmega644 or ATmega1284 in a much smaller form factor than the Mega2560 board.
https://pandauino.com/en/644-narrow-1284-narrow-atmega644-atmega1284/

I ordered a 644-Narrow board from Mouser and have it working with the AR488 GPIB connector board and an Adafruit MicroSD board.

The 644-Narrow is longer than the 328PB but only 0.1 inch wider, so I was able to squeeze the pins into the AR488 GPIB connector board and I added the MicroSD board on top:

attachment.php


Here is the side view of the board stack:

attachment.php


I tested the new 644-Narrow with EZ-GPIB program and duplicated my test result on the Agilent 34970A Data Acquisition instrument.

With the MicroSD attached, I duplicated my test result on three Tektronix 4050 BASIC commands for the tape drive: TLIST, FIND and OLD.

Emboldened, I then merged my MicroSD test programs with the AR488 GPIB code to see how big the combination would be.

As seen in the screenshot of compiling the combination program - it exceeds both the 32KB of flash and 2KB of RAM in the ATmega 328PB, but the good news is the 644-Narrow has 50% of the flash and 50% of the RAM left for the rest of my emulator program :)

attachment.php


Here is the output of that program - I'm using RealTerm since the Tektronix uses CR as the delimiter and lots of control characters in the PRINT statements and RealTerm has a custom font displaying ALL the control characters:

attachment.php


The text in red is the command - I have added the Tektronix commands to the AR488 Prologix GPIB commands for this test. When we get the full program running, the commands will come from the Tektronix computer over GPIB and the output will be sent back to the Tektronix computer over GPIB instead of being sent to the serial console.

You will notice in the first OLD command that line 1090 has two linefeeds inside the PRINT statement, and in the second OLD command line 1040 has multiple BELL control characters.

These three Tektronix BASIC commands are the minimum to use the emulator as they allow you to see the files (TLIST), select a file (FIND) and run a program (OLD).

I'm anxious to run these commands with the new GPIB code from the AR488 author to have the Arduino act as a DEVICE, instead of the CONTROLLER.
 
Looks like a nice project Monty!

So can I do anything to help? It would be really nice to have all tapes and programs on a single SD card!

/Mattis
 
Looks like a nice project Monty!

So can I do anything to help? It would be really nice to have all tapes and programs on a single SD card!

/Mattis

Mattis,

One thing you could do - now that you have your 4051 working, is to begin testing the programs I have uploaded on your 4051.
I tested some of them on the Dave Robert's 4051 emulator, but not all of them.

My earlier recovered programs may need some text editing to load and run on a 4051.
Examples of needed edits (Notepad++ is my favorite editor for this) include:
- CR/LF needs to be changed to CR, or the programs won't load on my 4052 or 4054
- ~ is used in some of my early programs to modify Tek control characters (~G~ for control-G BELL for example)
- _BS (Letter underscore then backspace control character) is used in other programs designed to work with the 4051 web browser emulator to modify Tek control characters (Ex:G_BS for Control-G)
- NUL control characters are found at the beginning of each line in some programs - need to all be deleted or they don't load on my 4052 and 4054.

My newer uploads labeled Universal have all been modified to work in my 4052 and 4054, I'd love you to test them on your 4051.
These Universal format files also work with the 4051 Emulator if you run the jsTEKTRONIX4051_universal.html file after you download the emulator from https://github.com/jonbstanley/Tek405xEmulator .

My TLIST, FIND, and OLD code is working fine with the serial console output, but there will likely be some changes needed when I get the device mode GPIB code and connect to my 4052.

I also have CD code working to change the directory from one folder to another. I will use this 'new' command in the MENU programs I will create in the root directory to select a particular folder MENU program and the folder MENU programs to get back to the root directory.

I have also got the READ command prototyped for ASCII files, and am now working on READ for BINARY files.

The work on the READ command for BINARY files should work with both PROGRAM and DATA files, and I believe will also work for the SECRET files that I have captured with my latest TAPE DUMP program, as it captures every byte on each 256 byte block on a tape.
 
Last edited:
I really wanted some nice demo pictures on my 4051 so I looked at the .BAS files in the pictures folder and quickly found out that the CRLF has to be replaced with CR. Then I got into trouble since all DATA lines were too long. 4051 is not coping with long lines. I made a small C program that splits up the lines and renumbers the program. I ran a few programs through this utility tool and ran them on my 4051. But it takes forever to download. I am not successful when setting 10 ms character delay. It seems like 100 ms is required!

I found one oddity in the .BAS files in the pictures folder in that the lines 3350 and 3360 appear twice. 4051 will overwrite the first occurrence with the second of course. But I don't really know which is right. However the 4051 produces a correct paint as it seems.

GdTQCsUl.jpg

h7IFm9Yl.jpg

aEoLvT6l.jpg

PMhvqhUl.jpg


The stargate uni was able to run without any modifications so it appears that .UNI is fine.
 
Excellent!

I apologize that I have not had time to go back through my archive and convert the programs to .UNI format.

It is possible that the 4052/4054 allow a slightly longer program line - but I doubt it.

One way I have 'fixed' 73 character lines without breaking them into two lines is to remove the space between the line number and first statement.
It could be that some of my older programs are simply listed to the serial port - which could have added the space that wasn't in the original program file.

My newest program recover technique uses the TransEra Super Utility ROM pack to capture entire tape blocks, so the programs include all the control characters.

Monty
 
Encouraged with my progress on designing tape emulator commands in the Arduino IDE using my prototype with the 644-Narrow and Adafruit MicroSD, I decided to design my first PCB to eliminate the rework in my prototype.
I used KiCad for the first time to create the component footprints and the layout for this PCB, as Oshpark site indicated they could directly use the board files from KiCad.

I will be using the Pololu MicroSD instead of the Adafruit board as it is 0.1" narrower and also shorter than the Adafruit design.
I centered the GPIB connector and MicroSD so the assembly will only be 0.1" higher on top and bottom edges than the AR488 PCB assembly.

Here is the top and bottom of my Tektronix 4924 Tape Emulator PCB design that I sent to Oshpark:

This is the side of the PCB that the 644-Narrow (component A1) will be mounted and the 9-pin header (J2) will be used to mount the Pololu MicroSD adapter above the 644-Narrow.

attachment.php


This is the side of the PCB that the GPIB (J1) connector will be mounted.

Since the 644-Narrow board is too long to allow bolts to attach through the GPIB connector, I will be modifying a nifty AR488 3D printed case posted on the AR488 eevblog to provide mechanical support to the GPIB connector and other two boards.

Oshpark has already notified me that my PCB has been sent off with other designs to fabricate, so I should have my first three PCBs back in two weeks.

attachment.php
 
Last edited:
Back
Top