• Please review our updated Terms and Rules here

Toshiba T2000/40 revival (floppy/batteries)

Okay so here it is

On the left, still enclosed in the screen aluminium frame : the LCD screen board that has those freaking 3,3uF that you find in each screen of the era, that were all ultra leaky and crusty.

On the right, the fully recapped same board (out of the aluminium bezel for obvious reasons) + the inverter board, fully recapped as well

For reasons that I agree with :) I only recap inverter boards with proper electrolytics, not with tantalums - but that's just my opinion.
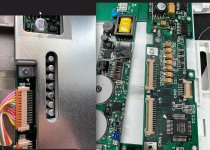
ApplicationFrameHost_NvcvGB3L4A.jpg

Motherboard has been recapped in the same way

Now I "just" have to put all of this back they way it was and hope for the best
ApplicationFrameHost_HFvSUD6n3y.jpg

By the way, sometimes recapping is useless, here this unit would absolutely never worked again without FULL recapping.
Every single of the caps was long dead. Reminds me of a macintosh plus.

If I'm lucky and this ever boots again, I'll later try to "upgrade" the IDE HD with a compact flash, as it's likely to fail very soon.
 
Okay that’s unexpected ; after all this work ; the thing does not burst into flames but welcomes me with a red blinking « dc in « light
I’m trying to power it up with dc14.4 volts on the battery plugs . I’ll try with the dc in once I figure the pin out :)
 
Last edited:
In the unlikely event someone ever reads my adventures in the future ; I've removed all capacitors from the PSU section of the T2000 motherboard, all of them test good except the smallest 10uF/16V. Only two capacitors I removed were visually leaky underneath, one of the leaky ones is testing good. If this small 10uF cap is related to my "RAMV" circuitry, maybe it'll come back to life.
I initially did not recap the big electrolytics in the PSU because they were visually perfect. Which is a bad indicator - confirmed here once again.

Spare parts are slow to arrive (at least now they do arrive). So I'll probably post news middle of next week.

The "DC IN blinking red" seems to be a common issue amongst early toshiba laptops, i've read multiple threads here and elsewhere (thanks @FuST ) but nobody has the schematics of toshiba units, and most of the regulators are obscure SMDs mosfets. So your repair is limited to recapping and hope for the best. By the way, the T2000's blinking actually means something and outputs a code ( see documentation ), kind of a morse code in "long and shorts".
 
I definitely found some blown semiconductors. Maybe they blew when the supply failed, or maybe they blew during repair.

I was eventually able to figure out what transistors were used. I also took spares from a dead Toshiba 486 laptop. Lots of common parts.

I replaced all aluminum caps but left the tantalum alone .. they looked fine.

I learned alot by studying the 1600 schematic that Fust did. Every power supply will have its differences but you get the idea.

If you have the energy to do so, you can map out your psu sections.l, and verify if the PWM controllers are working, if the buck converters are working etc.

Can you isolate the supplies from the computer to see how each rail is doing?

Do you have an oscilloscope to test with?
 
Okay so here it is

On the left, still enclosed in the screen aluminium frame : the LCD screen board that has those freaking 3,3uF that you find in each screen of the era, that were all ultra leaky and crusty.

On the right, the fully recapped same board (out of the aluminium bezel for obvious reasons) + the inverter board, fully recapped as well

For reasons that I agree with :) I only recap inverter boards with proper electrolytics, not with tantalums - but that's just my opinion.

View attachment 1261746

Motherboard has been recapped in the same way

Now I "just" have to put all of this back they way it was and hope for the best

View attachment 1261747

By the way, sometimes recapping is useless, here this unit would absolutely never worked again without FULL recapping.
Every single of the caps was long dead. Reminds me of a macintosh plus.

If I'm lucky and this ever boots again, I'll later try to "upgrade" the IDE HD with a compact flash, as it's likely to fail very soon.
Looks to me like you did the opposite.

You replaced aluminum electrolytics with tantalum? I don't see any issue particularly, but I'm curious why you didn't just replace same with same?
 
Hi @Twospruces
Yes I have all lab equipment you can think of,

My pictures are not super clear indeed.
I replaced all hybrid ("electrolytics") capacitors with tantalums on the motherbaord & the lcd screen
I replaced all small electrolytics from the inverter board with other electrolytics mostly because I feel such a circuit is not a good place for a tantalum
The inverter board is the one in the center. It's not obvious it's recapped because well, these are just new electrolytics. :)

What I did not do initially is touch the big electrolytics from the PSU section, as they "looked fine", and also because my unit was iirc semi-booting when I first got it (so it clearly degraded while waiting on the "pile of things to do" for a year or two).

Now i've desoldered all caps from the PSU , and waiting for the PSU parts to finish. I don't have much hope, as only one of the capacitors actually tested bad.

the 1600 schematic is Very interesting indeed ! They went into a lot of effort to not only make voltage rails but circuitry that checks the voltages, and in my case even sends a binary.hex error code in the led blinking.

I've said it in another topic while I was repairing my T1100 , but it's a pity toshiba or their successors don't release their schematics to the community. If a former employee could "leak" them out that would be much appreciated.
 
Last edited:
One thing that I can't find is the pinout of the power jack (4 pins + shielding) for my T2000
It's a 4 pins thing. I don't have the original power brick
One of the pins is obviously ground/chassis (third from the left is you look in front of it)

But the rest is a mystery.
 
Okay fully recapped ; same story . Blinks red .
I don’t think I’ll make even more gray hair trying to fix smd mosfets on a 4 layer board without schematics ;(
some people in this forum warns against buying Toshiba laptops of this era and I can agree …
 
On my T1000XE, if I recall, the blown supplies took out a serial UART chip, which was shorting the -9V supply.
The debug can be very involved.
Also, it can be easy to damage things when you are desoldering/testing/resoldering parts.
 
On my T2000 the power supply is sent to a small connector that feeds all the voltages , a few centimeters further on the same motherboard , into a female connector ;
in other words it is very simple to disconnect the psu from the motherboard ; which is handy for debugging — and when I do just that the psu still blinks red :(
So only one thing is clear ; my psu refuses to start due to all the measurements and safety they put in place . It only drives 2milliamps
Something tells the psu cpu to not start - I guess …
 
@CedsRepairs Are you sure that PSU should be able to work standalone? I think I have a T2000 somewhere in the basement waiting for repairing...maybe I can give it a try on Friday and send you some info.

What I have experienced with PSU from T1200 and T1600 is that not all of them turn on without load. For some boards I put some dummy load and it did a trick.

What you can also try is to check voltages on the connector pins if they at least shortly go to desired values (or very close to it). If not, maybe you can trace this rail and narrow the problem.
 
@CedsRepairs Where did you find this 3.3uF 6.3V capacitor? I tried from all available sources that I know and there is no one with that small height (16mm).

She smallest height I found is 20mm :(
 
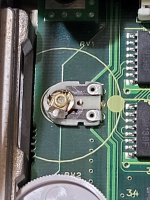
So,... regarding those thumbwheel pots.... I definitely need a couple of replacements.

I cannot identify the manufacturer.

20230824_222312.jpg
This is what it looks like with the thumbwheel broken off.

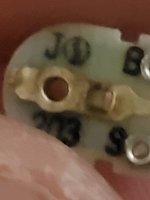
They are different values. One is 20k and one is 50k.

Here is what they look like from the underside. I can't identify the logo.

20230824_230027.jpg

Any suggestions?

I've ruined these pots trying to fix them.

But I am hopeful i can find replacements.
 
Back
Top