• Please review our updated Terms and Rules here

PET got seriously ill...

Commodore PET ROM Chip Adapter (MPS6540 MOS6540 6540). Replaces any MOS ROM chip in the Commodore PET 2001

I looked at the website and it appears to be a good solution for 28 pin ROMs
(6540) but doesn't the 3032 PETs have the 6332 ROM with the 24 pin package?
-Dave
 
PET RAM/ROM Expansion

PET RAM/ROM Expansion

Hi all,

I did not follow the complete thread now but if you want to repair your PET 2001 Motherboard the best solution is this PET RAM/ROM Expansion from Nicolas Welte / Germany.

http://freenet-homepage.de/x1541/hardware/petram.html

http://freenet-homepage.de/x1541/hardware/petram-p.html

it is a board that completely substitutes the RAM and ROM and you won't have any troubles again.. I use one of this expansions and it is perfect also for diagnosting problems. Nicolas is a nice guy.. I wanted to buy another expansion from him but he collects orders to build new ones ;-)

I paid around EUR35/$50 for the board 2 years ago .. and it is worth it
 
Sometimes an image says more than a thousand words...

attachment.php


(N.B. I made the typical lend vs. borrow mistake -- so thanks to Christian for *lending* me his programmer... ;-) )

Details yet to come!

Regards --
 

Attachments

  • conv-dscn1647.jpg
    conv-dscn1647.jpg
    51.4 KB · Views: 1
Hi all,

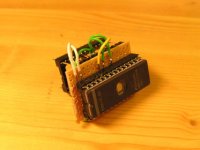
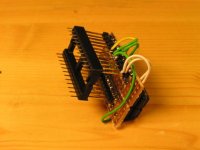
here are some photos of the 27C64 adapter I built using a 24 and a 28 pin socket, wire-wrap connectors, some wire and a piece of veroboard:

attachment.php

attachment.php


Initially I tried the procedure described by Mike_S in

What I do is take a 28 pin socket and bend out the pins that will be rerouted; then I take a 24 pin socket and solder thin wirewrap wire to the pins that will need to be rerouted. Poke the 28 pin through a piece of paper to insulate the rerouted pins and plug it into the 24 pin.

but when stacking all these sockets directly on top of each other so that they seemed safely connected, there was hardly any gap left a wire could be routet through. (Maybe I partly misunderstood the directions?) The wire-wrap connectors allowed me to circumvent this problem, and bending out the pins which needed rerouting still did the trick.

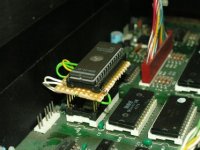
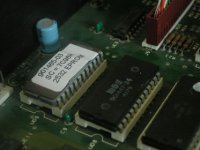
Here's the adaptor plugged into the PET's motherboard:

attachment.php


It does indeed not look too pretty... To this end, though being very happy the PET is, in principle, working again, I would indeed prefer a less bulgy solution. Since I haven't managed to get in touch with Bacon, I'd love to fall back on Dave's kind offer to send me 2532 over from sunny California. (Dave, do you read?)

Alternatively I might once more dive into the "etch-your-own-PCB" business -- although I remember it to be a really messy business when I last tried it some 25 years agio... (I was etching a board that would allow you to plug a second SID into the C64, according to instructions published by the renowned German 64'er magazine :) )

As for Nicolas' RAM/ROM expansion...

I did not follow the complete thread now but if you want to repair your PET 2001 Motherboard the best solution is this PET RAM/ROM Expansion from Nicolas Welte / Germany.

...I've encountered his hardware pages during my research regarding the PET's repair, and though the expansion board looks like a really smart device, it is somewhat beyond what I'd (currently) consider an appropriate modification for restoring a vintage computer's functionality. But that may change in future... ;-)

(BTW, the name Nicolas Welte somehow rang a bell -- is it possible that this guy has already been publishing Commodore-related stuff back in the eighteis? Books, magazines?)

So what's left to do?

- The keyboard definitely needs some cleaning. Some keys ceased to work at all -- for instance "CRSR Left/RIgh", which is pretty annoying.

- Currently the audio amplifier gets its supply voltage directly from the raw power supply connector (J8, it is?) -- which is probably the reason for the huge amount of continuously audible hissing and humming. I guess there must be some better way to drive the amplifier?

- After some minutes after powering on, the PET's screen starts to flicker vertically (not horizontally, as I initially stated by mistake). Don't know what to do about this yet, and I am admittedly not particularly keen on messing around with such a high voltage device as a video ciruit...

- Find a convenient way for transfering files between a PC and the PET. Reviewing http://www.vintage-computer.com/vcforum/showthread.php?t=14878 should reveal something.

So... I guess this is it. Is there a way to mark this thread as SOLVED? :)

Regards --
 

Attachments

  • conv-dscn1660.jpg
    conv-dscn1660.jpg
    50.3 KB · Views: 1
  • conv-dscn1661.jpg
    conv-dscn1661.jpg
    51.4 KB · Views: 1
  • conv-dscn1650.jpg
    conv-dscn1650.jpg
    58.3 KB · Views: 1
Good to see you're up and running again! Sure, a drop in replacement would be nice but working is always better than not working in my book.
- After some minutes after powering on, the PET's screen starts to flicker vertically (not horizontally, as I initially stated by mistake). Don't know what to do about this yet, and I am admittedly not particularly keen on messing around with such a high voltage device as a video ciruit...
Do you know which version of the video board you have? There are schematics on the Zimmers site which include lots of test points you can check with a scope. I got some great help from the guys here fixing a similar problem. Oh, and check the power for ripple in the monitor - I overlooked that and went on a wild goose chase...

I understand your concern about the high voltage stuff but as long as you're careful you should be OK. You shouldn't need to be near any of the dangerous bits and you can always power off and discharge things before hooking on probes or otherwise poking around.
 
, I'd love to fall back on Dave's kind offer to send me 2532 over from sunny California.

No problem. Use the "private message" (top right on this page) to send your shipping address to "dave_m". Do you need the 901465-03 or the -22 part?

As far as repairing the keyboard, there are several good solutions mentioned on the forum. One that worked well for me was the "Rubber Keypad Repair Kit" by MG Chemicals P/N 8339. Here is a link:

Rubber Keypad Repair Kit

From their website, they show a distributor in France:
SDEP
550, AV. De la mauldre
ZA de la couronne des près
78681 Epone, France
Phone: 33 (0)1 30 90 00 00, Fax: 33 (0)1 30 90 09 09, contact@sdep.fr <email>
 
Well, I use much thinner wire, so there's no problem soldering between the sockets. But the only thing that matters with a kludge is that it works until you can do it properly, and yours does that just as well.

Sometimes the pads and contacts only need a good cleaning; if not, then the repair kit would probably do the job nicely. Alternatively, I've had pretty good success punching little disks out of aluminum foil and gluing them on with a touch of contact cement; you can also use a PCB repair "pencil" or even the metallic paint used to repair rear window defroster tapes.

But it looks like you're well on the way; good luck with the "final touches".
 
Hi there,

There are schematics on the Zimmers site which include lots of test points you can check with a scope. I got some great help from the guys here fixing a similar

[...]

should be OK. You shouldn't need to be near any of the dangerous bits and you can always power off and discharge things before hooking on probes or otherwise poking around.

yes, I've seen the schematics, as well as the test oscillograms -- this information will come handy once I dig into the video circuitry issue. Considering my usual degree of absent-mindedness, I'm still a bit worried about work-safety, though...

As for cleaning the keyboard...

As far as repairing the keyboard, there are several good solutions mentioned on the forum. One that worked well for me was the "Rubber Keypad Repair Kit" by MG Chemicals P/N 8339.

Sometimes the pads and contacts only need a good cleaning; if not, then the repair kit would probably do the job nicely. Alternatively, I've had pretty good success punching little disks out of aluminum foil and gluing them on with a touch of contact cement; you can also use a PCB repair "pencil" or even the metallic paint used to repair rear window defroster tapes.


...loads of interesting stuff -- however, I guess I'll first give the method described at http://www.geocities.com/davegostelow/PETkeyboard/PETkeyb.html a try, hoping the key's conductive film is still in good shape. Well, we'll see.

All the best --
 
I guess I'll first give the method described at http://www.geocities.com/davegostelow/PETkeyboard/PETkeyb.html a try, hoping the key's conductive film is still in good shape. Well, we'll see.

I looked at the method by Mr. Gostelow and it is very comprehensive but if you break one of the many plastic parts you will be in deep yogurt. I would just clean the top of the keyboard with a brush and maybe a dab of isopropyl alcohol if the keycaps are dirty rather than take it all apart. The main job will be on the back of the keyboard. The printed circuit with the matrix of connections is gold-plated and probably OK as is. If not, a small amount of contact cleaner or alcohol will make it good. The real problem will be the reconditioning of the carbon tips on the rubber key bottoms. Age has given it a high resistance. Rubbing pencil lead on the tip will probably work at least for a while, but for a permenent fix, you need to bond a conductive material to the tip in such a manner that it will not flake off with usage and cause a short across the matrix later. Mike's trick of gluing a small disk of aluminium foil should work fine. If you decide on conductive paint, make sure you put a thin layer of super glue on each tip first, then wait a few minutes such that it is still slightly tacky, then put the paint over the glue. The paint should not tend to flake off due to good bonding. Also, be careful not to get the conductive paint on any part of the rubber key that does not have glue as it might flake off with usage.
-Dave
 
Dear all,

today I received a parcel from California... :) It contained a 2532 EPROM programmed with the Version 2 $F000 kernal code, and it works like a charm! It also looks much better than the clumsy adapter I initially built for the 2764 EPROM:

attachment.php


Manymanymanymanymanymanythanks to Dave! (Also for the additional EPROM -- cool, now I have a spare part in case one of the other ROM chips says good bye, too!) I'll get your sauerkraut on its way during the next days... ;-)

I looked at the method by Mr. Gostelow and it is very that does not
[...]
have glue as it might flake off with usage.

I haven't had time to dig into this business any further so far, but I guess I'll go for the super glue / conductive paint method once my little boys let me (and all the other to-do items which have meanwhile piled up are dealt with...).

All the best --

track18
 

Attachments

  • 2532EPROM.jpg
    2532EPROM.jpg
    42.8 KB · Views: 1
Ahh.. that's nice.

Nothing like the elegance and clean lines of a brand new replacement ROM.

Tez
 
I'm glad the EPROMs arrived in good condition. It looks like it took about 25 days to get a small parcel from California to Germany by regular mail. It must have travelled by a slow boat. I sent the extra EPROM for your future use.
Best regards, Dave
 
Last Page

Last Page

Is there a way for me to jump to the last page of a thread? I pretty much browse the Glock Talk most recent post page, and I have to click on the thread and then click to the last page. Does my question even make sense?
 
Dear all,

today I received a parcel from California... :) It contained a 2532 EPROM programmed with the Version 2 $F000 kernal code, and it works like a charm! It also looks much better than the clumsy adapter I initially built for the 2764 EPROM:

attachment.php


Manymanymanymanymanymanythanks to Dave! (Also for the additional EPROM -- cool, now I have a spare part in case one of the other ROM chips says good bye, too!) I'll get your sauerkraut on its way during the next days... ;-)

All the best --

track18

Today I received a fairly heavy parcel from Germany. It contained a vacuum sealed package of sauerkraut along with many packages of local sweets, chocolate and biscuits. Also enclosed was a nice letter giving the history of the various items as well as a wonderful recipe for preparing the sauerkraut with bratwurst.

I will enjoy these goodies from a friend.
-Dave
Well, I didn't really contribute anything but I'd love a copy of that recipe... waddya say?
 
Back
Top